Options
The Options command opens a dialog in which you specify settings for:
•The properties of the following Design View components: markup tags, layout containers, and templates with no known context
•Select options for the previews
•Sorting of attributes and elements in the Schema Tree View
•Actions to undertake when a file is double-clicked from within a project window
•The encoding of output documents
•The processing of the internally generated XSL-FO document, which is required in order to enable the PDF Preview and the generation of PDF files in StyleVision
•The XBRL taxonomy packages that should be used for validations and transformations
•The conversion of SPS files to MobileTogether Design files
•Locating the Java Virtual Machine
•Selecting the default Help format (Online Help or local PDF file) to open when the Help command is selected
Design options
In the Design tab (screenshot below), you can set the application-wide general options for designs.
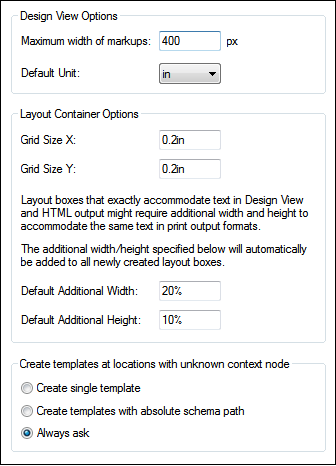
The following options can be set:
•Maximum width (in pixels) of markup tags. Enter the positive integer that is the required number of pixels.
•Grid size of layout containers in absolute length units. The specified lengths are the distances between two points on the respective grid axis.
•Default additional width and height of Layout Boxes. These additional lengths are added to all layout boxes in order to provide the extra length that is often required to accommodate the bigger text renditions of print formats. These values can be specified as percentage values or as absolute length units.
•The default behavior when a node-template is created at a location where the context node is not known. This option typically applies to User-Defined Templates in which the template has been created for items that cannot be placed in context in the schema source of the design. If a node is created within such a user-defined template, then the node can be created with (i) only its name, or (ii) with the full path to it from the schema root. You can set one of these options as the default behavior, or, alternatively, ask to be prompted each time this situation arises. The default selection for this option is Always Ask.
Previews
In the Previews tab (screenshot below), you can select options for the previews.
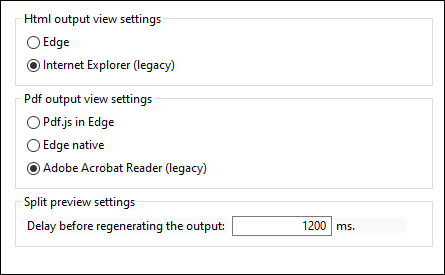
•HTML Output: Select whether to use Edge/Webview2 or Internet Explorer as the browser for HTML previews.
•PDF Output: Select which PDF reader to use for the PDF preview: (i) PDF.js (an open-source PDF viewer for browsers) in Edge; (ii) Edge native (the built-in PDF reader of Microsoft Edge); or (iii) Adobe Acrobat Reader.
•Split Preview settings: You can set a delay for the output previews that are generated on automatic refreshes. Automatic refreshes occur when the design is modified or data is revised in Authentic View. If you set, for example, a zero delay, then the output preview will be regenerated with a zero delay each time the design or Authentic data is modified. If the delay is a short period, then the output generation will be triggered at short intervals and therefore occur at high frequency. This might result not only in slow output-preview generation, but also to intermediate outputs, such as error messages that occur if a modification in progress leads to a temporarily invalid design or invalid data. On the other hand, a long delay could lead to a long wait for the output preview. Select an optimal value according to the size of your design and data. Note that the delay specified in this setting does not apply when you first switch to the split preview or when you run a manual refresh by clicking the Refresh button of the Output preview pane. In both these latter cases, the output is generated immediately.
Schema options
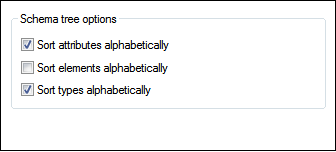
In the Schema tab, elements and attributes can be listed alphabetically in ascending order. To do this, check the respective check boxes in the Schema tab (screenshot below). By default, attributes are listed alphabetically and elements are listed in an order corresponding to the schema structure, as far as this is possible.
Project options
In the Project sidebar, when an XML file or XSD file is double-clicked, one of three actions is executed depending on the options set in the Project tab of the Options dialog (screenshot below): (i) Edit the file in XMLSpy; (ii) Create a new design based on the selected file; (iii) Ask the user which action to execute.
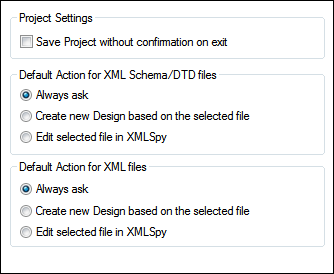
If the Save Without Confirmation setting is checked, then any changes to the project are automatically saved when the project or StyleVision is closed. Otherwise, you will be prompted to save any unsaved changes.
Default Encoding (of output files)
In the Default Encoding tab (screenshot below), you can set default encodings for the various outputs separately. The encoding specifies the codepoints sets for various character sets. The dropdown list of each combo box displays a list of encoding options. Select the encoding you require for each output type, and click OK. Every new SPS you create from this point on will set the respective output encodings as defined in this tab.
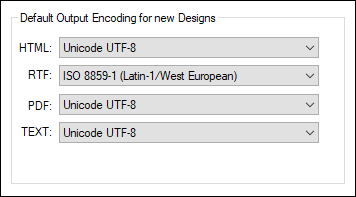
In the XSLT-for-HTML, the output encoding information is registered at the following locations:
•In the encoding attribute of the stylesheet's xsl:output element:
<xsl:output version="1.0" encoding="UTF-8" indent="no" omit-xml-declaration="no" media-type="text/html" />
•In the charset attribute of the content-type meta element in the HTML header:
<meta http-equiv="Content-Type" content="text/html; charset=UTF-8" />
In the XSLT-for-RTF, the output encoding information is registered in the encoding attribute of the stylesheet's xsl:output element:
<xsl:output version="1.0" encoding="ISO-8859-1" indent="no" method="text" omit-xml-declaration="yes" media-type="text/rtf" />
In the XSLT-for-PDF, the output encoding information is registered in the encoding attribute of the stylesheet's xsl:output element:
<xsl:output version="1.0" encoding="UTF-8" indent="no" omit-xml-declaration="no" media-type="text/html" />
Note: These settings are the default encodings, and will be used for new SPSs. You cannot change the encoding of the currently open SPS using this dialog. To change the encoding of the currently open SPS, use the File | Properties command.
XSL options
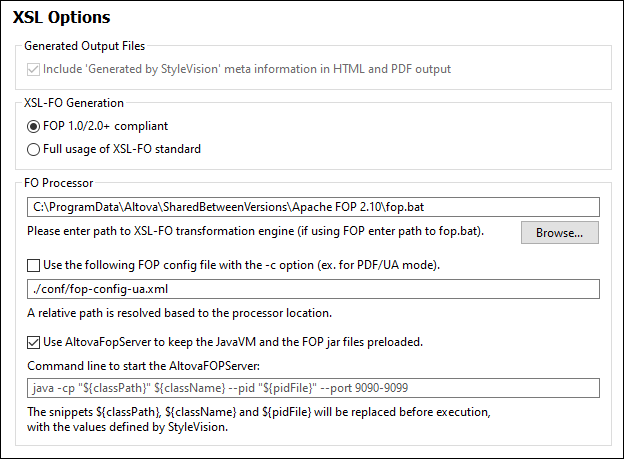
In the XSL options tab, you can specify a few parameters about the HTML and PDF outputs generated by StyleVision.
Disabling proprietary line
In the meta information of HTML and PDF output files, the line 'Generated by StyleVision' will be added by default. Purchased versions of StyleVision provide an option to disable the generation of this line.
About XSL-FO generation and PDF generation
PDF generation from an XML document is a two-step process:
1.The XML document is processed by the the currently active SPS or an XSLT document to generate an XSL-FO document.
2.The XSL-FO document is passed to an FO processor, which generates the PDF document. This is the PDF document that is displayed in the PDF Preview window.
XSL-FO Generation
In the XSL-FO Generation pane, you can specify what compliance level the generated XSL-FO document should have. Select the compliance level according to the FO processor you plan to use. If you are going to use Apache's FOP processor, select the first option (see screenshot above). In this case, the SPS will generate an XSL-FO document in which those XSL-FO features that are not supported by FOP are filtered out. If you plan to use an FO processor that is fully compliant, select the second option.
Depending on your selection, be aware of the possible outcomes, which are as follows:
•If you have selected FOP 1.0/2.x compliance and use FOP as your processor, then the PDF generation should work fine.
•If you have selected full usage of the XSL-FO standard and use FOP as your processor, then any formatting object or property in the XSL-FO document that is not supported by the current version of FOP will cause FOP to generate either a warning or an error. An error is fatal, and no PDF will be generated.
•If you use a processor other than FOP, the success of the transformation will depend upon the compliance level of the processor.
For standard use, we recommend:
•Installing FOP 2.10. If you notice any problems with FOP 2.10, the try either FOP 2.9, FOP 1.0 or FOP 0.93.
•Selecting FOP 1.0/2.x compliant in the Options dialog.
Note: The XSLT-for-FO that you generate with the File | Save Generated Files | Save Generated XSL-FO File command will have the compliance level you select in this dialog. Any error will be reported only when the XSL-FO document is processed by the FO processor.
Technical Note
StyleVision starts the FO processor at the path location you enter in the FO Processor pane of this dialog. It sends the following arguments to the executable:
%1 : -fo
%2 : filename.fo
%3 : -pdf
%4 : filename.pdf
These arguments are as used in the FOP command: FOP -fo filename.fo -pdf fileame.pdf. You can use these arguments to invoke any other FO processor if these four arguments suffice to make a successful call.
FO Processor
You can use any FO processor of your choice. Enter the path to the processor's executable in this pane. For details, see Setting up StyleVision.
You can specify a particular FOP config file to use when running FOP. (A configuration file would be useful, for example, if you want to generate PDFs in UA mode.) A default FOP config file for UA compatibility named fop-config-u.xml is stored in the conf folder of your Apache FOP installation folder. Note: When using the veraPDF validator for validating a PDF/UA document, you might get a validation error because the config file uses embedding-mode="subset" for its default font-embedding. To fix this error, open the config file and change the font's embedding-mode attribute to a value of full. Be aware, however, that full embedding would increase the size of the PDF noticeably.
You can use AltovaFOPServer to speed up transformations. The higher speed is obtained because AltovaFOPServer keeps the Java VM and FOP jar files loaded after the first transformation. The AltovaFOPServer is stopped when StyleVision is closed.
The command to start AltovaFOPServer at the command line has the following syntax:
java -cp "${classPath}" ${className} --pid "${pidFile}" --port 9090-9099
The classPath argument must contain the paths to the gson.jar and AltovaFOPServer.jar files.
An example command line to start AltovaFOPServer:
java -cp "C:\Program Files\Altova\Common2024\jar\gson\gson.jar;C:\Program Files\Altova\Common2024\jar\AltovaFOPServer.jar" com.altova.stylevision.fopserver.Main --pid "C:\Users\user\AppData\Local\Temp\AltovaFopServer.pid" --port 9090-9103,9999
StyleVision will by itself replace the argument snippets with the correct values, so you do not have to enter their values. If, however, you wish to use jar files that are at some specific locations, then you should replace the argument snippets with the actual paths to these locations.
Taxonomy packages
The Taxonomy Packages pane (i) provides access to Taxonomy Manager and (ii) enables you to add custom packages. Altova's XBRL Taxonomy Manager allows you to install, upgrade, and manage commonly used taxonomies. How to use it is described in the section Taxonomy Manager. The description below focuses exclusively on the installation of custom taxonomy packages.
An XBRL Taxonomy Package is a zipped archive that contains an offline copy of a taxonomy. The package contains a catalog XML file that maps URIs to the taxonomy's file locations, and so makes the taxonomy available offline to applications. The rules that specify how taxonomy packages are to be structured and built are laid out in the Taxonomy Packages Recommendation of XBRL.org.
After you have downloaded a taxonomy package, you can set up StyleVision to automatically identify and use the entry point catalog file of the package. Do this by adding the package to the list of active taxonomy packages. The catalog files of active packages will then be used to locate resources for operations such as XBRL validation.
Note: A resource pointed to by an active package's catalog file will be used for all StyleVision operations that require that resource. If such a resource is different in some way than the resource that was previously used by StyleVision, then errors might result when operations are run. For more information, see the caution at the bottom of this topic.
To add a taxonomy package, do the following:
1.Select Tools | Options | Taxonomy Packages to display the Taxonomy Packages pane (screenshot below).
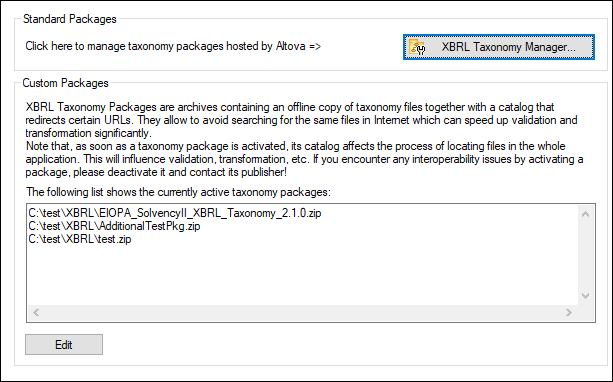
2.Click Edit (see screenshot above) to display the XBRL Taxonomy Packages dialog (screenshot below).

3.Click Add Taxonomy, then browse to the location of the taxonomy package, select it, and click Open. (You can also select multiple packages to add at one time.) The package will be added to the taxonomy package list in the dialog. The list is displayed as a tree of two levels. The first level indicates the taxonomy; the second level shows the packages of that taxonomy. The check box to the left of a taxonomy entry indicates whether that taxonomy is active or not. A newly added taxonomy will be active by default.
4.Click OK to finish. The newly added packages will be displayed in the Taxonomy Packages pane of the Options dialog (first screenshot above).
Note the following points:
•If you wish to add an additional package to a taxonomy, do this: Select the taxonomy in the XBRL Taxonomy Packages dialog (screenshot above), then add the additional package/s via the Add Packages button. The added package/s will be displayed at the second level of that taxonomy.
•When a taxonomy package is selected in the list in the upper pane of the XBRL Taxonomy Packages dialog, its details (including its offline location) are displayed in the dialog's lower pane (see screenshot above).
•To deactivate a taxonomy, uncheck its check box. If you deactivate a taxonomy, its catalog file/s will not be used. Deactivation is useful if, say, you wish to switch between two versions of a taxonomy.
•You can remove a package by selecting it and clicking Remove.
•The following Altova applications support Taxonomy Package Registration: XMLSpy, MapForce, and StyleVision. The taxonomy package list is common to all these applications. If you edit the list in one application, then the modified list will be displayed in the other applications as well. If you edit the package list in one application, and another application is open at the same time, then the other application will display an alert asking whether you wish to reload the package list to reflect the modification.
Caution: Package catalogs might redirect to incompatible resources A resource pointed to by an active package's catalog file/s will be used for all StyleVision operations that require that resource. An example of such a resource would be XML Schema, which is used for both XML validation as well as XBRL validation. If the offline resource located by the package's catalog file is incompatible with your existing environment, then errors might result. In this case, deactivate the taxonomy package and contact the creators of the package with the error information. |
Network options
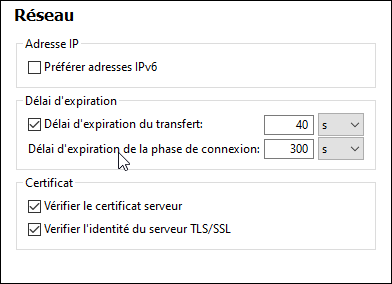
The Network section (screenshot below) enables you to configure important network settings.
IP addresses
When host names resolve to more than one address in mixed IPv4/IPv6 networks, selecting this option causes the IPv6 addresses to be used. If the option is not selected in such environments and IPv4 addresses are available, then IPv4 addresses are used.
Timeout
•Transfer timeout: If this limit is reached for the transfer of any two consecutive data packages of a transfer (sent or received), then the entire transfer is aborted. Values can be specified in seconds [s] or milliseconds [ms], with the default being 40 seconds. If the option is not selected, then there is no time limit for aborting a transfer.
•Connection phase timeout: This is the time limit within which the connection has to be established, including the time taken for security handshakes. Values can be specified in seconds [s] or milliseconds [ms], with the default being 300 seconds. This timeout cannot be disabled.
Certificate
•Verify TLS/SSL server certificate: If selected, then the authenticity of the server's certificate is checked by verifying the chain of digital signatures until a trusted root certificate is reached. This option is enabled by default. If this option is not selected, then the communication is insecure, and attacks (for example, a man-in-the-middle attack) would not be detected. Note that this option does not verify that the certificate is actually for the server that is communicated with. To enable full security, both the certificate and the identity must be checked (see next option).
•Verify TLS/SSL server identity: If selected, then the server's certificate is verified to belong to the server we intend to communicate with. This is done by checking that the server name in the URL is the same as the name in the certificate. This option is enabled by default. If this option is not selected, then the server's identify is not checked. Note that this option does not enable verification of the server's certificate. To enable full security, both the certificate as well as the identity must be checked (see previous option).
Network Proxy options
The Network Proxy section enables you to configure custom proxy settings. These settings affect how the application connects to the Internet (for XML validation purposes, for example). By default, the application uses the system's proxy settings, so you should not need to change the proxy settings in most cases. If necessary, however, you can set an alternative network proxy by selecting, in the Proxy Configuration combo box, either Automatic or Manual to configure the settings accordingly.
Note: The network proxy settings are shared among all Altova MissionKit applications. So, if you change the settings in one application, all MissionKit applications will be affected.
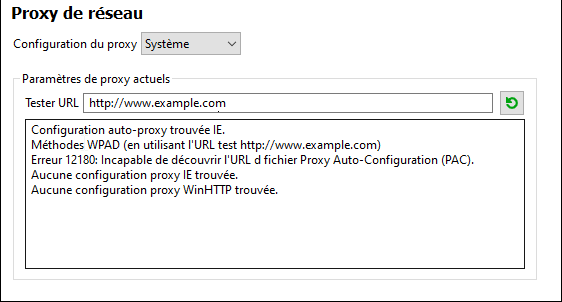
Use system proxy settings
Uses the Internet Explorer (IE) settings configurable via the system proxy settings. It also queries the settings configured with netsh.exe winhttp.
Automatic proxy configuration
The following options are provided:
•Auto-detect settings: Looks up a WPAD script (http://wpad.LOCALDOMAIN/wpad.dat) via DHCP or DNS, and uses this script for proxy setup.
•Script URL: Specify an HTTP URL to a proxy-auto-configuration (.pac) script that is to be used for proxy setup.
•Reload: Resets and reloads the current auto-proxy-configuration. This action requires Windows 8 or newer, and may need up to 30s to take effect.
Manual proxy configuration
Manually specify the fully qualified host name and port for the proxies of the respective protocols. A supported scheme may be included in the host name (for example: http://hostname). It is not required that the scheme is the same as the respective protocol if the proxy supports the scheme.
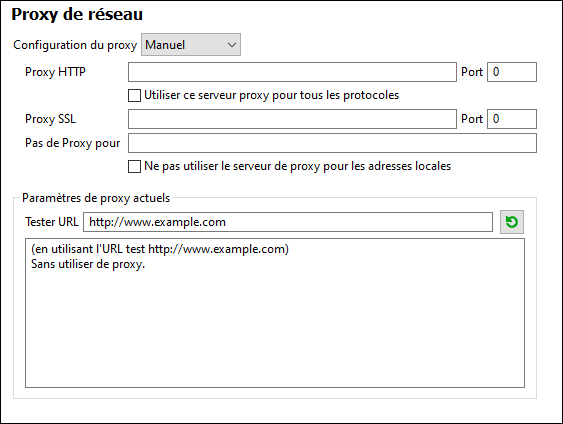
The following options are provided:
•HTTP Proxy: Uses the specified host name and port for the HTTP protocol. If Use this proxy server for all protocols is selected, then the specified HTTP proxy is used for all protocols.
•SSL Proxy: Uses the specified host name and port for the SSL protocol.
•No Proxy for: A semi-colon (;) separated list of fully qualified host names, domain names, or IP addresses for hosts that should be used without a proxy. IP addresses may not be truncated and IPv6 addresses have to be enclosed by square brackets (for example: [2606:2800:220:1:248:1893:25c8:1946]). Domain names must start with a leading dot (for example: .example.com).
•Do not use the proxy server for local addresses: If checked, adds <local> to the No Proxy for list. If this option is selected, then the following will not use the proxy: (i) 127.0.0.1, (ii) [::1], (iii) all host names not containing a dot character (.).
Note: If a proxy server has been set and you want to deploy a transformation to Altova FlowForce Server, you must select the option Do not use the proxy server for local addresses.
Current proxy settings
Provides a verbose log of the proxy detection. It can be refreshed with the Refresh button to the right of the Test URL field (for example, when changing the test URL, or when the proxy settings have been changed).
•Test URL: A test URL can be used to see which proxy is used for that specific URL. No I/O is done with this URL. This field must not be empty if proxy-auto-configuration is used (either through Use system proxy settings or Authomatic proxy configuration).
MobileTogether Design
The options listed below are available for the conversion of SPS files to MobileTogether Design (MTD) files. (These conversions are done via the Export as MobileTogether Design File command.)
•Static text and paragraph-level text that contain inline formatting (for example a paragraph element that contains a bold or italic element) is by default converted into a single MTD label, where the text will have the formatting of the block-level text. You can however set an option to split this kind of text (block-level text with inline formatting) into multiple MTD labels, where each label has the formatting that corresponds to the original text fragment.
•If the SPS has a condition with branches, then the conversion to MTD will, by default, convert all branches of the condition and will position them in sequence one below the other in the MTD document. You can optionally choose to suppress the conversion of the condition (and all its branches).
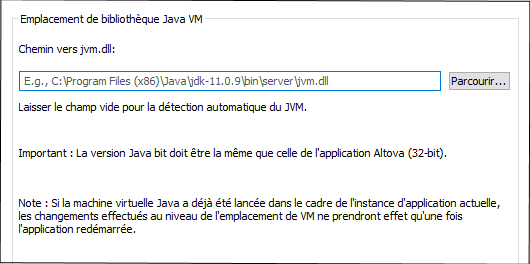
Java options
In the Java section (see screenshot below), you can optionally enter the path to a Java VM (Virtual Machine) on your file system. Note that adding a custom Java VM path is not always necessary. By default, StyleVision attempts to detect the Java VM path automatically by reading (in this order) the Windows registry and the JAVA_HOME environment variable. The custom path added in this dialog box will take priority over any other Java VM path detected automatically.
You may need to add a custom Java VM path, for example, if you are using a Java virtual machine which does not have an installer and does not create registry entries (e.g., Oracle's OpenJDK). You might also want to set this path if you need to override, for whatever reason, any Java VM path detected automatically by StyleVision.
Note the following:
•The Java VM path is shared between Altova desktop (not server) applications. Consequently, if you change it in one application, it will automatically apply to all other Altova applications.
•The path must point to the jvm.dll file from the \bin\server or \bin\client directory, relative to the directory where the JDK was installed.
•The StyleVision platform (32-bit, 64-bit) must be the same as that of the JDK.
•After changing the Java VM path, you may need to restart StyleVision for the new settings to take effect.
Changing the Java VM path affects the following areas:
•JDBC connectivity
•Java extension functions for XSLT/XPath
•Barcode support
Help
StyleVision provides Help (the user manual) in two formats:
•Online Help, in HTML format, which is available at the Altova website. In order to access the Online Help you will need Internet access.
•A Help file in PDF format, which is installed on your machine when you install StyleVision. It is named StyleVision.pdf and is located in the application folder (in the Program Files folder). If you do not have Internet access, you can always open this locally saved Help fie.
The Help option (screenshot below) enables you to select which of the two formats is opened when you click the Help (F1) command in the Help menu.
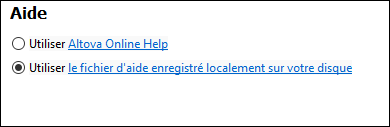
You can change this option at any time for the new selection to take effect. The links in this section (see screenshot above) open the respective Help format.