Deploy to Server
After you have successfully validated the project and tested the simulations, you are ready to deploy the project to MobileTogether Server. When the project is deployed to the server, it becomes a solution that a MobileTogether Client app can run. For more information about deploying the project and files, see the sections Deploying the Project and Location of Project Files.
In order to deploy the project to MobileTogether Server, you will need to access the server as a user having the privilege, Save Workflow from Designer. The access rights of users of MobileTogether Server are defined in the Web UI of MobileTogether Server. See the MobileTogether Server user manual for information about setting user privileges.
Deploying the project to MobileTogether Server
Deploy the project and its associated (image) files to MobileTogether Server as follows:
1.In the Files Pane (screenshot below), right-click Image Files, and, in the context menu that appears, select Add Deployable File.
2.Browse for the image file and add it to the Image Files list. You can select multiple files if you like. Click Open.
3.In the dialog that appears, choose whether you want the selected files to be deployed to the server, the client, or both, then click Yes. You will be prompted for each file separately.
4.The selected files will be added. Each file will be shown with its relative path and its deployment location (server, client, or both). Both properties can be changed in the context menu of each file.
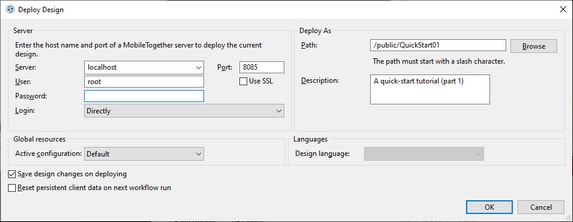
5.Select File | Deploy to MobileTogether Server. This displays the Deploy Design dialog (screenshot below).
6.Enter the MobileTogether Server address and administrator port (default HTTP port is 8085, HTTPS is 8086).
7.Enter the user name and password with which you want to access MobileTogether Server. Note that this user must have the Save Workflow from Designer privilege in order for deployment to be successful. See the MobileTogether Server user manual for information about user privileges.
8.In the Deploy As | Path field, enter the name under which you wish to deploy this solution on the server. For example, in the screenshot above, the solution will be saved in the /public container and will have the name QuickStart01. On MobileTogether Server, you will see only the one entry: QuickStart01. The image files will be contained in this entity and will not be visible as separate files.
9.Click OK when done. The project and the files selected for deployment are now deployed to MobileTogether Server as the workflow, QuickStart01.
That's it!
