iOS
The generated program code for iOS apps is an XCode project. It is saved in the directory you specified in Screen 6 of the Generate Program Code Wizard. You must now use XCode to open the .xcodeproj file and build the iOS app.
Requirements
In order to build, test and publish the iOS App from the generated program code, you will need the following:
•Latest version of XCode, available from Apple's Developer Platform.
•iOS 13.0 or higher for testing the app.
•Membership in the Apple Developer Program. You will need this to test and publish your app to the App Store.
Building and distributing the app
The broad outline for building the app is given below. For a complete description, see Apple's App Distribution Guidelines
1.Open the .xcodeproj file in XCode.
2.Ensure that team, app id, and provisioning profiles are set up. See Configuring Your XCode Project for Distribution for information about how to do this. Note that test devices for ad hoc distribution are only active after re-generating the corresponding provisioning files.
3.Finalize what splashscreen/s to use. By default, the portrait splashscreen (specified in Screen 2 of the Generate Program Code Wizard) will be drawn in both orientations to fill the screen with the same aspect ratio as the original. If, however, you wish to set up individual splashscreens specific to different devices and orientations, do the following: (i) Go to Supporting Files | Info.plist and delete Launch screen interface file base name; (ii) Click images.xcassets, then right-click in the view and choose New Launch Image; (iii) Specify a launch image for each resolution and orientation.
4.If you have hooked up an iOS device, go to Product | Destination and check your device. Otherwise, go to Product | Destination and select iOS Device.
5.To test the compiled app on your iOS device, click Product | Run (after having selected your iOS device under Product | Destination).
6.For ad hoc and App Store submissions, click Product | Archive and export your app. Please follow Apple's App Distribution Guidelines.
| Note: | In iOS apps that have multiple pages, when the Submit button on the app's last page is tapped, the app will be re-started. This is because an iOS app cannot shut itself down. |
Additional steps for using iCloud
If your app uses iCloud—typically, this happens if your app defines that files are saved to the client—then a few additional steps are required:
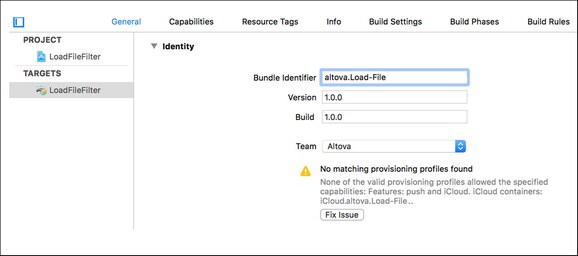
1.In XCode, click the General tab (see screenshot below). You will see a message saying that a provisioning file is missing.
2.If you have sufficient developer-account rights, click Fix Issue.
3.Click the Capabilities tab (refer to the screenshot above).
4.In the Services section, select iCloud Documents.
5.Modify the default settings if required, then click Fix Issue.
The steps above provide a quick way, if you have sufficient developer-account rights, to set up an app id and an iCloud container.
An iCloud Container ID is required to enable iCloud access for the app. During the generation of program code, an iCloud Container ID is automatically generated from the Bundle ID that you specified in Screen 6 of the Generate Program Code Wizard. The generated ID has the form: iCloud.<BundleIDPrefix>.<PackageName>. It is stored in a file called <appname>.entitlements, which is automatically created in the target directory of the program code. If you wish to change the automatically generated ID, modify its name in <appname>.entitlements, and save the file. The ID in the Entitlements file must match the iCloud Container ID in your developer account.
For more detailed information about iCloud use, see the following topics in the iOS Developer documentation: Adding Capabilities and Enabling CloudKit in your app.
