Barcode Scanners
A MobileTogether solution can be designed to read barcode data via a Zebra scanner, a Zebra mobile computer, or a Datalogic scanner and to then store and use data from the scan in the MobileTogether solution.
The following barcode scanners are supported.
Scanner | Connection to MT Client | MT Client |
Zebra | Bluetooth | Android, iOS |
Zebra | USB | Android, Windows |
Zebra mobile computer | Directly | Android |
Datalogic | Directly | Android |
| Note: | Zebra mobile computer scanners and Datalogic scanners are Android mobile devices with integrated scanners. The MobileTogether client app is installed on these devices and, since it is on the device, it connects directly with the device's scanner. |
Overview: How barcode scanners work with MT solutions
The design mechanism for reading barcode data from the scanner and sending it to the solution and for using the data in the solution is as follows. The list below mixes design steps with runtime steps in order to better explain the design steps and their effects.
1.Start a connection with the scanner. In the design, there is an action for this for each scanner. This kind of Connect action can be set on an event such as a button click. When you add a Connect action in the design, a page source for the corresponding scanner type is added to the design's page sources.
2.In the design, you can configure the scanner's behavior and, optionally, specify that information about the scanner be sent to the page source together with the scanned barcode data. These settings are specified by adding, typically to the event of the previous step, Configure actions for the relevant scanner type.
3.At runtime, after a connection to the scanner is established (by triggering a Connect action), the scanner can be used to read barcode data. Scanned data will be transmitted via the connection to the solution's scanner-related page source.
4.In the design, you can specify what action/s you want to carry out once the scanned data is received. These actions are defined on the OnDataReceived event of the respective scanner—which are accessed via the project's Barcode Scanner Actions property.
5.In the design, after barcode scanning has been completed, end the connection to the scanner via the Disconnect action of the respective scanner.
6.After you have completed your design, you can simulate the use of barcode scanners in your workflow.
Connect to scanner
You can use the Connect action that corresponds to the barcode scanner you will be using. When a Connect action is added, a page source for the corresponding scanner type is added to the design's page sources. The Connect actions for different scanner types are listed below together with their corresponding page sources. Click the links in the table for the descriptions of the different Connect actions. For a description of the page sources, see the corresponding section below.
Connect action | Page source tree |
$MT_ZEBRASCANNER | |
$MT_ZEBRAMOBILECOMPUTER | |
$MT_DATALOGICSCANNER |
Connecting to Zebra scanners via bluetooth
When the Connect action to a Zebra scanner via Bluetooth is triggered at runtime, a dialog appears in the solution. It contains a list of available Bluetooth devices and a barcode. The end-user must select from the device list the Zebra scanner to use and then, with this scanner, scan the barcode in the solution's dialog. This starts the pairing of the MobileTogether client device with the Zebra scanner. You can use the mt-zebra-scanner-connected() function to check whether the Zebra scanner is connected.
Configure scanner
You can configure the properties of your scanner by using Configure actions for that scanner type. For example, on a Zebra scanner you can, among other options, (i) select whether to capture the barcode data or the barcode image and (ii) set the volume, duration, and tonal frequency of the scanner's beeper. Since each Configure action sets one property, you can add as many Configure actions as you want.
Click the links below to see the descriptions of the different Configure actions.
•Zebra Mobile Computer Configure
Get scanner information
You can set the Config action of any scanner type to also send information about the scanner (such as its serial number or version number) to the solution when a barcode is scanned. Do this by adding, in the design, a Configure action that is set to Get Device Info (see screenshot of Zebra Configure below).

The scanner information that is sent varies according to the scanner type and is stored in the respective page source's /Root/Scanner node (see next section below).
Page source trees for barcode-scan data
The page source tree corresponding to a particular type of scanner is added to the design whenever a Connect action for that scanner type (see above) is added: $MT_ZEBRASCANNER, $MT_ZEBRAMOBILECOMPUTER, $MT_DATALOGICSCANNER. The page source is removed when the Connect action is deleted.
When a barcode is scanned at runtime, barcode data (and, if configured, scanner data) is sent to the page source. Each page source has a common structure.
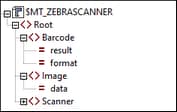
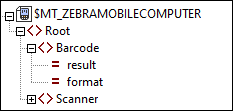
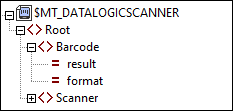
The Root node of each contains two child elements: Barcode and Scanner, which contain, respectively, data about the barcode and the scanner. The barcode data is stored in Barcode/@result and the barcode type (EAN, ISBN, etc) is stored in Barcode/@format.
On scanning a barcode at runtime, scanner information (such as its serial number) is sent to a page source only if a scanner Configure action has been set to Get Device Info.
The Root node of the $MT_ZEBRASCANNER page source has an additional child element—named Image. If a Zebra scanner's Configure action has its Set Scanner Mode option set to Image, then the barcode image is scanned and stored in Base64 format in the page source's Image/@data attribute.
| Note: | Data is left in these page sources till (i) the data is overwritten by data from a new scan or (ii) the solution is closed, in which case the data is deleted. |
Actions for barcode-scanner events
For each scanner type, you can specify actions to perform when data is received in the tree following a barcode scan:
•Zebra Scanner OnDataReceived
•Zebra Mobile Computer OnDataReceived
•Datalogic Scanner OnDataReceived
To define these actions, click the Additional Options button of the project property Barcode Scanner Actions. The OnDataReceived actions will be executed in sequence immediately the scan data is received in the page source.
For the Zebra scanner, which needs to have a Bluetooth or USB connection with the solution, actions can be defined for two other important events:
•Zebra Scanner OnConnectionEstablished
•Zebra Scanner OnConnectionTerminated
Disconnect from scanner
After barcode scanning for the solution has been completed, it is best to disconnect the scanner form the solution. This way, you will avoid inadvertently scanned data being passed and stored in the solution and you will release the scanner for other tasks not related to the solution. To disconnect a scanner, use the respective Disconnect action:
•Zebra Mobile Computer Connect/Disconnect
Simulations
Simulations now offer the possibility to simulate barcode scans with the supported scanners. Various aspects of the runtime scenario, such as a Bluetooth connection, establishing connections to the scanner, and receiving data can be simulated directly from the simulator. Default settings for some of these simulator options can be set in the Simulation 1 tab of the Options tab.


