Use File Data for Combo Box Entries
In this part, you will:
•Use the data tree structure to generate the combo box entries
•Run a simulation to test the effect of the change
Located in MobileTogether folder of (My) Documents folder: MobileTogetherDesignerExamples\Tutorials\AltovaProducts.xml.
<?xml version="1.0" encoding="UTF-8"?> <Products> <Selection></Selection> <Product>XMLSpy</Product> <Product>MapForce</Product> <Product>StyleVision</Product> <Product>MobileTogether</Product> <Product>DatabaseSpy</Product> <Product>DiffDog</Product> <Product>SchemaAgent</Product> <Product>UModel</Product> <Product>Authentic</Product> </Products>
|
Edit the combo box entries
Edit the combo box entries as follows:
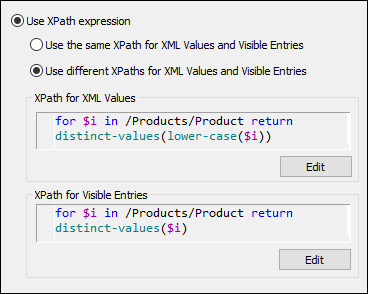
1.Select the combo box, and, in the Styles & Properties Pane, click the Additional Dialog button of the Combo Box Entry Values property. The Edit Combo Box dialog (screenshot below) appears.

2.Select Use XPath expression, and then Use different XPath for XML Values and Visible Entries.
3.Enter the XPath expressions for Visible Entries and XML Values as shown in the screenshot above.
4.Select the Sort values check box at the bottom of the dialog to sort the list when it is displayed.
5.Click OK to finish.
Remember that the Products node was defined as the default XPath context node for this page. The XPath for expression iterates over the Product child nodes of Products (the context node) and returns a sequence of all the unique distinct values, alphabetically sorted. In the case of the XML Values sequence, the values are transformed to lowercase before being filtered for uniqueness. These two sequences are the entries of the dropdown list (Visible Entries) and their corresponding XML values (XML Values). The advantage of using the data tree structure to build the combo box entries and a data source file to load data is that combo box entries are generated dynamically from the data source file; they are not hard-coded as items of a list in the design. Consequently, if a new product is added to the XML file, it will automatically appear as an entry in the dropdown list.
Run a simulation
When you run a simulation, it will run in exactly the same way as when the combo box entries were defined as a list (see the previous section, Run a Simulation). The only difference will be that the entries of the dropdown list will be the values of the Product elements in AltovaProducts.xml (see listing above). When an entry from the dropdown list is selected, the corresponding (lowercase) XML value will be entered in the Selection node, and the image URL will be correctly evaluated.
Change data in the data source file
Make the following two changes in the data source file, AltovaProducts.xml (listing above):
•Add a lowercase product name to the Selection node as shown in the listing below
•Remove a few Product elements from the file, or add some Product elements to the file, and change the order of the Product elements. In the Edit Combo Box dialog (see above), also test the effect of selecting/deselecting the Sort values check box.
<?xml version="1.0" encoding="UTF-8"?>
<Products>
<Selection>databasespy</Selection>
<Product>XMLSpy</Product>
...
...
<Product>DatabaseSpy</Product>
</Products>
After making these changes, save the file and run a simulation. The initial splash screen will be that of the product in the Selection node. Also, the dropdown list of the combo box will not have any empty entry, and the number of entries in the dropdown list will be equal to the number of unique Product elements in the XML file.
