Via REST Requests
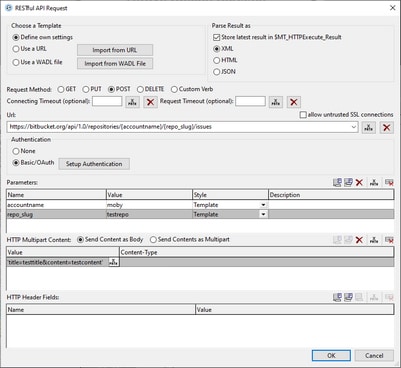
The settings for REST requests are defined in the RESTful API Request dialog (screenshot below). This dialog is accessed in two situations:
•When defining a page source that uses a REST request to connect to a data source
•Via the Execute REST Request action; in this case the response to the request can be stored in a $MT_HTTPExecute_Result variable.
You can choose to (i) define your own settings, (ii) import a URL, or (iii) use a WADL file. If you choose to define your own settings, you can specify your own definitions for the individual settings. If you import a URL or use a WADL file, some settings will be defined in the URL or WADL file, and so cannot be modified by you.
The various settings are described below:
•Templates and result parsing, including $MT_HTTPExecute_Result
•URL
Templates and result parsing
With templates are meant the three frameworks within which settings can be defined (your own settings, URL, or WADL; see screenshot above). You can switch between templates at any time by selecting the appropriate radio button. If the URL or WADL template option is already selected and you wish to use a different URL or WADL file, click, respectively, Import from URL or Import from WADL. Selecting the URL or WADL option (or their respective Import button) opens a dialog in which you can specify the URL or WADL file to use.
Define own settings
If you define your own settings, you can enter the request to a REST server as a URL, specify the data format of the target resource (XML, HTML, or JSON), then enter user authentication information, and, where appropriate, query parameters, and HTTP content and headers. See the descriptions below of each of these settings.
Use a URL
If a URL is long or complex, then it is better to import the URL in the Use a URL template rather than enter it in the Define Own Settings template. For example, a URL can contain a number of parameters, as in the example below (which is a Google query that contains five parameters):
https://www.google.at/search?q=REST+WADL&ie=utf-8&oe=utf-8&gws_rd=cr&ei=89cDVrDHMIP0Up_5vcAB
If you import this URL, it is entered in the template's URL field, and the parameters are entered automatically in the template's Parameters table. You can select the data format of the target resource (XML, HTML, or JSON) and the Request Method (GET, PUT, POST, or DELETE). You can then enter values for the parameters, but you cannot delete a parameter or change its type. If you wish to change the URL, click Import from URL. For a description of parameters, see the Parameters section below.
Use a WADL file
A WADL file is an XML document that defines the resources provided by a web service and the relationships between the resources. Resources are defined by resource elements. Each resource contains: (i) param elements to describe the inputs of a resource, and (ii) method elements to describe the request and response of a resource. The request element specifies how to represent the input, what types are required and any specific HTTP headers that are required. The response element describes the service's response, as well as error information.
When you select the WADL option you are prompted for the WADL file you want to use. After clicking OK, the Choose Method dialog appears (screenshot below). This dialog displays the methods defined in the WADL file.
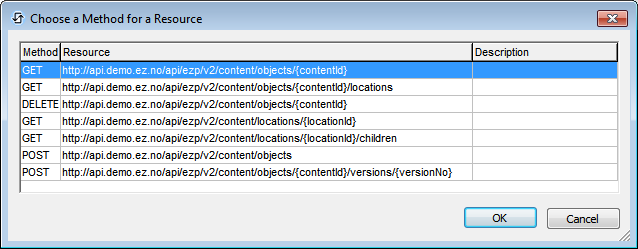
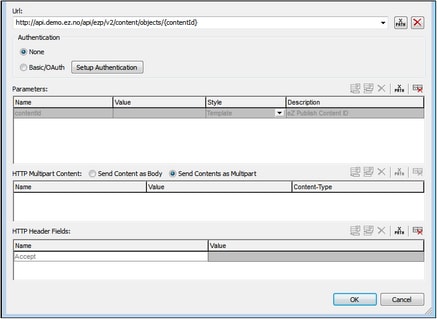
Select the method you wish to use, and click OK. The URL of the resource is entered in the URL field of the template, and the parameters, and HTTP content and headers defined in the WADL file for that resource are entered in the respective tables of the template (see screenshot below). In the template, you can enter the values of parameters and HTTP content and headers, but parameter names cannot be edited and parameters cannot be deleted.
Parse Result as
The result is what is returned by the web service in response to the request. In the Own Settings and URL templates, you must specify how this result is to be parsed (as XML, HTML, or JSON) so that MobileTogether can process the result correctly. In the WADL template, the information about the result format is taken from the definitions in the WADL file and automatically selected; as a result these radio buttons are disabled in this template.
$MT_HTTPExecute_Result
You can choose whether the result should be stored in the $MT_HTTPExecute_Result or not. If stored, you can use the result, via this variable, at other locations in the design. Note that this option is not displayed in the RESTful API Request dialog when the page source is being defined for the first time. It is displayed when the dialog is opened via the Execute REST Request action.
Request method
In the Own Settings and URL templates, you must specify the Request method (GET, PUT, POST, DELETE, or some other verb, which we call a custom verb). A custom verb would be one that is used by the server from which you are requesting the data source and the one that you want to use for the request. To use a custom verb, select its option and enter the custom verb in the text field that appears. You can, instead of directly entering the custom verb, use an XPath expression to generate the custom verb.
In the WADL template, the request method is determined by the selection you make in the Choose a Method for a Resource dialog (see above for screenshot), and is automatically selected in the template; as a result these radio buttons are disabled in this template.
You can set the following timeouts:
•A connection timeout, which is the time until a TCP connection is established.
•A request timeout, which is the time to complete the request.
Both values can be entered either directly or via an XPath expression and must be given in seconds, with decimals to be used for fractions of a second. The smallest fraction that will be accepted is the millisecond.
URL
The URL field can be edited only in the Define Own Settings template. In this template, you can enter the URL directly, or as an XPath expression. Use the Reset button to clear the entry in the URL field.
Allow untrusted SSL connections
A certificate associated with a URL is considered untrusted if it isn’t signed by a trusted root certificate or if it can’t link to a trusted root certificate. If the certificate is signed by a major certificate authority, it just means that one of the chain certificates in between yours and the root is not installed on the web server. If a trusted certificate is expected (for example because the HTTPS protocol is specified), then selecting this option enables connections also with URLs that have an untrusted certificate.
Authentication
You can supply authentication information if this is required for accessing the server. If no authentication is required, select None in the RESTful API Request dialog (see screenshot above).
Authentication information can be supplied in the following ways:
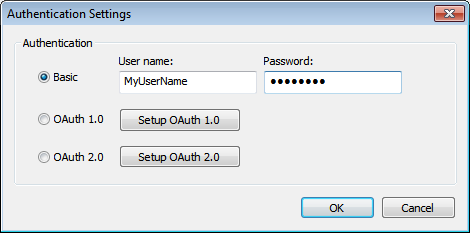
•Basic: A user name and password is supplied (see screenshot below)
•OAuth 1.0
•OAuth 2.0
If you wish to set up authentication information, click Setup Authentication in the RESTful API Request dialog (see screenshot above). This displays the Authentication Settings dialog (screenshot below), in which you can select the type of authentication the server requires and then supply the authentication details.
OAuth authentication
OAuth essentially authenticates MobileTogether Designer and authorizes access to the resources of the web service identified by the URL. This assumes that the web service supports OAuth. As an example web service that supports OAUTH, see the BitBucket documentation about OAuth 1.0.
The OAuth system works broadly as follows:
1.At the web service, create an OAuth key (or ID) and secret. Together these are known as an OAuth consumer.
2.Make a note of the web service's OAuth endpoints. There are three endpoints for OAuth 1.0 (Initial Endpoint, Authorization Endpoint, and Token Endpoint), and two endpoints for OAuth 2.0 (Authorization Endpoint and Token Endpoint). The endpoints are usually constant for all consumers.
3.Set up the application to access the web service with these five (OAuth 1.0) or four (OAuth 2.0) pieces of authentication information.
After you have obtained your key and secret from the web service, and noted the endpoints you need, you are ready to set up MobileTogether Designer to access the web service. Do this as follows:
1.In the Authentication Settings dialog (screenshot above), click Setup OAuth 1.0 or Setup OAuth 2.0. The OAuth Settings dialog (screenshot below) appears.
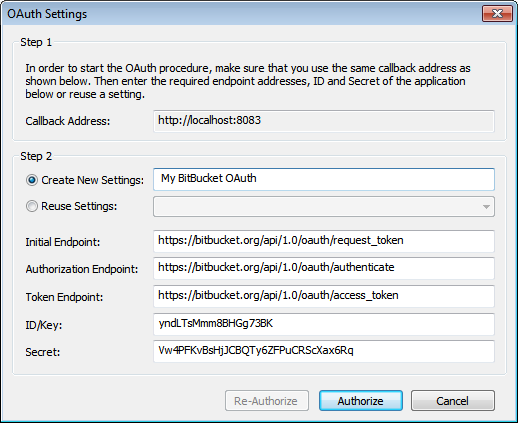
2.Set Callback Address to http://localhost:8083. This address is fixed; it is the address of the machine on which you are working.
3.Create New Settings: Give your settings a name. This enables the settings to be reused (via the Reuse Settings combo box option) for other solutions that use the same resources.
4.Enter the endpoints declared by the web service. These are usually constant across the web service for all consumers of the service.
5.Enter your key (or ID) and secret.
6.Click Authorize to finish.
Parameters
In the Define Own Settings template, parameters can be freely added, edited and deleted. In the Use URL and Use WADL templates, however, you can only edit the values of parameters; you cannot add or delete parameters, or edit their names.
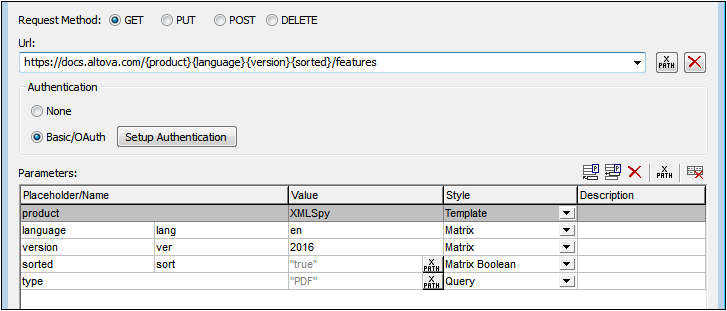
You can add the following types (or styles) of parameters (see the 'Styles' column of the screenshot below.):
•Template: Template parameters use placeholders to substitute a value in a URL at runtime. For example, in the screenshot below, there is one template parameter with the placeholder {product}. This placeholder is used in the URL (see screenshot below). It has curly braces around it to indicate that it is a placeholder. When the URL is used at runtime, the value of the placeholder is substituted in the corresponding place in the URL. The relevant part of the URL would therefore resolve to: https://docs.altova.com/XMLSpy.../features.
•Matrix: In the case of matrix parameters, the placeholder in the URL is replaced by a name=value pair. In the screenshot example below, there are two matrix parameters, given in the URL by the placeholders {language} and {version}. These placeholders in the URL would resolve to the parts highlighted in blue: https://docs.altova.com/XMLSpy;lang=en;ver=2016.../features. The semi-colon separator ; is prefxed to each parameter as part of the substitution.
•Matrix Boolean: If the value of a matrix boolean parameter is set to true, then the parameter's placeholder is replaced by the parameter's name. If the value is set to false, then the parameter's placeholder is replaced by the empty string (that is, by nothing). So in the example shown in the screenshot below, the matrix boolean placeholder would resolve to the highlighted part: https://docs.altova.com/XMLSpy;lang=en;ver=2016;sort/features. The semi-colon separator ; is prefxed to each parameter as part of the substitution.
•Query: Query parameters do not use placeholders. All the query parameters are gathered into a query string and this string is appended at runtime to the path part of the URL. For example, the URL shown in the screenshot below will resolve at runtime to this: https://docs.altova.com/XMLSpy;lang=en;ver=2016;sort/features?type=PDF. The question mark separator ? is prefxed to the query string. Additional queries are prefixed by the ampersand separator &. So a query string with two queries would look like this: ?type=PDF&about=json.
Columns of the Parameters table
The Parameters table has four columns. The use of the first three columns is explained in the description of the types of parameters given above. Notice that template, matrix, and matrix boolean parameters use placeholders. While template parameter placeholders are replaced by values, matrix and matrix boolean parameter placeholders are replaced by name-value pairs and names, respectively. Query parameters have no placeholders; their name-value pairs are appended to the path part of the URL. The Description column contains descriptions of the parameter for you, the MobileTogether Designer user.
Parameter table icons and table editing
At the top right of the Parameters table, there are icons that enable you to manage entries in the table.
•Appending and inserting parameters: Use Append to add a new parameter as the last parameter in the table. Use Insert to insert a new parameter directly above the currently selected parameter. The order in which parameters are entered in the table is unimportant. It is the order of the placeholders in the URL that counts. All query parameters are gathered into a query string that is appended to the path part of the URL at runtime.
•Deleting parameters: Click Delete to delete the selected parameter.
•XPath expressions for parameter values: When a parameter is selected, click XPath to open the Edit XPath/XQuery Expression dialog and enter an expression that resolves to a string. This string is entered as the value of the parameter. In these cases, an XPath icon appears in the Value column of the parameter. Clicking this icon enables you to edit the XPath expression.
•Resetting parameter values: Click Reset parameter to delete the value of a parameter.
•Editing parameter names and values: Click in the respective field and edit.
HTTP content
You can specify content to send with HTTP PUT and POST requests. You can send the content as a single item in the body of the request (Send content as body) or as multiple items in a multipart request (Send contents as multipart). Select the appropriate radio button from these two options.

Append or insert a content entry using the icons at top right.
Send content as body
Enter the content's value and the content's MIME type. The content can be entered directly or can be accessed from an XML node.
Send contents as multipart
Enter the name for the content part being sent, the type of content access, the content itself, and the MIME type of the content. The content's value is the actual content being sent. In the screenshot above, the content is obtained, via XPath expressions, from page source nodes. Images are sent in Base64 format or as a file.
HTTP header fields
HTTP header fields are colon-separated name-value pairs, for example: Accept:text/plain. Append or insert an entry for each header, and then enter the header name and value (see screenshot below).

