Connecting to Oracle (JDBC)
This example shows you how to connect to an Oracle database server from a client machine, using the JDBC interface. The connection is created as a pure Java connection, using the Oracle Instant Client Package (Basic) available from the Oracle website. The advantage of this connection type is that it requires only the Java environment and the .jar libraries supplied by the Oracle Instant Client Package, saving you the effort to install and configure a more complex database client.
Prerequisites:
•JRE (Java Runtime Environment) or Java Development Kit (JDK) must be installed. This may be either Oracle JDK or an open source build such as Oracle OpenJDK. MobileTogether Designer will determine the path to the Java Virtual Machine (JVM) from the following locations, in this order: a) The custom JVM path you may have set in application Options; b) The JVM path found in the Windows registry; c) The JAVA_HOME environment variable.
•Make sure that the platform of MobileTogether Designer (32-bit, 64-bit) matches that of the JRE/JDK.
•The Oracle Instant Client Package (Basic) must be available on your operating system. The package can be downloaded from the official Oracle website. This example uses Oracle Instant Client Package version 12.1.0.2.0, for Windows 32-bit and, consequently, Oracle JDK 32-bit.
•You have the following database connection details: host, port, service name, username, and password.
To connect to Oracle through the Instant Client Package:
1.Start the database connection wizard.
2.Click JDBC Connections.
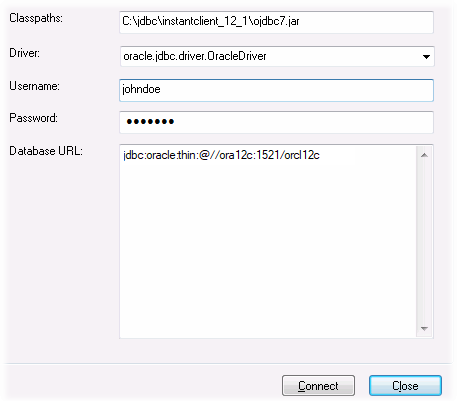
3.Next to "Classpaths", enter the path to the .jar file which provides connectivity to the database. If necessary, you can also enter a semicolon-separated list of .jar file paths. In this example, the required .jar file is located at the following path: C:\jdbc\instantclient_12_1\ojdbc7.jar. Note that you can leave the "Classpaths" text box empty if you have added the .jar file path(s) to the CLASSPATH environment variable of the operating system (see also Configuring the CLASSPATH).
4.In the "Driver" box, select either oracle.jdbc.OracleDriver or oracle.jdbc.driver.OracleDriver. Note that these entries are available if a valid .jar file path is found either in the "Classpaths" text box, or in the operating system's CLASSPATH environment variable (see the previous step).
5.Enter the username and password to the database in the corresponding text boxes.

6.Enter the connection string to the database server in the Database URL text box, by replacing the highlighted values with the ones applicable to your database server.
jdbc:oracle:thin:@//host:port:service |
7.Click Connect.