Saving Data to the DB
This section:
•Saving on the basis of solution progress
•Filtering the columns to save
Saving on the basis of solution progress
The context menu of a $DB root node has a Save Data command (screenshot below) which enables the data source represented by the root node to be updated at different points during the progress of the solution. The options are described below. If the default option, Not Automatically, is selected, then data is saved only when the Save action of an event is triggered.
The Save Data command rolls out a sub-menu with the following mutually exclusive options (only one can be selected):

•On Every Page Leave: Data in the tree is saved every time a page containing that tree is exited.
•On Any Solution Finish: Data in the tree is saved when the solution is exited, no matter at what point or how the solution is exited.
•On Last Submit: Data in the tree is saved when the workflow progresses as designed, from first page to last page, and when the last Submit button is tapped. If this option is selected and the solution is exited before the last Submit button is tapped, then data in the tree will not be saved.
•Not Automatically: The tree will not automatically be saved. You must use the Save, Save to File, or Save to HTTP/FTP actions to save data.
In the case of databases, there are options to save (i) modifications only; (ii) all rows; (iii) all rows if anything has been modified. If you wish to select an option that checks for modifications, then make sure that an OriginalRowSet has been created for the table; otherwise an error will be reported on validation.
The default is Not Automatically.
The Save action
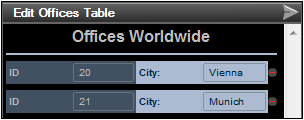
Data can be saved to the DB when a page event or control event is triggered for which the Save action has been defined. Such an event could be, for example, the clicking of the Submit button by the end user. In the screenshot below, the Submit button is located in the Edit Offices Table bar.

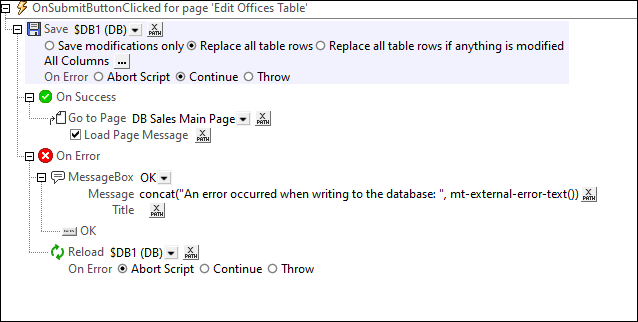
The Save action can be defined on a page action or control action. You can access the respective Actions dialogs via the All Actions dialog (Page | Actions Overview). The screenshot below shows a Page Actions dialog with the Save action defined for the OnSubmitButtonClicked event.

| Note: | You can save (i) only those records that have been modified, added, or deleted; (ii) all records; (iii) all records if anything has been modified. If you wish to select an option that checks for modifications, then make sure that an OriginalRowSet has been created for the table; otherwise an error will be reported on validation. Note that, if the DB has no private key, then the entire modified table will be saved to the DB, replacing the original table. |
The DB Execute action
The DB Execute action is a powerful mechanism for modifying DB data. With this action, you can use SQL statements to update and save data. For information about using the action, see the section Page Design | Database | The DB Execute Action.
Saving related tables
To specify how to save related tables, click the Relations button  . This displays the Database Relation Save Settings dialog, which shows the related tables. In the combo box of each related table you can choose from the following options: (i) Replace all table rows of the related table; (ii) In the related table, save modifications only; (iii) Not save any changes to the related table.
When making these choices, take into account any private-key to foreign-key relations that exist between the main and related tables.
You can also access the save settings of the related table of a DB page source via the context menu of the page source in the Page Sources Pane.
Filtering the columns to save
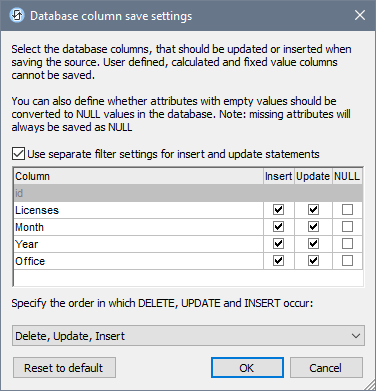
In the context menu of $DB root nodes, select the command Filter Columns to display the Database Column Save Settings dialog (screenshot below) and to select which columns should be updated or inserted.

The dialog displays the columns of the DB page source. You can specify which columns can be updated or can take inserted values. (Updates refer to modified data in existing row elements; inserted values refer to data in newly added row elements.) By default, the Insert and Update options of each column are selected together as a pair. If, however, you wish to specify different options for a column's Insert and Update options, check the Use separate filter settings for Insert and Update statements check box. Attributes with empty values can be converted to NULL values in the DB by checking that column's NULL check box. Note that missing attributes will always be saved as NULL.
Columns that cannot be updated (because they are user-defined, fixed-value, or calculated-value) will not have an Insert, Update, or NULL option check box. In the screenshot above, the ID column cannot be updated because it holds fixed values. Deselect the columns you do not want to update.
You can specify the order in which deletions, updates, and insertions occur by selecting the desired order in the combo box at the bottom of the dialog.
If you wish to reset the Save settings so that all columns are updated, click Reset to default.
About OriginalRowSet
In order for data to be edited and saved, the tree of the page source must also include an OriginalRowSet element, which is a copy of the RowSet element. The original data is saved in the OriginalRowSet element, while edited data is saved in the RowSet element. When the page source is saved, the difference between the two trees, OriginalRowSet and RowSet, is calculated, and the page source is updated on the basis of the difference. If the modification is successful, then the modified data is copied to OriginalRowSet so that OriginalRowSet contains the newly saved DB data, and the modification process can be repeated.
Note the following points:
•The OriginalRowSet element is not created by default in the tree of the DB page source. To create it, right-click the root node of the DB page source and toggle on the command Create OriginalRowSet.
•The Create OriginalRowSet.command is enabled for database type ($DB) root nodes. It is a toggle command that creates/removes an OriginalRowSet data structure that contains the original data of the page source.
•Till the time modified data is saved to the DB, the original DB data is retained in the OriginalRowSet structure. This ensures that the original DB data is still available in the tree.
•To retrieve the original data of a DB row that has been modified but not yet saved, use the XPath function mt-db-original-row.
Committing transactions
Another way to save data to a DB is to begin an independent transaction and commit it. DB transactions are available as actions for page and control events.
About DB Transactions For each DB access that needs a transaction, one is automatically created and closed afterwards. This might not be desirable for some setups. For example, when you have two DB page sources that you want to update atomically together: If both tables are saved successfully, then the transaction is committed, but rolled back otherwise. To accommodate this kind of situation, transactions can be created on a connection basis.
If you begin a transaction, all DB operations belonging to the same DB connection will use this transaction.
Committing a transaction makes changes visible to the world outside your transaction. Changes can be rolled back. In this case, even if you have done a Save on your page source, the changes won’t be visible after a rollback! Note that any transaction that is not closed (committed or rolled back) when the end of the action tree has been reached will be rolled back automatically! A warning to this effect will be displayed in the Messages window.
It is important to bear in mind that, while the behavior above refers to explicit transaction actions, this behavior also applies to all DB operations that use the same connection as the transaction.
|