Setting the CSV Options
After you add a text component to the mapping area, you can configure the settings applicable to it from the Component Settings dialog box. You can open the Component settings dialog box in one of the following ways:
•Select the component and, on the Component menu, click Properties.
•Double-click the component header.
•Right-click the component header, and then click Properties.

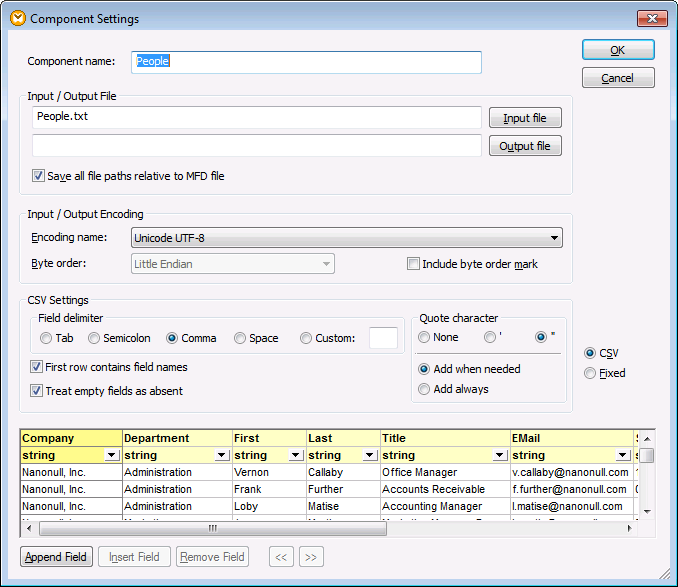
Text Component Settings dialog box (in CSV mode)
The available settings are as follows.
Component name | The component name is automatically generated when you create a component. However, you can change the name at any time. The component name can contain spaces and full stops. It may not contain slashes, backslashes, colons, double quotes, leading and trailing spaces. If you want to change the name of the component, be aware of the following:
•If you intend to deploy the mapping to FlowForce Server, the component name must be unique. •It is recommended to use only characters that can be entered at the command line. National characters may have a different encoding in Windows and at the command line. | ||||||||||
Input file | Specifies the file from which MapForce will read data. This field is meaningful for a source component and is filled when you first create the component and assign to it a text file. The field can remain empty if you are using the text file component as a target for your mapping.
In a source component, MapForce uses the value of this field to read column names and preview the contents of the instance text file.
To select a new file, click Input File. | ||||||||||
Output file | Specifies the file to which MapForce will write data. This field is meaningful for a target component.
To select a new file, click Output File. | ||||||||||
Save all file paths relative to MFD file | When this option is enabled, MapForce saves the file paths displayed on the Component Settings dialog box relative to the location of the MapForce Design (.mfd) file. This setting affects the input and output files used by the text component. See also Using Relative Paths on a Component. | ||||||||||
Input / Output Encoding | Allows you specify the following settings of the output instance file:
•Encoding name •Byte order •Whether the byte order mark (BOM) character should be included.
By default, any new components have the encoding defined in the Default encoding for new components option. You can access this option from Tools | Options, General tab. | ||||||||||
Field delimiter | CSV files are comma delimited "," by default. This option enables you to select the Tab, Semicolon, or Space characters as delimiters. You can also enter a custom delimiter in the Custom field. | ||||||||||
First row contains field names | Select this option to instruct MapForce to treat the values in the first record of the text file as column headers. The column headers then appear as item names on the mapping. | ||||||||||
Treat empty fields as absent | When this option is enabled, empty fields in the source file will not produce a corresponding empty item (element or attribute) in the target file.
For example, the CSV record "General outgassing pollutants,,,," consists of four fields, the last three of which are empty.
Assuming that the output is an XML file, when this option is disabled, the empty fields will be created in the output with an empty value (in this example, the elements Last, Title, and Email):  When this option is enabled, the empty fields will not be created in the output: | ||||||||||
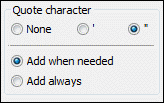
If your input file contains quotes around field values, select the quote character that exists in the source file. The same setting will also be used for output files.  For output files, you can specify additional settings:
| |||||||||||
CSV / Fixed | Changes the component type to either CSV or FLF (fixed-length field). | ||||||||||
Preview area | The lower part of the dialog box displays a preview of up to 20 rows of the file selected as input or output.
If necessary, you can create the structure of the file (or change the structure of the existing one), as follows.
To change the name of a field, click the header (for example, Field1), and type the new value. Note that the field names are not editable when the First row contains field names option is enabled.  To change the data type of a field, select the required value from the drop-down list. MapForce checks the data type, so if the input data and the field format to do not agree, then the data is highlighted in red.  The field types are based on the default XML schema data types. For example, the Date type is in the form YYYY-MM-DD. |