Database Table Actions
When you use a database as a target component, you can configure various database table actions. For example, you can insert all records from the source file into your database. You can also decide when to update, delete, and ignore records. This section provides an overview of all the available actions and shows some of the possible scenarios of using table actions.
SQL statements in the output
When you map data to a database and preview the result of the mapping in the Output pane, you will see an SQL script. The script shows pseudo-SQL statements for information purposes only. You must not apply this SQL script manually to the database, using SQL tools other than the following execution engines: MapForce, MapForce Server (both standalone or under FlowForce Server management), or the execution environment of the code generated for C++, C#, or Java. The script in the Output pane may contain values that are not understood by external SQL editors.
If you want to apply changes to the database directly from MapForce, open the Output pane and click the Run SQL/NoSQL-Script command in the toolbar or in the Output menu. This action will modify the database with immediate effect.
When the mapping is executed with MapForce Server (standalone or under FlowForce Server management), the changes to the database are made with immediate effect. The same happens in the generated code: The database changes are made when you compile and run the code (e.g., by clicking the Run command in Visual Studio).
Important note
Your MapForce installation includes several sample databases that are available in the MapForceExamples folder. It is not recommended to modify any databases in this folder, as this may render several examples unusable. A simple way to avoid overriding original data is to back up the entire MapForceExamples folder before updating any files in it.
Note about MySQL/MariaDB ODBC
If the target database is MySQL or MariaDB through ODBC, the option Return matched rows instead of affected rows must be enabled in the Cursor/Results tab of MySQL ODBC Connector. Alternatively, if you enter the connection string manually in the Database Connection wizard, add Option=2 to the connection string (e.g., Dsn=mydsn;Option=2;).
To enable this option from the MySQL ODBC Connector, take the steps below:
1.Press the Windows key and start typing ODBC.
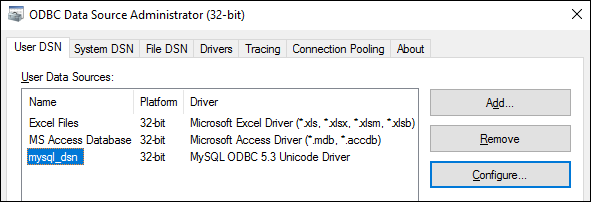
2.Run the ODBC Data Sources Administrator (32-bit or 64-bit, depending on the platform of the installed MySQL ODBC Connector).
3.Click the Data Source Name (DSN) used by the MapForce mapping and then click Configure (see below).

4.Click Details >> to make the advanced options available.
5.Click the Cursors/Results tab and select the check box Return matched rows instead of affected rows.