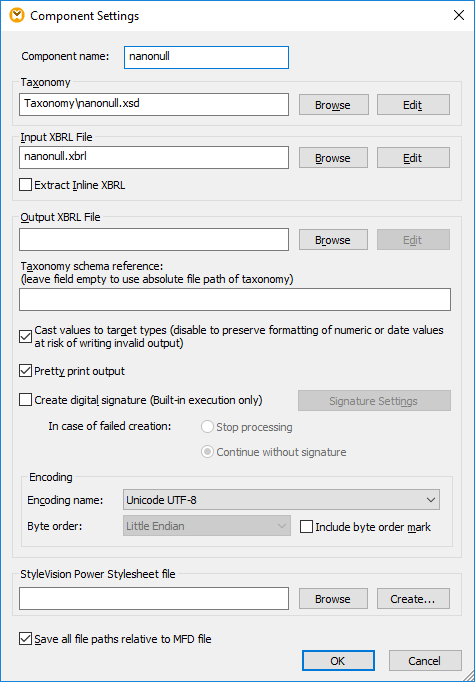
XBRL Component Settings
Once you added an XBRL component to the mapping area, you can configure its settings from the "Component Settings" dialog box.
To open the Component Settings dialog box:
•Double-click the title bar of the XBRL component, or right-click it and select Properties.

The Component Settings dialog box includes the following settings.
Component name | The component name is automatically generated when you create a component. However, you can change the name at any time. The component name can contain spaces and full stops. It may not contain slashes, backslashes, colons, double quotes, leading and trailing spaces. If you want to change the name of the component, be aware of the following:
•If you intend to deploy the mapping to FlowForce Server, the component name must be unique. •It is recommended to use only characters that can be entered at the command line. National characters may have a different encoding in Windows and at the command line. | |
Taxonomy | Specifies the file name and path of the main taxonomy file.
To change the location of the file, click Browse and select the new file.
To edit the file in your XBRL editor (for example, XMLSpy), click Edit. | |
Input XBRL File | Specifies the file name of the input XBRL instance for the currently selected XBRL component. This field is filled automatically when you first insert the XBRL component and assign an XBRL instance file.
To change the location of the file, click Browse and select the new file.
To edit the file in your XBRL editor (for example, XMLSpy), click Edit. | |
Extract Inline XBRL | When this check box is selected, the Inline XBRL content will be extracted from the .html, .htm, or .xhtml file specified as input. | |
Output XBRL File | Specifies the file name and path where the XBRL target instance file is placed, if the component is used as a mapping target.
The entry from the Input XBRL File field is automatically copied to this field when you assign the input XBRL instance file. If you do not assign an input XBRL instance file to the component, then this field contains the file name and path of the taxonomy file and the extension "xml".
To change the location of the file, click Browse and select the new file.
To edit the file in your XBRL editor (for example, XMLSpy), click Edit. | |
Taxonomy schema reference | The path of the referenced/associated taxonomy schema file relative to the MFD file. Use this field if you want to specify a different taxonomy location for validation. The taxonomy reference is written into the href attribute of the link:schemaRef element, for example:
| |
Cast values to target types | Allows you to define if the target XML schema types should be used when mapping, or if all data mapped to the target component should be treated as string values. By default, this setting is enabled. | |
Pretty print output | Reformats the output XBRL document to give it a structured look. Each child node is offset from its parent by a single tab character. | |
Create digital signature | Allows you to add a digital signature to the XBRL output instance file. Adding a digital signature is possible when you select "Built-in" as transformation language, see also Digital Signatures. | |
Encoding | Allows you specify the following settings of the output instance file:
•Encoding name •Byte order •Whether the byte order mark (BOM) character should be included. | |
StyleVision Power Stylesheet file | This option allows you to select or create an Altova StyleVision stylesheet file. Such files enable you to output data from the XBRL instance file to a variety of formats suitable for reporting, such as HTML, RTF, and others. | |
Save all file paths relative to MFD file | When this option is enabled, MapForce saves the file paths displayed on the Component Settings dialog box relative to the location of the MapForce Design (.mfd) file. This setting affects the following files:
•The XBRL taxonomy file •The XBRL input file •The XBRL output file •The StyleVision stylesheet file
See also Using Relative Paths on a Component. |