Stored Procedures in Target Components
This example shows you how to call a procedure that takes input parameters and updates a database. Calling a procedure this way makes it possible to enable transactions and roll the action back in case of an error, or add a custom SQL statement to be executed before the procedure is called. This scenario implies that the stored procedure acts like a target component in MapForce and you are not interested in the output returned by it. For an example that illustrates how to pass parameters and also map data returned by a stored procedure, see Stored Procedures with Input and Output.
Let us first create the demo stored procedure in the "AdventureWorks" database. To do this, run the script below against the database. You can do this from a query window of Microsoft SQL Server Management Studio, or directly from the DB Query pane of MapForce, see Browsing and Querying Databases. In either case, make sure that your database user account has permission to create stored procedures.
CREATE PROCEDURE Production.uspAddProductModel |
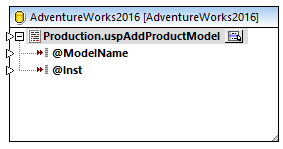
The stored procedure above takes two parameters (@ModelName, @Inst) as input and inserts the corresponding values into the ProductModel table of the AdventureWorks database, along with some database-generated data.
The following steps show you how to create a mapping that consumes data returned by this procedure.
1.Connect to the "AdventureWorks" database from MapForce and add the stored procedure to the mapping, as described in Adding Stored Procedures to the Mapping. Make sure that your database user account has permission to view and execute stored procedures.
2.Click the Show Context Menu  button next to the stored procedure and select Show Nodes As Target. The stored procedure now appears as target component on the mapping, where the left side lists the input parameters.

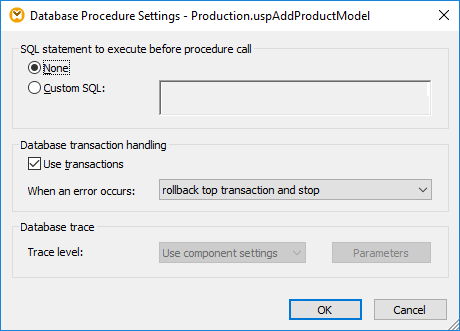
3.Click the Show Context Menu  button again, and select Procedure Settings. This optional step enables you to execute the stored procedure inside a transaction that can be rolled back. You can also add a custom SQL statement to be executed before the procedure is called.
4.Select the Use Transactions check box.

| Note: | In this example, database tracing is disabled at database component level and no tracing is set to take place. However, you can enable database tracing for stored procedures if necessary. |
5.Add the source component that provides data to be inserted into the database. In this example, the source data is supplied by constants; however, any other source component supported by MapForce could act as input. For more information about constants, see Add a Constant to the Mapping.

Since this mapping updates a database, you do not preview its output directly like with other mappings. Instead, click the Output button to display the pseudo-SQL containing hints about how the database will be modified. If you enabled transactions, these will occur as indicated by the comments.

The pseudo-SQL displayed in the Output pane does not show the actual transaction commands, only hints (as comments). The actual SQL commands are sent to the underlying database API, however. |
To run the mapping against the database, do one of the following:
•On the Output menu, click Run SQL-Script.
•Click the Run SQL-Script  toolbar button.
Stored procedures and duplicate inputs
If you need to map data from multiple sources on the mapping to the same stored procedure, you can duplicate the stored procedure so that it accepts multiple inputs. To do this, right-click the stored procedure item on the component and select Add duplicate input from the context menu, see also Duplicating Input. When the mapping runs, such duplicate stored procedures will be called once for each duplicated input.
Note that the Add duplicate input command is disabled for the stored procedure parameters, because each parameter is an atomic value (and could also be "nullable").
Tracing at stored-procedure level
To enable tracing at stored-procedure level:
1.Make sure that the tracing level at database component level is set to either Always or Error (see above).
2.Do one of the following, click the Show Context Menu  button, and then select Procedure Settings from the context menu.
3.Select the trace level. The Use component settings option inherits the same settings that were defined at the component level. The Limit to errors option restricts tracing only to error events. Always disabled means that no tracing will occur for this table or stored procedure.