Connections
A connection is a line that connects a source to a target. Connections represent visually how data is mapped from one node to another. The subsections below describe different connection-related actions you can perform.
Create, copy, delete a connection
To create a connection between two items, press and hold the output connector of a source node and drag it to a destination node. An input connector accepts only one connection. If you try to add a second connection to the same input, MapForce will ask if you want to replace the connection with a new one or duplicate the input item. An output connector can have several connections, each to a different input.
To copy a connection to a different item, press and hold the thick section at the end of the connection (see screenshot in Move a connection) and drag it to the selected destination while holding the Ctrl key.
To delete a connection, click the connection and press the Delete key. Alternatively, right-click the connection and click Delete in the context menu.
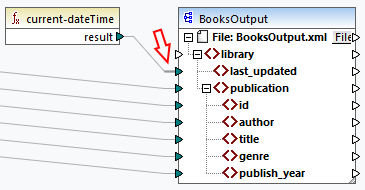
To help you in the mapping process, MapForce highlights mandatory inputs in orange in target components. The example below shows that as soon as you connect the book element of the Books component to the publication element of the BookOutput component, the connectors of the mandatory nodes of the BooksOutput component will be highlighted. If you do not connect mandatory inputs, the respective nodes will not be mapped to the target, and the mapping will be invalid.

Missing parent connections
When you create connections between source and target node manually, MapForce analyzes possible mapping outcomes. If you connect two child nodes without connecting their parent nodes, you will see a notification message that suggests connecting the parent of the source node with the parent of the target node. This notification message helps you prevent situations where a single child node appears in the Output pane.
If you want to disable such notifications, take the following steps:
1.Go to the Tools menu and click Options.
2.Open the Messages group.
3.Clear the check box When creating a connection, suggest connecting ancestor items.
Move a connection
To move a connection to a different node, press and hold the thick section at the end of the connection (see screenshot below) and drag it to the selected destination.

See connection tooltips
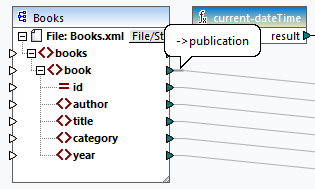
Connection tooltips allow you to see the names of (i) nodes to which data is mapped or (ii) nodes from which data is mapped. To be able to see tips, press the toolbar button  (Show tips). To see the names of nodes to which data is mapped, point the cursor at the thick section of a connection near the output connector (see screenshot below). To see the name of a node from which data is mapped, point the cursor at the thick section of a connection near the input connector. If multiple connections have been defined from the same output, maximum ten item names will be displayed in the tooltip.
In the example below, the target node to which the data from the book element is mapped is called publication.

Change connection settings
To change the connection settings, do one of the following:
•Select a connection. Then go to the Connection menu and click Properties.
•Double-click the connection.
•Right-click the connection and click Properties.
For more information, see Connection Settings.
Highlight connections selectively
MapForce allows you to selectively highlight connections in a mapping. This feature may be useful when your mapping has many components with multiple connections. Highlighting connections selectively will make it easier to check whether the nodes of the selected component are mapped correctly. Note that the term connector used for the toolbar buttons below refers to a connection, i.e., a line connecting component nodes. See the available options below.
Show selected component connectors (only direct connections) | |
Show connectors from source to target (direct and indirect connections) |
Only direct connections
When the Direct-connections button is not pressed, you can see all connections in black. When the Direct-connections button is pressed, only connections related to the currently selected component are black. Other connections are light gray.
Direct and indirect connections
The Source-to-target Connections button becomes available only when the Direct-connections button is pressed. When the Source-to-target Connections button is pressed, you can trace connections of the currently selected component, including its direct connections and connections of its connected components up to the source and target files.
To understand how these two options work, see the example below.
Example
The screenshot below illustrates a part of the ChainedPersonList.mfd mapping, which is available in the MapForceExamples folder. In the mapping below, we have pressed the Direct-connections button, clicked the header of the concat component but have not yet pressed the Source-to-target Connections button. Therefore, we can now see that only the direct connections of the concat function to the "-" constant, the substring, position, and Contacts components are black. The other connections in the mapping are light gray.

The next step is to press the Source-to-target Connections button. The screenshot below reflects the changes:

With the Source-to-target Connections button pressed, some other connections have become black: (i) the connections of the substring function to the 1 constant and the PersonList component, and (ii) the connection of the position function to the PersonList component. However, the connections between the PersonList component and its preceding component remain light gray. Thus, when you press the Source-to-target Connections button and click on a component, you can trace the component's direct connections. If the selected component is connected to some transformation components (e.g, functions, constants, filters, sort components, SQL-NoSQL-WHERE/ORDER components, if-else conditions, value-maps), you will also be able to see their connections up to the structural components (such as PersonList above), variables, join components, or Web service functions, to which these transformation components are connected.
In this section
This section gives an overview of connections and is organized into the following topics:
•Keep Connections after Deleting Components