Project Folders
MapForce enables you to organize mappings inside a project into folders. You can create as many folders as you need and add mappings to them. Such folders are virtual and exist only inside a MapForce project: These folders do not correspond to the folders on your operating system. One of the advantages of creating folders in a project is that you can define common code generation settings for all the mapping files in that particular folder. To create a folder inside a MapForce project, take the steps below:
1.Go to the Project menu and click Create Folder. Alternatively, right-click the project in the Project window and select Create Folder.
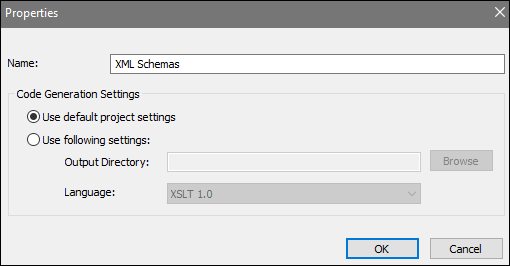
2.In the Properties dialog box (see screenshot below), enter the required code generation settings and click OK.

The list below describes the settings you can define in the Properties dialog box.
•Name: This is the name of the folder in your project.
•Use default project settings: This option means that the code generation settings in the current folder are the same as in the entire project. Therefore, when you generate code from your project, MapForce will use the code generation settings defined in the project settings. If your folder requires custom code generation settings, select Use following settings and specify the code output directory and language as required.
•Output directory: This is the folder where the generated code from all the mappings in this folder will be saved.
•Language: This option defines the code generation language for all the mapping files in this folder.