Joins in SQL Mode
When you connect eligible database components (such as tables or views) directly to a join component, an SQL mode  button appears at the top-right corner of the join component. When SQL mode is enabled, the join operation is undertaken by the database from where the mapping reads data. In other words, MapForce will internally send to the database a query with the appropriate SQL syntax to select and combine data from all tables that take part in the join. Importantly, you do not need to write any SQL; the required query is produced based on how you visually designed the Join component on the mapping, as you will see in subsequent examples.
For SQL mode to be possible, the following conditions must be met:
1.Both objects (tables or views) that are to be joined must be from the same database.
2.Both objects that are to be joined must originate from the same MapForce component. (Note that you can quickly add/remove database objects in a component as follows: right-click the database component, and select Add/Remove/Edit Database Objects from the context menu.)
3.The Join condition (or conditions) must be defined only from the component properties (by right-clicking the header of the join component, and selecting Properties), and not on the mapping (see also Adding Join Conditions).
| Note: | When database tables are joined in SQL mode, MapForce will create the join condition (or conditions) automatically, based on foreign key relationships detected between tables. For automatic join conditions to happen, the database tables must be in a child-parent relationship on the MapForce component (that is, one table must be "parent" or "child" of another one on the component), see Example: Join Tables in SQL Mode. |
4.All database tables must not yet be in the current target context. When the join result is used in a target component, none of the joined tables may be connected directly or indirectly to any target parent nodes. For more information about how a mapping is executed, see Mapping Rules and Strategies.
You can view or control the SQL mode through the SQL ( ![]() ) button at the top-right corner of the join component, as follows:
) button at the top-right corner of the join component, as follows:
 | SQL mode is disabled (join will be executed by MapForce (or, if applicable, by MapForce Server). |
 | SQL mode is enabled (join will be executed by the database). |
If the  button is missing, this means that SQL mode is not meaningful or not supported for the data that is being joined.
In certain cases, the SQL mode must be explicitly disabled (  ), for example:
•When your mapping requires join conditions outside of the join component properties (that is, conditions defined on the mapping and connected to the condition item of the join component).
•When you want to join tables from different databases. Use a standard (non-SQL) join if you need to join tables from different databases.
Changing the Join mode
When the Join component is in SQL mode  , you can join database tables or views in one of the following ways:
•INNER JOIN - Only records which satisfy the condition in both input sets are returned by the Join component.
•LEFT OUTER JOIN - The Join component includes all records from the "leftmost" table (in MapForce, this is the topmost table of a Join component), plus those records from the subsequently joined table that satisfy the join condition.
To view the join mode of a table or view on the Join component, observe the icon shown in front of the joined table or view. One of the following icons can be shown for any joined table or view except the first one:
•Inner Join 
•Left Join 
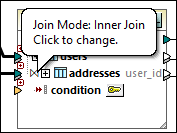
To display a tooltip with details about the join, move the cursor over the icon:

To change the join mode, do one of the following:
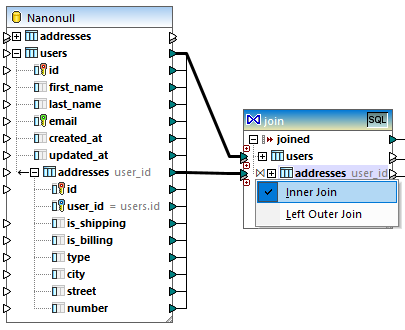
•Click the Inner Join  or Left Join
  icon in front of each joined table or view, and select Inner Join or Left Outer Join from the context menu.
•Right-click the second (or third, fourth, etc) joined table or view on the Join component, and select Join Type | Inner Join, or Join Type | Left Outer Join from the context menu.

Note the following:
•If you changed the join mode to LEFT OUTER JOIN, then the upper table or view represents the "left" side of the join.
•Changing the join mode affects the data returned by the join component in the same way that INNER JOIN or LEFT JOIN affects the result of a SQL query in a database.
Alias names
It is often the case that joined database tables or views contain identical field names in both joined structures. When SQL mode is enabled, such items appear on the component prefixed by the keyword "AS". For example, if two joined tables contain an "id" field, this field appears as "id" on the first joined table and as "id AS id2" on the second joined table. Joined tables can also produce alias names, for example, if the same table is joined to itself.
The alias field or table names are important if you need to refer to them subsequently on a mapping. For example, imagine a case when you want to filter or sort the result of the join. To achieve this, the output of the join component can be connected to a SQL WHERE/ORDER component, where you would enter the SQL WHERE and ORDER BY clauses.
To refer to a field from the WHERE clause, write the table name, followed by a dot (.) character, followed by the field name. To refer to a table alias, use the alias name as it appears on the Join component. In the ORDER BY clause, you can either use the same technique (table.field), or write just the alias field name (the name that appears after "AS").
For an example mapping which uses SQL WHERE/ORDER clauses, see Example: Join Tables in SQL Mode.
| Note: | SQL WHERE/ORDER components are not allowed between a database table and the join component; they can be added only after (but not before) a join component. For more information about SQL WHERE/ORDER components, see Filtering and Sorting Database Data (SQL WHERE/ORDER). |