MapForce Plug-in for Visual Studio
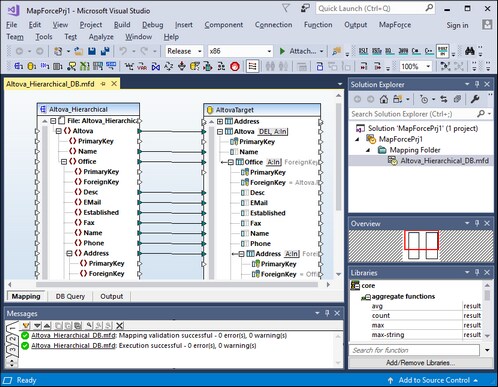
You can integrate MapForce 2024 into the Microsoft Visual Studio versions 2012/2013/2015/2017/2019/2022. This integration helps combine the mapping capabilities of MapForce with the development environment of Visual Studio. When the MapForce plug-in is enabled, you can create mappings and mapping projects directly in Visual Studio (see screenshot below).
Installation
To install the MapForce Plug-in for Visual Studio, take the steps below:
1.Install Microsoft Visual Studio 2012/2013/2015/2017/2019/2022. Note that from Visual Studio 2022 onwards, Visual Studio is being made available only as a 64-bit application.
2.Install MapForce (Enterprise or Professional Edition). If you have installed Visual Studio 2022+, then you must install the 64-bit version of MapForce.
3.Download and run the MapForce integration package for Microsoft Visual Studio. This package is available on the MapForce (Enterprise and Professional Editions) download page at www.altova.com.
Once the integration package has been installed, you will be able to use MapForce in the Visual Studio environment.
Important
You must use the integration package corresponding to your MapForce version (current version is 2024). The integration package is not edition-specific and can therefore be used for both Enterprise and Professional editions. |
Information about menus and functions
When the MapForce plug-in for Visual Studio is enabled, you can access different MapForce menus and functions (see below). You can customize MapForce menus and toolbars from the Tools | Customize menu of Visual Studio.
| Note: | In Visual Studio 2019 and later, MapForce functionality can be accessed in the Extensions menu of Visual Studio. In earlier versions of Visual Studio, MapForce features are available in the top-level menus of Visual Studio. |
You can select MapForce themes in the MapForce menu of Visual Studio. The options are Classic, Light, and Dark themes.
|
When the MapForce plug-in for Visual Studio is enabled, you can create, open, and work with mappings and mapping projects directly in Visual Studio. To create a new mapping design file in Visual Studio, use the File | New menu command. To create a new project, use the File | New Project menu command. To open existing mapping files or projects, you can use the following Visual Studio menus: File | Open | File or File | Open | Project/Solution. Then you can look for the MapForce-related file types.
|
MapForce Global Resources are available in the MapForce | Manage Global Resources menu of Visual Studio. In Visual Studio 2019 onwards, the corresponding menu is Extensions | MapForce | Manage Global Resources.
|
After you have opened a mapping file, the mapping debugging commands become available in the Debug menu and in the Debug toolbar. In Visual Studio 2019 onwards, the corresponding menu is Extensions | MapForce | Debug.
|
MapForce options are available in the Tools | MapForce Options menu of Visual Studio.
|
When you open a mapping in the main pane of Visual Studio, the View | MapForce menu becomes available. It includes the same options as the View menu of the standalone version of MapForce.
|
If the MapForce Libraries window is not visible in Visual Studio, you can enable it from the View | MapForce | Libraries Window menu (this menu becomes available in Visual Studio when a mapping file is open). Once the Libraries window is enabled, you can dock it to a particular position in the interface.
|
The MapForce menus Help, Support Center, Check for Updates and About are available in the Help | MapForce Help menu of Visual Studio.
|

