Example: Read Data from Protocol Buffers
This example shows you how to read data from a binary file encoded in Protocol Buffers format. The source binary file is available at the following path: <Documents>\Altova\MapForce2024\MapForceExamples\Tutorial\assets.bin. The .proto file describing the binary file is available in the same directory and it looks as follows:
syntax="proto3";
package mapforce.demo;
message CulturalAssets { repeated PaintingType painting = 1; }
message PaintingType { string name = 1; string period = 2; float height = 3; // in cm float width = 4; // in cm string remarks = 5; LocationEnum location = 6;
enum LocationEnum { UNKNOWN = 0; MUSEUM = 1; TEMPLE = 2; PRIVATE = 3; } } |
assets.proto
The source binary file contains information about various cultural assets (in this example, a collection of paintings). As illustrated by the .proto file above, each painting has a height and width expressed in centimeters. There are various other fields that describe a painting, including an enumeration that specifies its location (museum, private collection, or temple). The business requirement is to extract this information to a comma-separated values (CSV) file. Also, all painting dimensions must be converted from centimeters to inch and be represented as a single string, in a format like "24 in x 56.8 in".
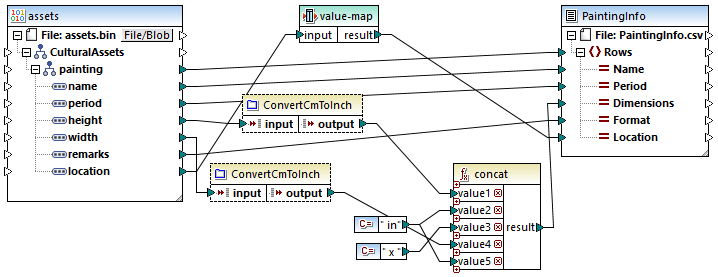
The mapping that extracts data according to the requirements above and produces the desired output is illustrated below. This mapping is available in the following directory: <Documents>\Altova\MapForce2024\MapForceExamples\Tutorial\. You can open the mapping and run it directly, or follow the steps below to create it from scratch.

ReadProtocolBuffers.mfd
As illustrated above, the mapping consists of a source binary component (assets) and a target CSV component (PaintingInfo). Additionally, it contains the following intermediary components:
•A value-map table responsible for converting enumeration values like 0, 1, 2, 3 to a human-readable string representation (for example, 0 = UNKNOWN, 1 = MUSEUM, and so on).
•The ConvertCmToInch function. As suggested by the title, this is a user-defined function that converts centimeters to inches. This function is called twice on the mapping (for height and width, respectively).
•The concat function. This function concatenates several values and returns a string in the format "# in x # in", where # represents the actual height and width of the painting, in inches.
The following steps illustrate how to create the mapping above from scratch.
Step 1: Add the source binary file
1.On the Insert menu, click Protocol Buffers File, and browse for the following file: <Documents>\Altova\MapForce2024\MapForceExamples\Tutorial\assets.proto.
2.When prompted, select "CulturalAssets" as root message, and click OK.
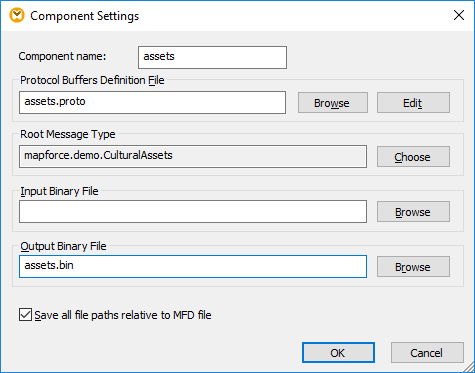
3.Double-click the title bar of the new component. The "Binary Component Settings" dialog box opens.
4.Click Browse next to Input Binary File, and select the following file: <Documents>\Altova\MapForce2024\MapForceExamples\Tutorial\assets.bin.

See also Adding Binary Files to the Mapping.
Step 2: Add the target CSV component
1.On the Insert menu, click Text File.
2.Select the Use simple processing for standard CSV... check box, and click Continue. The "CSV Component Settings" dialog box opens.
3.Click the Append Field button several times to create five target fields required to store the expected data.
4.Optionally, double-click the header of each field to give it a more suggestive name.
For more information, see Setting the CSV Options.
Step 3: Add the value-map
1.On the Insert menu, click Value-Map.
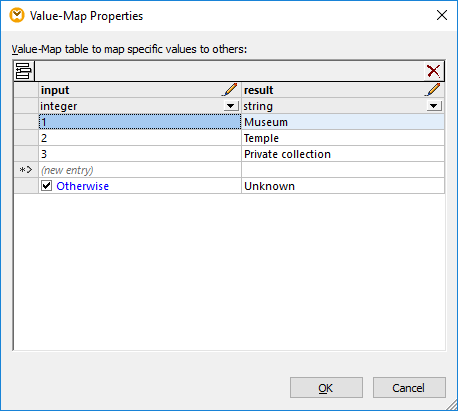
2.Create an entry for each mapped record, as shown below.

The "Otherwise" condition handles the case when the binary file contains no value for the Location field. In the event this happens, the mapping will write the value "Unknown" to the target instead of no result. For more information, see Using Value-Maps.
Step 4: Create the user-defined function
1.On the Function menu, click Create User-Defined Function and call it "ConvertCmToInch". Leave all other options unchanged.
2.Drag the divide and round-precision built-in functions from the Libraries window into the function's mapping window. See also Add a Function to the Mapping.
3.Add two constants and make all connections as illustrated below, see also Add a Constant to the Mapping. The first constant supplies the decimal constant required to convert centimeters to inches according to formula, and the second one supplies the rounding precision.
Essentially, the function divides the input value by 2.54, and then rounds the result to one decimal digit, as illustrated below:

To avoid potential errors, set the data type of the input and output components to "decimal". To view or change the data type, double-click the title bar of the component, or right-click the title bar, and select Properties from the context menu. |
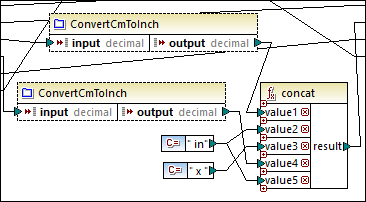
Once the user-defined function is ready, click Return to main mapping ![]() , and drag the function from the Libraries window into the mapping to call it. In this example, it is called two times. For more information, see User-Defined Functions.
, and drag the function from the Libraries window into the mapping to call it. In this example, it is called two times. For more information, see User-Defined Functions.
Step 5: Add the concatenation function
Start typing "concat" in the Libraries window, and then drag the concat function into the mapping. To add all the required input arguments, click Add parameter ( ![]() ) several times, see also Add or Delete Function Arguments. The constants " in" and " x " are string values. Essentially, the function returns the painting's height, followed by the string " in ", followed by " x ", followed by the painting's width, and followed by " in" again.
) several times, see also Add or Delete Function Arguments. The constants " in" and " x " are string values. Essentially, the function returns the painting's height, followed by the string " in ", followed by " x ", followed by the painting's width, and followed by " in" again.

Running the mapping
To preview the generated file in MapForce, click the Output pane. Notice that the third CSV column contains painting dimensions in required format.

Mapping output
To save the mapping output to the disk:
•On the Output menu, click Save Output File.
Automation with MapForce Server
If you have licensed MapForce Server, you can also run the mapping at the command line, on a Linux, macOS, or Windows machine, as follows:
1.Compile the mapping to a MapForce Server execution file (.mfx) with the menu command File | Compile to MapForce Server Execution File, see also Compiling Mappings to MapForce Server Execution Files.
2.Copy the .mfx file to the server machine.
3.Run MapForce Server with the command below.
mapforceserver run ReadProtocolBuffers.mfx |
Notes:
•mapforceserver is the path to the MapForce Server executable as applicable for your operating system.
•Change the path to the .mfx file as applicable, or copy the .mfx to the same folder as the executable.
•The .mfx file is self-contained; the .proto file is not needed for server execution.
In server execution, you can also run mappings as an API call, or as FlowForce Server jobs, either on demand or on recurring basis. For more information, see Automation with MapForce Server.