Working with Certificates
Authorization certificates are commonly used to create and verify XML signatures. This section contains information about obtaining, importing, and exporting certificates. It is organized into the following sub-sections:
•Obtaining a certificate with a private-public-key pair
•Importing a private-public-key certificate
•The certificate stores on a Windows machine
•Exporting a public-key certificate
Obtaining a certificate with a private-public-key pair
A certificate can be obtained in the following ways:
•From a certificate authority. The certificate authority verifies the identity of the certificate's owner. Certificates obtained in this way are in contrast to self-signed certificates, which can be created by anyone with a certificate creation tool.
•By creating a self-signed certificate. Such certificates are not verified by any authority, but often provide adequate security. A number of certificate creation tools, such as Microsoft's Visual Studio, are available.
For use with XML signatures you will need a certificate with a private-public-key pair.
| Note: | XMLSpy's XML Signature feature supports certificates of type RSA-SHA1, DSA-SHA1, and SHA-256 |
Importing a private-public-key certificate
After a private-public-key certificate has been obtained, you will need to import it to your Windows certificate store. Do this as follows:
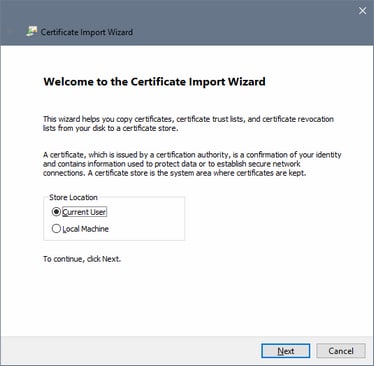
1.Double-click the certificate file to open the Certificate Import Wizard (screenshot below), and click Next.
2.In the File to Import window, ensure that the certificate file is selected, then click Next.
3.Type in the password for the private key. You must know the password if you intend to use the private key to create an XML signature. The password for the private key will be supplied to you when you obtain the certificate. After typing in the password, click Next.
4.You can allow the wizard to automatically select the store in which to place the certificate—according to the certificate type—or you can select the store yourself. (It might be better to select the store yourself, so you know the location of the certificate.) Click Next when done.
5.Click Finish to complete the process.
Certificate stores on a Windows machine
The certificate store on a Windows XP machine can be accessed as follows:
1.In the Start menu, select Run.
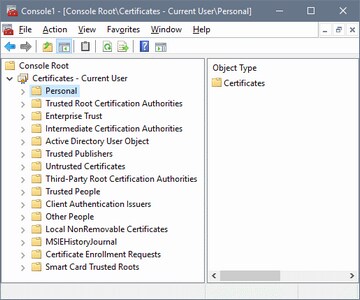
2.Type in mmc and click OK. A Console window pops up (screenshot below).
3.In the Console window, select the command File | Add/Remove Snap-in.
4.In the Standalone tab of the Add/Remove Snap-in dialog that pops up, click Add.
5.In the Add Standalone Snap-in dialog that pops up, select Certificates and click Add.
6.Close the Add Standalone Snap-in dialog.
7.In the Add/Remove Snap-in dialog, click OK.
8.The Console Root in the Console window will now contain a Certificates item (see screenshot above). This Certificates item contains the certificate stores of your machine.
9.Save the Console as a Microsoft Management Console File (.msc file) via the File | Save command of the Console window. You can subsequently use this MSC file (via the File | Open command of a Console window) to access the certificate stores on your machine.
Exporting a public-key certificate
If you have a certificate with a private-public key, you might wish to export this certificate with only a public key. This public-key certificate can then be sent to receivers for use in verifying signatures created with the private key of the certificate.
A public-key certificate can be exported from an existing private-public-key certificate as follows:
1.Open the certificate stores in a Console window. Do this as follows: (i) Enter mmc on the Start menu's Run command line; (ii) In the Console window that pops up, select File | Open, and select the MSC file in which the certificate stores were saved (see section immediately above this section).
2.Browse for the certificate that you wish to export as a public-key certificate and right-click it.
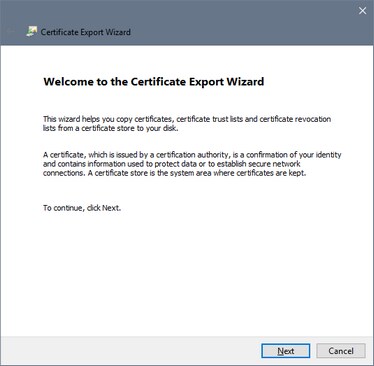
3.In the context menu that pops up, select All Tasks | Export. This pops up the Certificate Export Wizard (screenshot below).
4.Select Next.
5.In the Export Private Key window, select No, do not export the private key, and click Next.
6.In the Export File Format window, select the required format (leave the default DER format unchanged if you are not sure), and click Next.
7.In the File to Export window, browse for the location where you wish to save the file and provide a name for the file (without a file extension, which will be automatically appended). Click Next when done.
8.Click Finish to complete the export.
A public-key certificate will be created at the location you specified. This public-key certificate can be sent to receivers of XML files signed with the corresponding private key. The receiver can then import this public-key certificate to a certificate store on his or her machine and use the public key of this certificate for verification.


