JSON Text View
Altova website:  JSON Editor
JSON schemas, Avro schemas, and JSON/JSON5 instance documents (including Avro data instances in JSON format) can be edited using the intelligent editing features of Text View. These features include: folding margins, structural marking, syntax coloring, syntax checking, saving Base64-encoded image strings in their image formats, and auto-completion. XMLSpy also provides conversion between JSON/JSON5 and XML in both directions, and enables you to generate a JSON schema from a JSON/JSON5 instance.
Folding margins
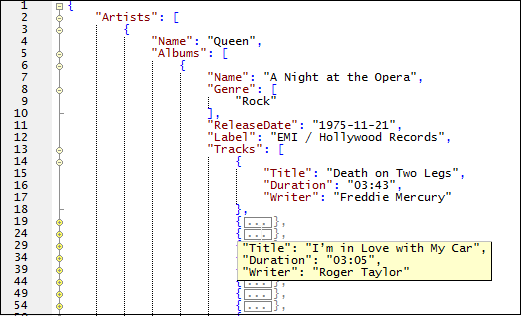
Source folding is enabled on JSON keywords and definitions, and refers to the ability to expand and collapse these nodes. Such nodes are indicated in the source folding margin by a +/- sign (see screenshot below). The margin can be toggled on and off in the Text View Settings dialog. When a node is collapsed, this is visually indicated by an ellipsis (see screenshot below). If the mouse cursor is placed over an ellipsis, the content of the collapsed node is displayed in a popup (see screenshot). If the content is too large for a popup, this is indicated by an ellipsis at the bottom of the popup.

The Toggle All Folds icon  in the Text toolbar toggles all nodes to their expanded forms or collapses all nodes to the top-level document element.
The following options are available when clicking on the node's +/- icon:
Click [-] | Collapses the node. |
Click [+] | Expands the node so that descendant nodes are shown expanded or collapsed according to how they were before the node was collapsed. |
Shift+Click [-] | Collapses all descendant nodes, but leaves the node that was clicked in its expanded form. |
Ctrl+Click [+] | Expand the clicked node as well as all its descendant nodes. |
Structural marking
The pair of curly braces or square brackets that delimit a JSON object or array, respectively, (see screenshot below) turns bold when the cursor is placed either before or after one of the braces or brackets. This indicates where the definition of a particular element starts and ends.

Syntax coloring
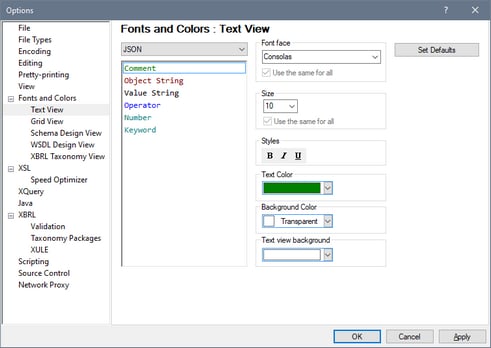
A JSON document (JSON or Avro instance/schema), as well as a JSON5 document, is each made up of object strings, value strings, operators, numbers and keywords. In Text View, each category of items can be displayed in a different color (see screenshot above) according to settings you make in the Options dialog (screenshot below). You can set the colors of the various JSON components in the Text Fonts section of the Options dialog (screenshot below). In the combo box at top left, select JSON, and then select the required color (in the Styles pane) for each JSON item.
| Note: | JSON5 syntax—but not JSON syntax—allows for comments. Comments in JSON5 are delimited like this: // comment // or /* comment */. |
Syntax checking
The syntax of a JSON document (JSON or Avro instance/schema) can be checked by selecting the command XML | Check Well-Formedness (F7). The results of the well-formed check are displayed in the Messages window (screenshot below).

The error message in the screenshot above points out an error in the document: An opening curly brace occurs at a location where a colon is expected.
Auto-completion
Auto-completion is enabled when the JSON document (JSON instance/schema or Avro schema) being edited is associated with a schema.
•If the document is a JSON schema, then auto-completion is based on the schema version indicated by the \$schema keyword. For more information, see also JSON Schema Version.
•If the document is a JSON/JSON5 instance, then a JSON schema must be assigned to the instance in order for auto-completion to be enabled.
•If the document is an Avro data document in JSON format, then an Avro schema must be assigned to the instance for auto-completion to work.
•If the document is an Avro schema, then it is automatically associated with the schema for Avro Schema, and auto-completion is based on this schema.
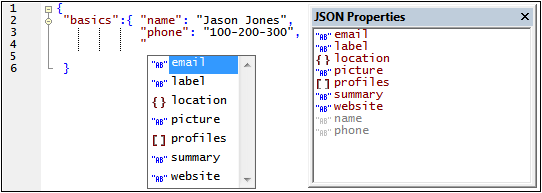
Auto-completion provides you with the available entry options at the cursor location. It does this (i) via pop-ups in the main window, and (ii) via the entry helpers (see screenshot below). The pop-ups and entry helpers each display a list of entries that are valid at that cursor location. To move through the entries in the pop-up list, use the arrow keys. If the schema contains a description of the entry (in the entry's description keyword in the schema), then the description is displayed next to the highlighted pop-up entry. Select an entry from the pop-up window or double-click an entry in the entry helper to insert it.

In the instance document shown in the screenshot above, the pop-up and JSON Properties entry helper are shown when the cursor is located after the quotes that indicate the start of a property's name. The entry helper displays all the properties allowed at that point; the properties that have already been entered are shown grayed out and disabled. The pop-up displays only the properties that are allowed at that point.
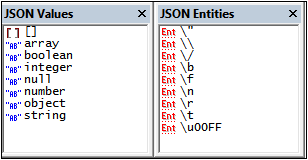
There are two other entry helpers: JSON Values and JSON Entities (screenshot below). These show, respectively, the allowed values of key:value pairs and entities for escaping characters in JSON strings. The JSON Values entry helper in the screenshot below shows the values allowed for the type keyword while editing a JSON schema. The last entry in the JSON Entities entry helper, \u00FF, is a placeholder that stands for a Unicode character. Replace the part highlighted in blue with the code of the Unicode character you want.

Other context-sensitive auto-completion entries or hints include the following, when these are specified in the schema: enumerations, descriptions, required occurrences, and default values.
Save a Base64-encoded string as an image
To save a Base64-encoded string in its image format, right-click the encoding text and select the command Save as Image. In the dialog that appears, select the location where you want to save the image and enter a name for the image file. The extension of the image file (.png, .gif, .svg, etc) will be auto-detected from the Base64 encoding and will appear in the Save dialog. Click Save when done.
This action can also be carried out via the Edit | Save as Image menu command.
