New
This section:
•Assigning a DTD or XML Schema to a new XML document
•Specifying the root element of a new XML document
•Assigning an SPS to a new XML document
•Creaing new XBRL taxonomies with the XBRL Taxonomy Wizard
Icon and shortcut
Icon: | |
Shortcut: | Ctrl+N |
Description
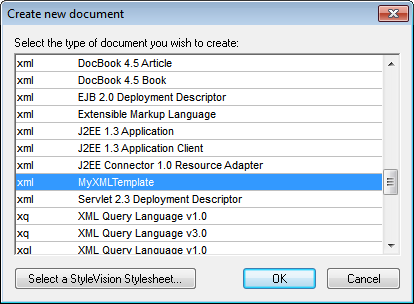
The New command is used to create a new document. Clicking New opens the Create New Document dialog (screenshot below), in which you can select the type of document you wish to create. If the document type you wish to create is not listed in the dialog, select XML and change the file extension when you save the file. Note that you can add new document types to this dialog list using the Tools | Options | File Types section.

Templates for new documents
The document-type list of the Create New Document dialog can also contain entries for user-defined document templates of any document type. These templates can be opened directly from the Create New Document dialog and edited. To create your own document template so that it appears in the list of document types in the Create New Document dialog, you first create the template document and then save it to the folder designated to contain document templates.
Create a document template as follows:
1.Open the XMLSpy\Template folder of the application folder using Windows Explorer or your preferred navigation tool, and select a rudimentary template file from among the files named new.xxx (where .xxx is a file extension, such as .xml or .xslt).
2.Open the file in XMLSpy, and modify the file as required. This file will be the template file.
3.After you have finished, select File | Save as to save the file back to the \Template folder with a suitable name, say MyXMLTemplate.xml. You now have a document template called MyXMLTemplate, which will appear in the list of document types in the Create New Document dialog.

4.To open the template, select File | New, and then the template (my-xml, in this case).
To delete a document template from the list of document types, delete (or move) the template file from the template folder.
Assigning a DTD or XML Schema to a new XML document
When you create a new document of a certain type via the Create New Document dialog, the document is automatically opened with the correct DTD or XML Schema association. For example, an XHTML file will be opened with the DTD http://www.w3.org/TR/xhtml1/DTD/xhtml1-strict.dtd associated with it. And an XML Schema (.xsd) file is associated with the http://www.w3.org/2001/XMLSchema schema document.
If you are creating a new document for which the schema is not known (for example, an XML file), then you are prompted to associate a schema (DTD or XML Schema) to the new document (screenshot below).

If, in the dialog, you select DTD or XML Schema and click OK, you can browse for the schema you want. Clicking Cancel creates a new file that is not associated with any schema.
Specifying the root element of a new XML document
If an XML Schema is selected as the associated schema of an XML document and if this schema has more than one global element, each of these is a potential root element. In this case, the Select a Root Element dialog (screenshot below) pops up, in which you can select which global element is to be the root element of the XML document. In the screenshot below, the OrgChart global element is selected.

Clicking OK now will create a new XML document with this element (OrgChart) as its root element.
Assigning an SPS to a new XML document
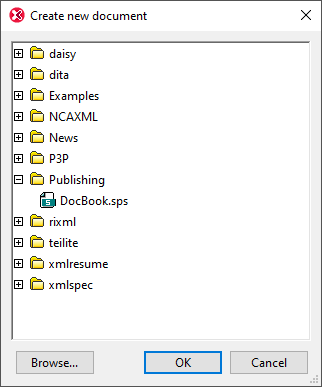
When a new XML document is created, you can associate a StyleVision Power Stylesheet (.sps file) to view the document in Authentic View. In the Create New Document dialog (see first screenshot in this section), when you click the Select StyleVision Stylesheet, the Create New Document dialog (shown below) appears.

You can browse for the required SPS in the folder tabs, or you can click the Browse button to navigate for and select the SPS.
Creating new XBRL taxonomies with the XBRL Taxonomy Wizard
In the Create a New Document dialog, if XBRL Taxonomy Schema (.xsd) is selected, then a wizard guides you through the steps for creating a new XBRL taxonomy. Ths wizard is described in the XBRL section of the documentation.