XML in Text View
XMLSpy offers some specialized XML text editing features (described below) in addition to the generally available editing features in Text View (which are described in Text View in the Editing Views section).
•Escaping and unescaping XML characters
•Inserting XML fragments via XInclude
•Copying XPath and XPointer expressions to the clipboard
•Save a Base64-encoded image string as an image
Commenting text in/out
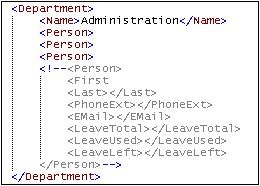
Text in an XML document can be commented out using the XML start-comment and end-comment delimiters, respectively <!-- and -->. In XMLSpy, these comment delimiters can be easily inserted using the Edit | Comment In/Out menu command.
To comment out a block of text, select the text to be commented out and then select the command Comment In/Out, either from the Edit menu or the context menu that you get on right-clicking the selected text. The commented text will be grayed out (see screenshot below).

To uncomment a commented block of text, select the commented block excluding the comment delimiters, and select the command Comment In/Out, either from the Edit menu or the context menu that you get on right-clicking the selected text. The comment delimiters will be removed and the text will no longer be grayed out.
Note about empty lines
In XML documents, empty lines are discarded when you change views or save the document. If you wish to retain empty lines, enclose them in comment delimiters.
Find and Replace
You can use the Find (Ctrl+F) and Replace (Ctrl+H) commands of the Edit menu to find text in Grid View and replace it. Results are highlighted in orange, and containing cells also highlighted in orange.
Escaping and unescaping XML characters
The five XML special characters (listed below) can be escaped and unescaped with the corresponding entity references (listed below) by highlighting a block of text and selecting the context menu command Escape XML Characters or Unescape XML Characters. The XML special characters in that block of text will then be escaped or unescaped according to the command selected.
< | < |
> | > |
& | & |
' | ' |
" | " |
For example:
<a></a> can be escaped with the Escape XML Characters command to <a></a> and
<a></a> can be unescaped with the Unescape XML Characters command to <a></a>
Inserting file paths
The Edit | Insert File Path command enables you to browse for the file in question and insert its file path at the selected location in the XML document being edited. This command enables you to quickly and accurately enter a file path. See the command description for more details.
Inserting XML fragments via XInclude
The Edit | Insert XInclude enables you, via XInclude, to insert the contents of an entire XML document, or a fragment of one, in the XML document being edited. This command enables you to quickly and accurately enter entire XML documents (via the XInclude mechanism) or fragments of XML documents (via an XPointer extension of the XInclude mechanism). See the command description for more details.
Copying XPath and XPointer expressions to the clipboard
The XPath and XPointer expressions of the selected node (expressing the node's position in the XML document) can be copied to the clipboard using the Edit | Copy XPath and Edit | Copy XPointer commands, respectively. This enables you to obtain the correct XPath and XPointer expressions targeting the selected node.
For example, let the selected node in Text View or Grid View be the third Office element of a document element called Offices. In this case, the copied XPath expression will be /Offices/Ofice[3]. And the copied XPointer expression, if the Office elements have no other-named sibling that occurs before the third Office element, will be element(/1/3).
The copied expressions can then be inserted at any required location. For example, an XPath expression can be inserted in an XSLT stylesheet and an XPointer expression in the href attribute of an xinclude element.
For more detailed descriptions of the commands, see their descriptions in the User Reference section.
Save a Base64-encoded string as an image
To save a Base64-encoded string in its image format, right-click the encoding text and select the command Save as Image. In the dialog that appears, select the location where you want to save the image and enter a name for the image file. The extension of the image file (.png, .gif, .svg, etc) will be auto-detected from the Base64 encoding and will appear in the Save dialog. Click Save when done.
This action can also be carried out via the Edit | Save as Image menu command.