XQuery Intelligent Editing
The XQuery mode of Text View provides the following intelligent editing features.
Bracket-matching
The bracket-matching feature highlights the opening and closing brackets of a pair of brackets, enabling you to clearly see the contents of a pair of brackets. This is particularly useful when brackets are nested, as in XQuery comments (see screenshot below).
•Bracket-matching is activated when the cursor is placed either immediately before or immediately after a bracket (either opening or closing). That bracket is highlighted (bold black) together with its corresponding bracket. Notice the cursor position in the screenshot above.
•Bracket-matching is enabled for round parentheses (), square brackets [], and curly braces {}. The exception is angular brackets <>, which are used for XML tags.
Note: When you place the cursor just inside a start or end bracket, both brackets are highlighted. Pressing Ctrl+E moves the cursor to the other member of the pair. Pressing Ctrl+E repeatedly enables you to switch between the start and end brackets. This is another aid to quickly navigating your document.
Keywords
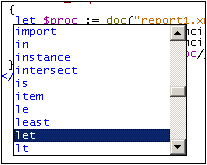
XQuery keywords are instructions used in query expressions, and they are displayed in blue. You select a keyword by placing the cursor inside a keyword, or immediately before or after it. With a keyword selected, pressing Ctrl+Space causes a complete list of keywords to be displayed in a pop-up menu. You can scroll through the list and double-click a keyword you wish to have replace the selected keyword.

In the screenshot above, the cursor was placed in the let keyword. Double-clicking a keyword from the list causes it to replace the let keyword.
Variables
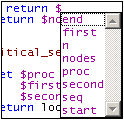
Names of variables are prefixed with the $ sign, and they are displayed in purple. This mechanism of the intelligent editing feature is similar to that for keywords. There are two ways to access the pop-up list of all variables in a document:
•After typing a $ character, press Ctrl+Space
•Select a variable and press Ctrl+Space. (A variable is selected when you place the cursor immediately after the $ character, or within the name of a variable, or immediately after the name of a variable.)

To insert a variable after the $ character (when typing), or to replace a selected variable, double-click the variable you want in the pop-up menu.
Functions
Just as with keywords and variables, a pop-up menu of built-in functions is displayed when you select a function (displayed in olive) and press Ctrl+Space. (A function is selected when you place the cursor within a function name, or immediately before or after a function name. The cursor must not be placed between the parentheses that follow the function's name.) Double-clicking a function name in the pop-up menu replaces the selected function name with the function from the pop-up menu.
To display a tip containing the signature of a function (screenshot below), place the cursor immediately after the opening parenthesis and press Ctrl+Space. Note that the signature can be displayed only for standard XQuery functions.
The downward-pointing arrowhead indicates that there is more than one function with the same name but with different arguments or return types. Click on the arrowhead to display the signature of the next function (if available); click repeatedly to cycle through all the functions with that name. Alternatively, you can use the Ctrl+Shift+Up or Ctrl+Shift+Down key-combinations to move through a sequence.
Visual guides
Text folding (or source folding) is enabled on XQuery curly braces, XQuery comments, XML elements, and XML comments, and refers to the ability to expand and collapse these nodes. Such nodes are indicated in the source folding margin by a +/- sign (see screenshot below). The margin can be toggled on and off in the Text View Settings dialog. When a node is collapsed, this is visually indicated by an ellipsis (see screenshot below). If the mouse cursor is placed over an ellipsis, the content of the collapsed node is displayed in a popup (see screenshot). If the content is too large for a popup, this is indicated by an ellipsis at the bottom of the popup.

The Toggle All Folds icon  in the Text toolbar toggles all nodes to their expanded forms or collapses all nodes to the top-level document element.
The following options are available when clicking on the node's +/- icon:
Click [-] | Collapses the node. |
Click [+] | Expands the node so that descendant nodes are shown expanded or collapsed according to how they were before the node was collapsed. |
Shift+Click [-] | Collapses all descendant nodes, but leaves the node that was clicked in its expanded form. |
Ctrl+Click [+] | Expand the clicked node as well as all its descendant nodes. |