Editing in Content Model View
The description of how to edit in Content Model View is organized into the following sections:
•Configuring Content Model View
•Attributes, Assertions, and Identity Constraints
•Keyboard shortcuts and drag-and-drop
•Comments and processing instructions
•Documenting the content model
Configuring Content Model View
You can configure the content model view for the entire schema in the Schema display configuration dialog (Schema Design | Configure View). For details about configuration options, see the Configure View section later in the User Reference. Note that the settings you define here apply to the whole schema, and to the schema documentation output as well the printer output.
Attributes, Assertions, and Identity Constraints
The attributes, assertions, and identity constraints of a component can appear in a pane below the Content Model View, the AAIDC pane, or as boxes in the Content Model View itself, that is, in the diagram. This second viewing option can be set in the Schema Display Configuration dialog. Alternatively, you can use the three Display in Diagram toolbar buttons in the Schema Design toolbar (screenshot below, also see icon list below).

For a description of how to insert and edit attributes, assertions, and identity constraints, see the section, Attributes, Assertions, and Identity Constraints.
Content Model View icons
 | Show Globals: Available in Content Model View. Switches to Schema Overview. |
Add Predefined Details: In the Schema Design toolbar and enabled in Content Model View. Toggles the display of predefined details in components on and off. | |
 | Display Attributes in Diagram: In the Schema Design toolbar and enabled in Content Model View. Toggles the display of attributes between the diagram (toggled on) and the Attributes tab. |
 | Display Assertions in Diagram: In the Schema Design toolbar and enabled in Content Model View. Toggles the display of assertions between the diagram (toggled on) and the Assertions tab. |
 | Display Constraints in Diagram: In the Schema Design toolbar and enabled in Content Model View. Toggles the display of IDCs between the diagram (toggled on) and the Identity Constraints tab. |
 | Visualize Identity Constraints: In the Schema Design toolbar and enabled in Content Model View. Toggles the display of IDC information on and off. |
Context menu operations
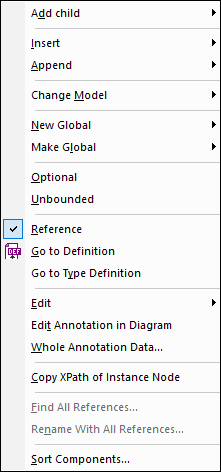
Several editing operations in Content Model View are carried out via the context menu (screenshot below) that appears when you right-click within Content Model View. Only commands for operations allowed at that point in the content model diagram are enabled. Operations are carried out relative to the right-clicked object. For example, when a child is added, it is added relative to the right-clicked object.

Given below is a list of operations available via the context menu.
•Add child compositors and components: The Add Child command opens a sub-menu, in which you can select the compositor or component to add.
•Insert/Append compositors and components: Inserts the compositor or component at the same hierarchical level as the selected object, before the selected object (Insert) or after its last sibling (Append).
•Change a compositor: Right-click a compositor, select Change Model | <new compositor>.
•Create global components: (i) The New Global command can be accessed by clicking anywhere in Content Model View. It displays a sub-menu in which you can select the new global component to create. (ii) If an object can be created as a global component, the Make Global command in its context menu is enabled. On selecting this command, the object will be created as a global component. In Content Model View, it will contain a reference to the newly created global component.
•Change the occurrence definition: Use the Optional and Unbounded toggle commands together to obtain the desired occurrence setting: (i) optional = 0 or 1; (ii) optional + unbounded = 0 to infinity; (iii) unbounded = 1 to infinity; (iv) not optional + not unbounded = 1. (Note: optional sets the minOccurs attribute of the component, unbounded sets the maxOccurs attribute.)
•Toggle between local and global definitions: If a global element exists that has the same name as a local element, use the Reference toggle command to switch between referencing the global definition (toggle on) and using the local definition (toggle off).
•Go to another content model: If a component has its own content model (for example, if it references a global component), then the Go to Definition command is active, and you can select it to go to the content model. Alternatively, you can press Ctrl and double-click the component.
•Go to the component's type definition: If a component has a type definition (simple type or complex type), then clicking the Go to Type Definition command will take you to the type definition. In the case of built-in simple types, a message box appears that contains information about the simple type.
•Edit predefined details: If predefined details have been set to be displayed in the diagram (with the Add Predefined Details icon in the Schema Design toolbar), then the Edit command displays a submenu containing the predefined details. Select the required predefined detail, and edit its value in the diagram.
•Create and edit compositor/component annotation: The Edit Annotation command creates annotation space below the compositor/component (see screenshot below). You can enter and edit the annotation here. If the annotation already exists, clicking the command highlights the annotation text for editing. Double-clicking existing annotation text is a faster way of starting an edit.

In the XML Schema document, the annotation is created inside the compositor or component's annotation/documentation element. Also see the section below about documentation.
•Copy XPath of instance node: The command Copy XPath of Instance Node is enabled for elements and attributes defined within a global element or global complex type. It copies to the clipboard an XPath expression that locates the selected node. The location path expression starts at the global component whose content model is currently being displayed in Content Model View.
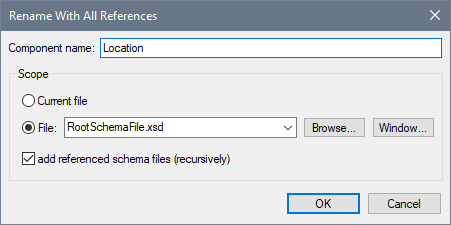
•Find and rename component: The commands Find All References and Rename with All References are enabled for global elements. These, respectively, find all occurrences of the selected component and rename all occurrences of the selected component in the active document and, optionally, in all schema files related to the active document.

In the screenshot above the name Email will replace the name of the right-clicked component and of all its references within the search scope. See Finding and Renaming Globals for details.
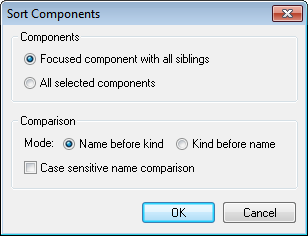
•Sort declarations and references: Using the Sort command, all selected components or the siblings of the selected component can be sorted. Make your sort settings in the Sort Components dialog (screenshot below) and click OK.

To select multiple components, press the Shift or Ctrl key while clicking. You can sort using component names as the first sort key and component kind as the second sort key, or vice versa.
Note: You can select a component and copy, cut, delete, or drag it. In few cases, such as attributes of a complexType restriction, this might be disallowed,
Keyboard shortcuts and drag-and-drop
You can copy and paste elements in Content Model View using the shortcuts Ctrl+c and Ctrl+v. Copied objects are pasted as child objects of the selected object. Where this is not possible for structural reasons, a message to this effect is displayed.
You can also drag-and-drop: (i) objects to other locations in the diagram, (ii) some components, such as attributes, from the Components entry helper into the diagram.
Component properties
If Content Model View is configured so that components are displayed with predefined details in the component box, then you can edit this information directly in the diagram. The display of predefined details can be turned on and off by clicking the Add Predefined Details toolbar icon (see icon list above).
Alternatively, you can edit a component's properties in the Details entry helper, and changes will be reflected in the placeholder fields—if these are configured to be displayed.
Annotations
XML Schema annotations are held in the annotation element. There are two types of annotation, each of which is contained in a different child element of annotation:
•documentation child: Contains information that could be useful for editors of the schema
•appinfo child: Allows you to insert a script or information that a processing application may use
Given below is the text of an annotation element that contains both types of child elements.
<xs:element name="session_date" type="xs:dateTime" nillable="true">
<xs:annotation>
<xs:documentation>Date and time when interview was held</xs:documentation>
<xs:appinfo source="https://www.altova.com/datehandlers/interviews">separator = :</xs:appinfo>
</xs:annotation>
</xs:element>
In Content Model View, you can create annotation for individual compositors and components as follows.
1.Right-click the compositor or component.

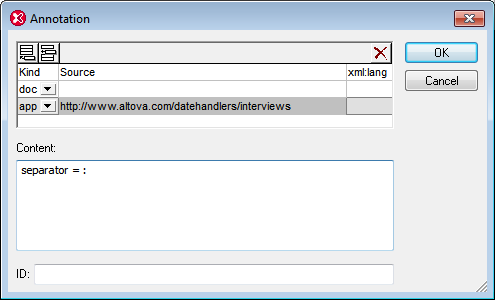
2.Select the context menu option Whole Annotation Data. The Annotation dialog box opens (see screenshot below). If an annotation (either documentation or appinfo) exists for that element, then this is indicated by a corresponding row in the dialog.

3.To create an appinfo element, click the Append ![]() or Insert
or Insert ![]() icon at top left to append or insert a new row, respectively.
icon at top left to append or insert a new row, respectively.
4.In the Kind field of the new row, select the app option from the dropdown menu.
5.In the Content pane of the dialog, enter the script or info that you want to have processed by a processing application.
6.Optionally, in the Source field, you can enter a source URI where further information can be made available to the processing application.
Comments and processing instructions
When XML Schema documents are loaded in XMLSpy, or when views are changed, comments and processing instructions within simple types and complex types are collected and moved to the end of the enclosing object. It is therefore recommended that you use annotations instead of comments in such cases.
Documenting the content model
You can generate detailed documentation about your schema in HTML and MS Word formats. Detailed documentation is generated for each global component, and the list of global components is displayed in a table-of-contents page that allows you to link to the content models of individual components. Additionally, related elements (such as child elements or complex types) are referenced by hyperlinks, thus enabling you to navigate from element to element. To generate schema documentation, select the menu command Schema design | Generate documentation.