Schema Subsets
One or more components of an XML Schema can be created as a separate schema file, known as a schema subset. The advantage of using smaller schema subsets to compose the larger schema (by means of Includes) is that the smaller files are more manageable than the single full schema.
In Schema View, one possible work scenario that describes various aspects of the Schema Subsets feature is as follows:
1.Create a schema subset that contains one or more components of the active schema. How to do this is described below,
2.Create additional schema subsets as required.
3.Include the newly created schema subset/s to compose the larger schema. Do this for each schema subset by appending or inserting an Include component in the Schema Overview window, and selecting the newly created schema subset file.
4.Delete any components that were present in the original full schema but are now duplicated because of the included subset/s.
You can also do the reverse in Schema View, that is, flatten the included schema subsets so that: (i) the components contained in the schema subsets are added directly to the main schema, and (ii) the included schema subsets are deleted from the main schema. How to flatten a schema is described further below.
Creating schema subsets
To create a schema subset, do the following:
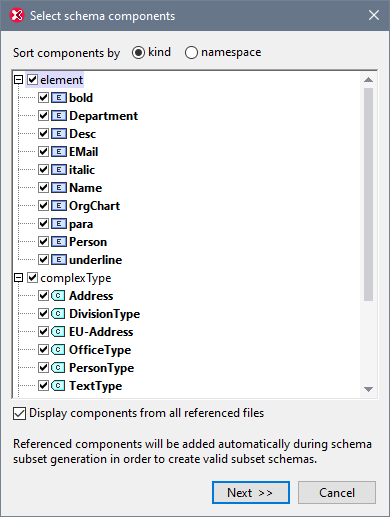
1.With the required XML Schema active in Schema View, select the command Schema Design | Create Schema Subset. This pops up the Select Schema Components dialog (screenshot below).
2.In the dialog, check the component or components you wish to create as a single schema subset, then click Next. (Note that a check box below the pane enables components from all referenced files to also be listed for selection.)

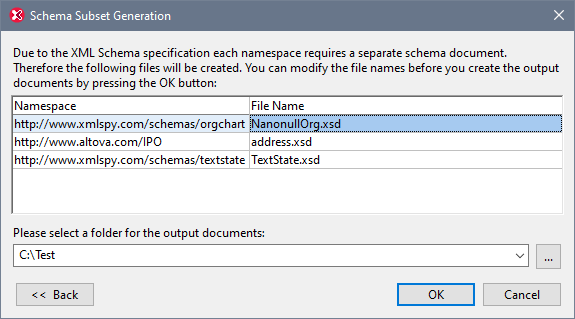
3.In the Schema Subset Generation dialog that now appears (screenshot below), enter the name/s you want the file/s of the schema subset package to have. You must also specify the folder in which the new schema subset files are to be saved. A schema subset package could have multiple files if one or more of the components being created is an imported component in the original schema. A separate schema file is created for each namespace in the schema subset. The filenames displayed in the dialog are, by default, the names of the original files. But since you are not allowed to overwrite the original files, use new filenames if you wish to save the files in the same folder as the original files.

4.On clicking OK, the schema subset file with the namespace corresponding to that of the active file is opened in Schema View. Any other files in the package are created but not opened in Schema View.
Flattening a schema
Flattening the active schema in Schema View is the process of: (i) adding the components of all included schemas as global components of the active schema, and (ii) deleting the included schemas.
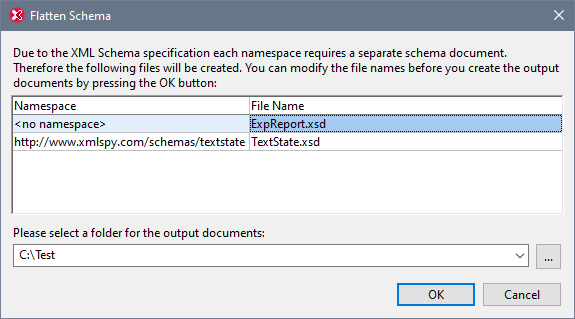
To flatten the active schema, select the command Schema Design | Flatten Schema. This pops up the Flatten Schema dialog (screenshot below), which contains the names of separate files, one for each namespace that will be in the flattened schema. These default names are the same as the original filenames. But since you are not allowed to overwrite the original files, the filenames must be changed if you wish to save in the same folder as the active file. You can browse for a folder in which the flattened schema and its associated files will be saved.

On clicking OK, the flattened schema file will be opened in Schema View.