Overview
You can start FlexText directly from MapForce, when adding text files as mapping components (use the Insert | Text File menu command). You can also start FlexText as a standalone program, by running the Altova MapForce FlexText executable available in the MapForce installation directory.
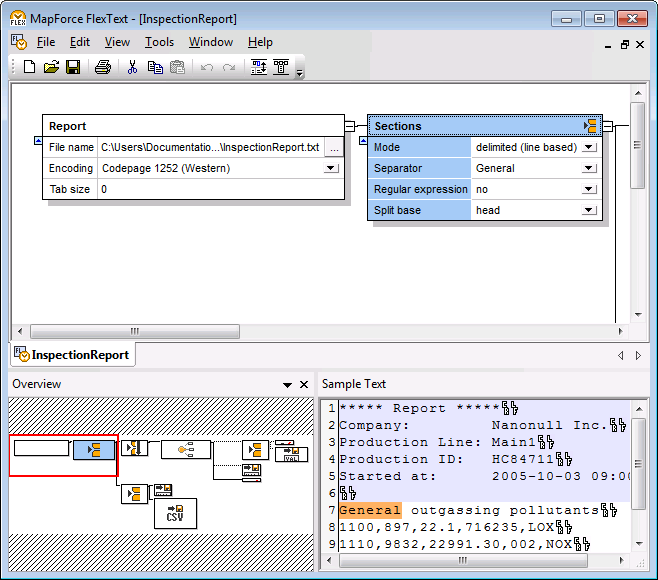
The screen shot below illustrates a sample FlexText template (InspectionReport.mft) which is available, along with several other FlexText samples, in the <Documents>\Altova\MapForce2025\MapForceExamples\ directory.

The FlexText graphical Interface
The FlexText interface consists of the following panes: Design pane, Overview pane and Sample Text pane. As you will see next, the position and appearance of these panes can be customized according to your preferences.
Design pane
The Design pane is the working area where you define the structure of your text, by means of containers. Containers define the rules for handling text data according to criteria you specify. The first container of any FlexText template is the Root container, which represents the entire text file. All other containers essentially define the subsequent text processing logic (typically, splitting text into meaningful units from which you can map data). For example, the Split Once container splits a fragment of text into exactly two fragments. By default, the name of any container describes its function (for example, Repeated Split); however, you can change it if necessary. You typically define as many containers as demanded by the structure of the text file with which you are working.
The FlexText Reference section of this documentation covers containers in more detail. However, to begin with, note the following about containers:
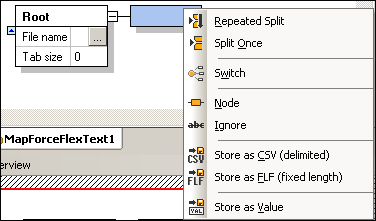
•Clicking the icon in the top-right corner of a container opens a pop-up menu from which you can select the container type.

•Each container has a number of options which dictate what happens to text data at that particular place in the structure. These options determine the content of the container, and enable you to refine it before providing it to the MapForce component.

•To show or hide container contents, click the Expand ![]() or Collapse
or Collapse ![]() icon, respectively.
icon, respectively.
•To collapse containers as a group, press the Shift key. Two chevrons ![]() appear. Clicking the handle collapses the section of the container tree to the right of the one clicked.
appear. Clicking the handle collapses the section of the container tree to the right of the one clicked.
•To preview the text created by a particular container directly in the design pane, enable the Node Text in Design view  toolbar button.
•When the Auto-collapse unselected node text  toolbar button is enabled, the full contents of a container is expanded when you select it. All other containers are collapsed.
Overview pane
The Overview pane gives a bird's-eye view of the Design pane. To navigate the Design pane, click and drag the red rectangle. To detach the Overview pane and reposition it elsewhere in the interface, click its title bar and drag the pane to the desired location.
Sample Text pane
The Sample Text pane displays the contents of the currently selected container. (Note that this pane is not shown if the Node Text in Design view  toolbar button is enabled. Instead, the contents of the currently selected container is shown in the Design pane.)
To help you quickly identify the Tab and Carriage Return/Line Feed characters in the preview text, FlexText displays such characters using the ![]() and
and ![]() symbols, respectively.
symbols, respectively.