Managing XML Schemas
To view, add, or drop XML schemas in a database, DatabaseSpy provides the XML Schema management for databases dialog box. To open this dialog box, do one of the following:
•Click the XML Schema Management ![]() toolbar button.
toolbar button.
•Select the menu command Tools | XML Schema Management for Databases.
•Right-click an XML schema in the Online Browser and choose Manage XML Schemas... from the context menu.
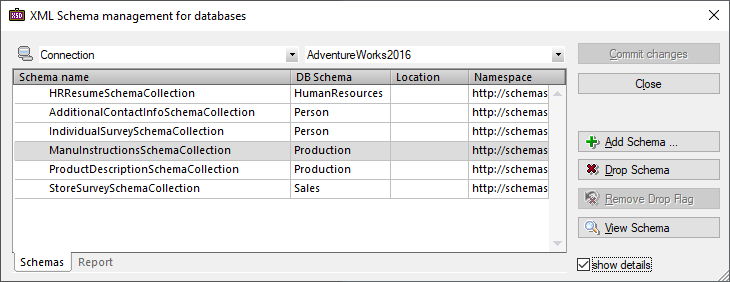
If you are not connected to a data source, the dialog box appears in offline state. To connect to a database, click the Connect to a database ![]() button and follow the wizard steps. On successful connection to a database that supports XML, the list of available XML schemas appears in the dialog box, for example:
button and follow the wizard steps. On successful connection to a database that supports XML, the list of available XML schemas appears in the dialog box, for example:

You can now add schemas, drop schemas, or view a schema in XMLSpy by clicking the corresponding buttons. You can also edit a schema's description (and "Decomposition" property if applicable) directly from the grid.
Note that any changes you make on the dialog box are not immediately committed to the database. Edited objects are marked as new (![]() ), changed (
), changed (![]() ), or deleted (
), or deleted (![]() ) in the grid. You must click Commit changes in order for the changes to become effective. To undo the deletion of a schema while the change is not committed, first select the schema and then click
) in the grid. You must click Commit changes in order for the changes to become effective. To undo the deletion of a schema while the change is not committed, first select the schema and then click ![]() Remove Drop Flag .
Remove Drop Flag .
Commit changes | Sends an SQL transaction to the database to make the changes on the dialog box permanent. This button is disabled if no changes have been made yet. |
Close | Closes the dialog box. If there are uncommitted changes, a message box asks for your confirmation to commit or discard them. |
 Add Schema Add Schema | Opens a dialog box where you can select a new XML schema to be registered with the database. If the schema has references to other schemas, these will be registered as well. |
 Drop Schema Drop Schema | Marks the schema for deletion. The actual deletion occurs only after you click Commit changes. |
 Remove Drop Flag Remove Drop Flag | Undoes the deletion of the schema. This button is enabled only for schemas that have been marked for deletion. |
Opens the XML schema (for viewing) in Altova XMLSpy. Note that any schema changes made from XMLSpy are saved locally and do not affect the database. |
To display additional information about the schema, select the Show details check box. To resize the dialog box, click and drag its lower-right corner outwards.
After you click Commit changes, the outcome of the SQL transaction is reported in the Report tab.
Your database user account must have the relevant database rights in order to add or drop XML schemas; otherwise, the SQL transaction fails with an error. |
All the functions in this dialog box are also available as a context menu when you right-click anywhere in the data grid.