Design Editor
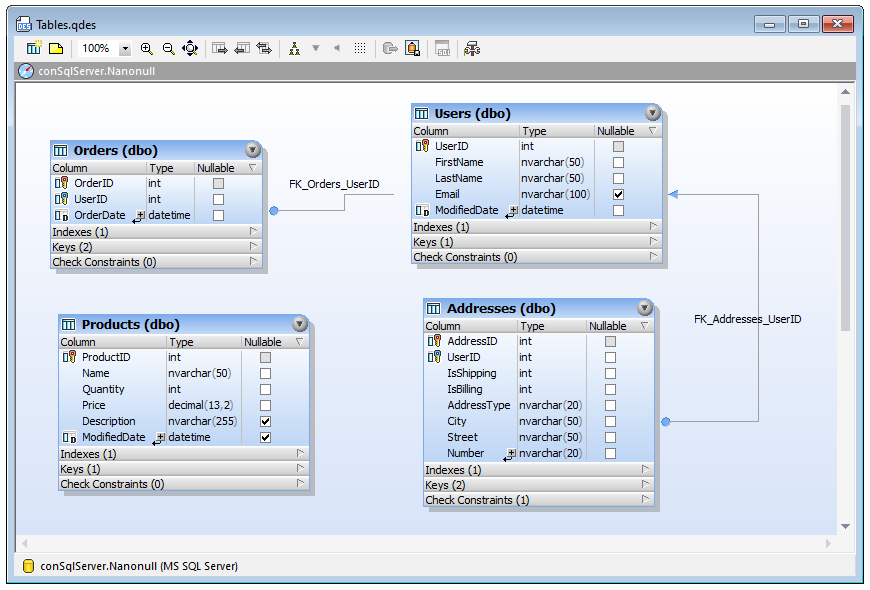
The Design Editor is a graphical user interface where you can view your database objects and their relations as graphical objects. A table including its columns, indexes, keys, and constraints is displayed in a so-called "table design". You can add new tables or edit existing ones or just drag a table into a Design Editor window to see what its structure looks like.

Design Editor
When you add new objects (tables or columns) to Design Editor or change the structure of existing ones, these changes are not immediately effective in the database. Any changes in the database design are recorded in the Database Structure Change Script and can then either be executed or rejected.
When you right-click in an unoccupied area of the Design Editor, several general options are available in the context menu which are listed below. The corresponding Toolbar icons are shown to the left, and keyboard shortcuts to the right of the options if they are available.
Icon | Command | Shortcut | Description |
|---|---|---|---|
 | Create new Table | Ctrl+T | Creates a new table in the currently active Design Editor window and automatically assigns it to the active data source, that is, the data source which is selected in the Online Browser. See also Creating Tables. |
Add Sticky Note | Alt+N | Adds a Sticky Note to the Design Editor window. | |
Select | Select User Tables | Alt+T | Selects all user tables that are contained in the active Design Editor window. | |
Select | Select System Tables | Alt+S | Selects all system tables that are contained in the active Design Editor window. | |
Auto Layout whole Diagram | Shows the design in a hierarchical layout where all relations between the tables are considered and the tables are laid out properly. | ||
 | Save Diagram as Image | Saves the currently active design as Portable Network Graphic (*.png). |
In addition, the toolbar provides the following icons:
Icon | Command | Shortcut | Description |
|---|---|---|---|
Changes the zoom factor of the Design Editor window; enter a value or select a zoom factor from the drop-down list. | |||
Zoom in | Ctrl+Num + | Increases the zoom factor of the Design Editor window by 10 percent. You can also zoom in by scrolling (with the scroll-wheel of the mouse) while keeping the Ctrl key pressed. | |
Zoom Out | Ctrl+Num - | Decreases the zoom factor of the Design Editor window by 10 percent. You can also zoom out by scrolling (with the scroll-wheel of the mouse) while keeping the Ctrl key pressed. | |
Zoom to Fit | Sizes the working area to include all tables in the current Design Editor window. | ||
 | Insert Referenced Tables | Inserts all related tables that are referenced by a constraint of the selected table. | |
Insert Referencing Tables | Inserts all related tables that include a constraint referencing the selected table. | ||
Insert All Related Tables | Inserts both referenced and referencing tables. | ||
 | Expand selected Tables | Expands all tables that are selected in the current Design Editor window. | |
 | Collapse selected Tables | Collapses all tables that are selected in the current Design Editor window. | |
Snap to Grid | Ctrl+G | Shows/hides the grid and toggles the snap-to-grid function on and off. | |
 | Export | Lets you export data from tables, see Exporting Database Data. This command becomes enabled after you select one or more tables in Design Editor. | |
 | Update Change Script | Starts the generation of a change script or updates it after changes occurred to the database structure.
By default, the database structure change script is configured to be generated or updated automatically, so this button is disabled. To enable on demand generation of the database change script, select the On demand check box in Change Script options. | |
 | Show Options | Opens the Design Editor options dialog box where you can customize the settings for the Design Editor. |
For more information about exploring or designing the database structure in Design Editor, see Managing Database Objects.