Searching and Sorting
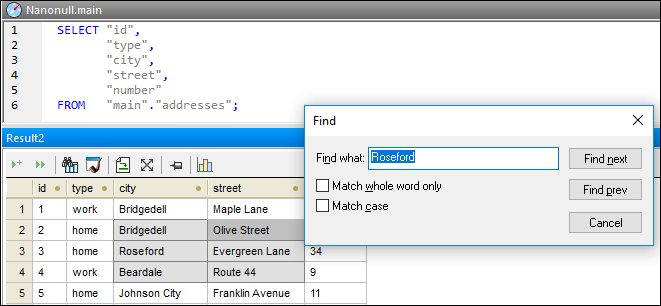
Data that has been retrieved from a database is displayed in DatabaseSpy's Result window. If you are searching for a particular string in your data, you can either create an appropriate SELECT statement using a WHERE clause to retrieve only rows that include that string, or, you can make use of DatabaseSpy's search functionality directly in the Result window. This allows you to search for text in all the columns included in the result of a database query. You can also restrict the search to a particular column, row, or custom selection in the Result window.

You can call the Find dialog box by clicking the Find  button in the Result window toolbar, or by pressing the standard shortcut Ctrl+F when the cursor is in the Result window.
The Find  button is also available when the Result window is in the Editing mode.
To search for text in the Result window:
1.Retrieve data from the table you want to search.
2.Optionally, select the column or row where you would like to search for text. You can also select multiple cells by clicking while holding the Ctrl key pressed—in this case, the search will be restricted only to selected cells.
3.In the Result window, click the Find  button. Alternatively, click into the result grid and select the menu option Edit | Find... or press Ctrl+F.
4.Type the string you are looking for into the Find what field.
5.Optionally, select the Match whole word only check box if you want to restrict your search to entire words that match the search term.
6.Optionally, select the Match case check box if you want to consider the case when searching.
7.Optionally, select the Search in selected cells only check box if you want to restrict the search only to selected cells.
8.Click Find next to start the search. The first occurrence of the search term is highlighted in the result grid.
9.Optionally, click Find next again to jump to the next occurrence of the search term or click Find prev to jump to the previous occurrence of the search term, if available.
10.To quit the search, click Cancel or press Esc.
Sorting results
By default, the data is sorted according to its primary key column in ascending order. You can change the sort order in the result grid using the context menu, or by clicking the sorting arrows in the column headers, provided that this option has been activated in the SQL Editor options.
If sorting symbols are displayed in the column headers, you can click them to toggle the sorting order in the sequence:
1.ascending ![]()
2.descending ![]()
3.default ![]()

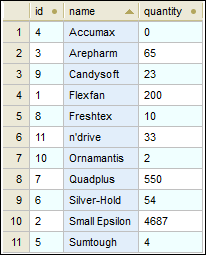
In the example above, data is sorted in ascending order according to the "name" column.
| Note: | Sort icons are not shown if only a partial result was retrieved (for example, if the execution was cancelled while in progress). |
Sorting is case insensitive if the column by which you want to sort stores string values. For example, in the example above, ascending sorting was applied to the column "name", as indicated by the ascending sort  icon. Thanks to case-insensitive sorting, the product "n'drive" occurs between "Freshtex" and "Ornamantis", even though it begins with a lowercase later.
To sort data in the result grid:
Do one of the following:
•Right-click anywhere in the column to be sorted and select either Ascending or Descending from the Sorting sub-menu of the context menu.
•Click the sorting symbol in any of the column headers to sort the data. The data is sorted according to the contents of that column in ascending order. Click the same column again to sort in descending order. A third click restores the default sort order.
To restore the default sort order:
•Right-click anywhere in the table and choose Sorting | Restore default from the context menu.