Query/Mutation Editor
This topic describes the structure of the Query/Mutation Editor in the GraphQL Settings dialog and explains how to work with the editor.
For information about basic concepts associated with GraphQL queries and mutations, see the following pages:
For information about sample queries and mutations, see Examples.
Structure of the editor
The screenshot below shows the Query/Mutation Editor of the GraphQL Settings dialog.
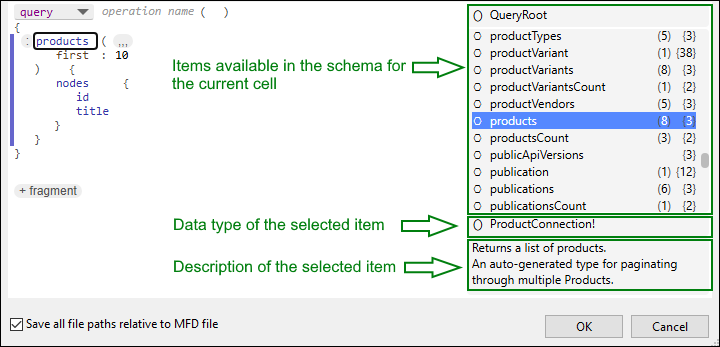
Notice how the editor is organized:
•The left-hand side is used to create a query or a mutation.
•The right-hand side shows the explorer pane that contains three blocks of information: items available in the schema for the current cell, the data type and description of the selected item.
Fields in the explorer pane have numbers in the parentheses and curly braces, for example, products (8) {3}. The number in the parentheses (e.g, (8)) indicates the number of arguments that the field can accept. The number in the curly braces (e.g., {3}) shows how many sub-fields exist for this field.
Basic concepts and aspects
•A cell is a container for a single name, value or button, which is similar to a cell in a spreadsheet.
•A tree node has one main cell, possibly additional data cells, and optionally child nodes. Each instance of fields, arguments, etc. is represented by its own tree node.
•The main cell is usually the name of the current node. However, there are two exceptions: For the operation, the main cell is the operation type; for fragments, the main cell is the fragment keyword.
•There is a navigation mode and a cell-edit mode, similar to a spreadsheet application.
•There is a currently focused cell that indicates the current position in the tree.
•The focused row is the line that contains the focused cell.
•If something can be added, an add button (+) appears in the focused row or on mouse hover. The following items can be added:
o(+) adds an item of the relevant kind for the location of the add button. If the add button is red, at least one item is required at this location. After clicking an add button, a placeholder node appears to allow filling in the cells. If nothing is entered, the placeholder node disappears if you move away from it.
o(,,,) adds an argument.
o($) adds a variable definition to the operation.
o(=) adds a default value to the variable definition.
o(@) adds a directive.
o(:) adds an alias to a field.
o(+ fragment) adds a fragment.
•Error messages are shown directly below the tree nodes where errors are detected.
Switch between a query and a mutation
In the editor, you can define only one GraphQL operation (a query or a mutation) and zero or more fragments. To switch between a query and a mutation, make sure the top cell is focused, then do one of the following:
•Press Enter to open the dropdown list and select the desired operation type.
•Click the top cell to open the dropdown list and select the desired operation type.
•Press q to select a query or m to select a mutation.
Shortcuts and mouse functions
You can navigate the editor, using the mouse or keyboard keys. For details, see below.
Navigation mode
•Use cursor keys, Tab, Shift+Tab, PgUp, PgDn to move around.
•To activate a focused add button, press Enter.
•To switch to the cell-edit mode, press Enter, F2, or start typing.
•If the focus cell is the main cell of a tree node, the whole tree node is considered selected. This is indicated by a colored bar at the left border.
•Use Ctrl+X or Ctrl+C to cut or copy the current selection (the whole tree node or the current cell), respectively, to the clipboard in text format.
•Use Del to delete the current selection (the whole tree node or the current cell).
•Use Ctrl+V to insert the clipboard contents at the current location. This works only if the clipboard contains text that is valid to insert at the current location; otherwise, you get an error message.
•Use Ctrl+Z to undo the last action.
•Use Ctrl+Y to reverse the last Undo action.
•On the operation type or name, "$" adds a variable definition.
•On the name cell of selections, variable definitions, arguments or directives, "," adds a sibling after the current field.
•On the name cell of a field:
o"(" adds an argument,
o"@" adds a directive,
o"{" adds a child selection.
•Use Esc to exit the dialog without saving (there will be a warning if you want to discard your changes) - this action has the same effect as clicking Cancel.
•Use Ctrl+Enter to exit the dialog with saving (same as clicking OK).
•Use Ctrl+Tab or Ctrl+Shift+Tab to move the keyboard focus out of the Graph QL editor.
Cell-edit mode
•You can type and edit values in input fields.
•The explorer pane shows available items that begin with the typed text.
•Use the Cursor up/down keys and PgUp and PgDn to choose an item from the explorer pane. Alternatively, you can use the mouse.
•Use Enter to commit the edited text.
•Use Esc to discard the edited text.
•Use Tab to commit and move to the next cell (Shift+Tab for the previous cell).
•Type "...myfragmentname" to create a fragment spread.
•Type "...on mytype" to create an inline fragment.
•Type "..." to create an inline fragment without a type condition.
•Only on newly inserted selections, variable definitions, or arguments can you type not only the name but a full Graph QL expression that is valid at this location and will be inserted after pressing Enter. For example, typing "myalias:myfield(arg:10)" will create a field with an alias and an argument with a value.
Mouse functions
•Click a cell to activate it.
•Click an add button to activate it.
•Double-click a cell to enter its edit mode.
•Click in the explorer pane to set a selection.
•Double-click in the explorer pane to apply a selection.
Sample query definition shown in GIF
The demo below illustrates how to create a query in the editor of the GraphQL Settings dialog.
