Connecting to Microsoft SQL Server (ODBC)
This example illustrates how to connect to a SQL Server database via ODBC.
Prerequisites
Download and install the Microsoft ODBC Driver for SQL Server from the Microsoft website. This example uses Microsoft ODBC Driver 17 for SQL Server to connect to a SQL Server 2016 database. You might need a different ODBC driver version, depending on your SQL Server version. For information about compatibility, see the driver's system requirements.
Connection
1.Start the database connection wizard and click ODBC Connections.
2.Select User DSN (or System DSN if you have administrative privileges), and then click Create a New DSN  .
.
3.Select the driver from the list. Note that the driver appears in the list only after it has been installed.
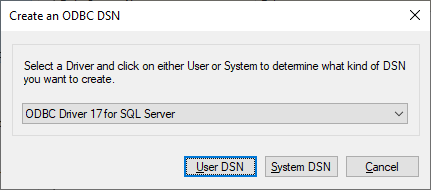
4.Click User DSN (or System DSN if you are creating a System DSN). Creating a System DSN requires that MapForce be run as an administrator. Therefore, in order to create a System DSN, cancel the wizard, make sure that you run MapForce as an administrator, and perform the steps above again.
5.Enter a name for the data source, enter, optionally, a description to identify this connection, and select from the list the SQL Server to which you are connecting. Click Next to go to the next screen.

6.In the next screen, select the authentication method to use. If the database server was configured to allow connections from users authenticated on the Windows domain, select With Integrated Windows authentication. Otherwise, select one of the other options, as applicable. This example uses With SQL Server Authentication, which requires that the user name and password be entered in the relevant boxes. Click Next when done.

7.In the next screen of our example (screenshot below), we have selected Change the default database and entered Sandbox (the name of the database to which to connect). Click Next after you have entered the settings you want.

8.Click Next and, optionally, configure additional parameters for this connection. Click Finish when done.

9.A confirmation dialog box listing the connection details opens. Click OK.
10.The data source now appears in the list of User or System data sources.