External Stylesheets
This section describes how external CSS stylesheets can be managed from within the StyleVision GUI. It consists of the following parts:
•Adding an external CSS stylesheet to the SPS
•Viewing the contents of an external CSS stylesheet and modifying the media applicability
•Switching between the full CSS stylesheet set and a single CSS stylesheet
External CSS stylesheets can be managed from two sidebars: the Style Repository sidebar and the Design Overview sidebar. If an aspect of the external stylesheets is viewable in both sidebars (for example, the relative precedence of multiple stylesheets), then changes made in one sidebar will automatically be reflected in the other.
Adding an external CSS stylesheet to the SPS
To assign an external CSS stylesheet to the SPS, do the following:
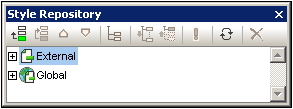
1.In Design View, select the External item in the Style Repository window (screenshot below).

| 2. | Click the Add button at the top left of the Style Repository toolbar (see screenshot above). |
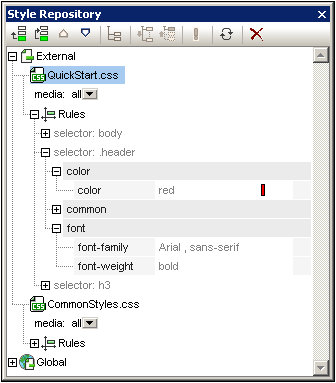
| 3. | In the Open dialog that pops up, browse for and select the required CSS file, then click Open. The CSS file is added to the External item as part of its tree structure (see tree listing and screenshot below). |
| 4. | To add an additional external CSS stylesheet, repeat steps 1 to 3. The new CSS stylesheet will be added to the External tree, below all previously added external CSS stylesheets. |
| Note: | You can also add an external CSS stylesheet via the Design Overview sidebar. |
Viewing and modifying the tree of external CSS stylesheets
The tree of external CSS stylesheets is structured as follows (also see screenshot below):
- CSS-1.css (File location appears on mouseover)
- Media (can be defined in Style Repository window)
- Rules (non-editable; must be edited in CSS file)
- Selector-1
- Property-1
- ...
- Property-N
- ...
- Selector-N
+ ...
+ CSS-N.css
The media to which that particular stylesheet is applicable can be edited in the Style Repository window. Do this by clicking the down arrow to the right of the item and selecting the required media from the dropdown list. The rules defined in the external CSS stylesheet are displayed in the Style Repository window, but cannot be edited. The Stylesheet, Rules, and individual Selector items in the tree can be expanded and collapsed by clicking the + and - symbols to the left of each item (see screenshot below).
To delete an external stylesheet, select the stylesheet and click the Reset button in the Style Repository toolbar.

Changing the precedence of the external CSS stylesheets
The external CSS stylesheets that are assigned in the Style Repository window will be imported into the HTML output file using the @import instruction. In the HTML file, this would look something like this:
<html>
<head>
<style>
<!--
@import url("ExternalCSS-1.css");
@import url("ExternalCSS-2.css")screen;
@import url("ExternalCSS-3.css")print;
-->
</style>
</head>
<body/>
</html>
The order in which the files are listed in the HTML file corresponds to the order in which they are listed in the External tree of the Style Repository and in the CSS Files tree of the Design Overview sidebar. To change the order of the CSS stylesheets in the Style Repository, select the stylesheet for which the precedence has to be changed. Then use the Move Up  or Move Down
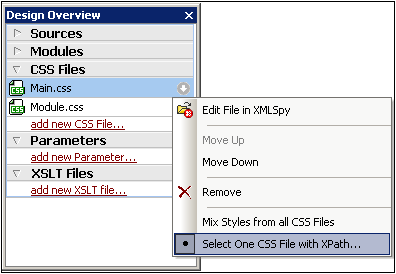
  buttons in the Style Repository toolbar to reposition that stylesheet relative to the other stylesheets in the tree. In the Design Overview sidebar, click the Edit button of a CSS stylesheet and select the Move Up or Move Down command as required.
Important: Note that it is the lowermost stylesheet that has the highest import precedence, and that the import precedence decreases with each stylesheet higher in the listing order. The order of import precedence in the listing shown above is: (i) ExternalCSS-3.css; (ii) ExternalCSS-2.css; (iii) ExternalCSS-1.css. When two CSS rules, each in a different stylesheet, use the same selector, the rule in the stylesheet with the higher import precedence applies.
Switching between all CSS files and a single CSS file
You can choose to either: (i) let rules in all CSS files apply with the cascading rules determining precedence, or (ii) let rules in a single selected CSS file apply. You can select the option you want in the Design Overview sidebar (see screenshot below). Click the Edit button of any of the listed CSS files and select either the Mix Styles command or Select One command. This option is also available in the Style Repository (on any of the external stylesheets).

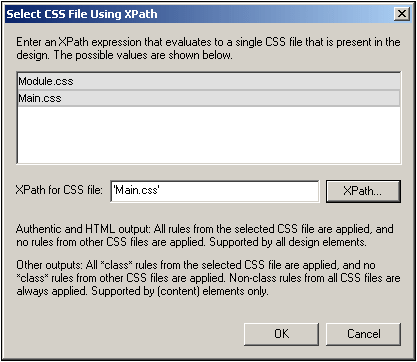
If you click the Select One CSS File with XPath command, a dialog pops up in which you can enter the XPath expression (screenshot below). The XPath expression must evaluate to the name of one of the CSS files in the SPS, exactly as these names are listed in the top pane of the dialog. If you enter the filename as a string, note that, like all strings in XPath expressions, the string must be entered within single quotes.

Note the following:
•When a single CSS file is selected: In the Authentic and HTML outputs, all rules from the selected CSS file are applied and these rules are supported on all design components. In the RTF, PDF, and Word 2007+ outputs, only class selector rules from the selected CSS file are applied. Non-class rules are applied from all CSS files, with conflicts being resolved on the basis of the priority of the CSS file. In the RTF, PDF, and Word 2007+ outputs, these rules can be applied to the following design components: Auto-Calculations, the (contents) placeholder, paragraph (block) components, and table cells.
•When styles are mixed from all CSS files: In the Authentic and HTML outputs, all rules from all the CSS file are applied and are supported on all design components. Conflicts are resolved on the basis of the priority of the CSS file. In the RTF, PDF, and Word 2007+ outputs, only non-class selector rules are applied, with conflicts being resolved on the basis of priority.