Validate YAML Documents
XMLSpy contains a YAML validation engine that can be invoked to do the following:
•If a JSON schema in YAML format is the active document: Validates the JSON schema against the referenced JSON Schema specification; the schema version is indicated by the $schema keyword; the validation can be carried out in any of the three views (Text, Grid, or YAML Schema).
•If a YAML instance is the active document: Validates the YAML instance against a JSON schema (in JSON or YAML format). The schema is assigned to the YAML instance as described below. JSON instance validation can be carried out in Text View and Grid View.
Assign a JSON schema to a YAML instance
YAML instance documents can be validated against a JSON schema. The JSON schema can be in JSON format or YAML format.
To set the JSON schema against which you want to validate a JSON/YAML document, do the following:
1.Make the JSON/YAML document the active document.
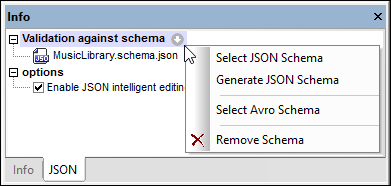
2.In the JSON tab of the Info window (screenshot below), click the arrow icon next to Validation against schema, and, in the menu that appears, click Select JSON Schema. (Note that Avro support is available in XMLSpy Enterprise Edition only.) For validating YAML documents, you can select a JSON schema that is written in either JSON format or YAML format, but not an Avro schema.

Note that the JSON schema assignment is not written into the JSON or YAML document, but entered in the Info window (see screenshot above) and used for validation in XMLSpy.
To remove the assignment, select the command Remove Schema from the same menu (see screenshot above).
Note: If the JSON or YAML file is part of an XMLSpy project, then the JSON schema for validation can also be assigned via the Project Properties dialog (use the Validate With option in this dialog). If you then validate a project folder, all the JSON and YAML files in the project folder will be validated against the JSON schema. If you wish to run JSON and YAML validations separately, then we recommend that you put each document type in a separate project subfolder.
For information about generating a JSON schema from the YAML instance, see the section Generating JSON Schema from a JSON/YAML Instance.
Validate instance and schema documents
Select the command XML | Validate XML (F8) or click the Validate (F8) icon  in the toolbar to validate the active YAML instance or JSON schema. If an instance document is being validated, a schema document must be assigned to the instance (see above). Validation results are displayed in the Messages window. Errors are also flagged in the line-numbering margin.
Note: The validation error indicators and smart fixes described above are refreshed only when the XML | Validate (F8) command is executed; they are not updated in the background. So, after correcting an error, you must run the Validate (F8) command again to make sure that the error has indeed been fixed.
To go to the schema document from the instance document, double-click the schema in the Info window (see screenshot above), or select the command DTD/Schema | Go to Schema. To go directly to the schema definition of a JSON/YAML keyword or object, select the keyword or object in the instance document and select DTD/Schema | Go to Definition.
You can also validate a project folder containing JSON files by using the Validate command.
Validate on modification
The Validate on Edit mode is toggled on by default. When toggled on, well-formed checks and validation checks are carried out as you modify a document in Text View or Grid View. For validation of a JSON/YAML document to be carried out (additional to well-formed checks), a JSON schema must be assigned to the JSON document. Errors are shown by displaying erroneous text in red and flagging the location with a red exclamation mark. See Validating JSON Documents and Validating YAML Documents for more information.
The Validate on Edit mode can be toggled on/off either (i) via the XML | Validate on Edit menu command, (ii) the Validate on Edit toolbar button, or (iii) via the On Edit option of the Validation settings of the Options dialog.