Filters
Filters in XML documents
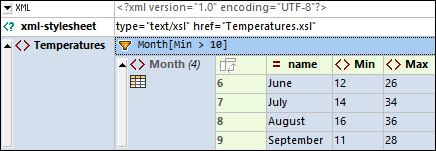
A filter in XML Grid View can be applied to an element node and enables you to filter the descendants of that node. Wherever a filter can be applied, a grayed out filter icon is displayed. Once a filter has been defined, this icon is shown in color (see screenshot below). A filter is defined with an XQuery 3.1 expression. For example, in the screenshot below, a filter has been set on the Temperatures node to display only those Month child elements that have a Min child element with a value that is greater than 10. (Note that in the screenshot the index number of the respective Month element instance is listed.)

To set up a filter, right-click the element you want to filter, select Filter from the context menu that appears, enter the XQuery expression, and click Enter. The Filter cell is indicated by the icon  (see screenshot above). You can activate/deactivate the filter by clicking the Filter icon.
<?xml version="1.0" encoding="UTF-8"?> <Temperatures> <Month name="January"> <Min>-5</Min> <Max>3</Max> </Month> <Month name="February"> <Min>-16</Min> <Max>1</Max> </Month> <Month name="March"> <Min>-9</Min> <Max>7</Max> </Month> <Month name="April"> <Min>2</Min> <Max>16</Max> </Month> <Month name="May"> <Min>8</Min> <Max>21</Max> </Month> <Month name="June"> <Min>12</Min> <Max>26</Max> </Month> <Month name="July"> <Min>14</Min> <Max>34</Max> </Month> <Month name="August"> <Min>16</Min> <Max>36</Max> </Month> <Month name="September"> <Min>11</Min> <Max>28</Max> </Month> <Month name="October"> <Min>10</Min> <Max>26</Max> </Month> <Month name="November"> <Min>-1</Min> <Max>14</Max> </Month> <Month name="December"> <Min>-3</Min> <Max>9</Max> </Month> </Temperatures>
|
Note the following points about filters:
•Filters can be applied only to element nodes.
•The context node of the filter's XQuery expression is the current node. In the screenshot above, for example, the context node is the Temperatures node.
•Filters can be nested. A nested filter will be applied to the filtered content of the parent filter.
•Each filter is executed independently and is not affected by formulas or other filters (unless it is a nested filter).
•To add a new line in an expression, press Ctrl+Enter. This is useful if you want to display an expression over several lines for better readability.
•The filtered content is a visual display only. The actual content remains unchanged.
•After a filter has been created, it can be deactivated/reactivated via the node's context menu Filter command.
•Filters are not stored in the XML, JSON, or YAML document, but are kept in a special application metadata file located in your (My) Documents folder: Altova\XMLSpyCommon\json-metadata.json. Filters will be automatically applied from this file when the document is re-opened in Grid View. You can pass the metadata file to other XMLSpy users so that they can use the same filters.
Filters in JSON/YAML documents
Filters enable you to filter the display of objects and arrays. For example, in the screenshot below, a filter (which is an XQuery 3.1 expression) has been applied to an array so that only those tracks written by Brian May are displayed. In JSON terms, only those object children of Tracks are displayed that have a Writer property containing the string value Brian May. The filter's XQuery expression looks up all child objects of Tracks and selects those for which a lookup of the Writer property matches the string 'Brian May'.

Each filter is executed independently and is not affected by other filters or formulas in the document.
For information about constructing XQuery expressions for JSON/YAML documents, see the section XQuery Expressions for JSON.
Note: When entering expressions for filters and formulas in Grid View, you might want to display an expression over several lines for better readability. To add a new line in the expression, press Ctrl+Enter.
Note: Since a filter is based on XQuery, it will not work in YAML documents that are not JSON-like. So, if, for example, you use anchors or aliases in your YAML document, then the calculation of a filter will result in an XQuery error message.
Set up a filter
To set up a filter, right-click the element you want to filter, select Filter from the context menu that appears, enter the XQuery expression, and click Enter. The Filter cell is indicated by the icon  (see screenshot above). You can activate/deactivate the filter by clicking the Filter icon.
Note the following points about filters:
•Filters can be applied only to objects and arrays.
•The context node of the filter's XQuery expression is the current node. In the screenshot above, for example, the context node of the filter's XQuery expression is the Tracks node.
•Filters can be nested. A nested filter will be applied to the filtered content of the parent filter.
•Each filter is executed independently and is not affected by formulas or other filters (unless it is a nested filter).
•To add a new line in an expression, press Ctrl+Enter. This is useful if you want to display an expression over several lines for better readability.
•The filtered content is a visual display only. The actual content remains unchanged.
•After a filter has been created, it can be deactivated/reactivated via the node's context menu Filter command.
•Filters are not stored in the XML, JSON, or YAML document, but are kept in a special application metadata file located in your (My) Documents folder: Altova\XMLSpyCommon\json-metadata.json. Filters will be automatically applied from this file when the document is re-opened in Grid View. You can pass the metadata file to other XMLSpy users so that they can use the same filters.
