New
This section:
•Assigning a DTD or XML Schema to a new XML document
•Specifying the root element of a new XML document
•Assigning an SPS to a new XML document
Icon and shortcut
Icon: | |
Shortcut: | Ctrl+N |
Description
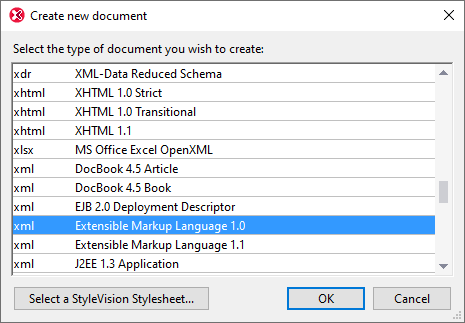
The New command is used to create a new document. Clicking New opens the Create New Document dialog (screenshot below), in which you can select the type of document you wish to create (from among 80+ types by file extension). If the document type you wish to create is not listed in the dialog, select XML and change the file extension when you save the file. Note that you can add new document types to this dialog list using the Tools | Options | File Types section.

Templates for new documents
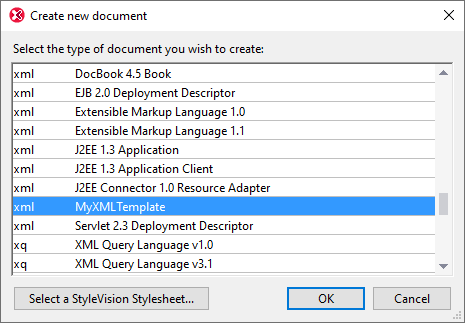
The document-type list of the Create New Document dialog can also contain entries for user-defined document templates of any document type. These templates can be opened directly from the Create New Document dialog and edited. To create your own document template so that it appears in the list of document types in the Create New Document dialog, first create the template document and then save it to document templates folder: the Template folder of the application folder.
Create a document template as follows:
1.Open the Template folder of the application folder using Windows Explorer or your preferred navigation tool, and select a rudimentary template file from among the files named new.xxx (where .xxx is a file extension, such as .xml or .xslt).
2.Open the file in XMLSpy, and modify the file as required. This file will be the template file.
3.After you have finished, select File | Save as to save the file back to the Template folder with a suitable name, say MyXMLTemplate.xml. You now have a document template called MyXMLTemplate, which will appear in the list of document types in the Create New Document dialog.

4.To open the template, select File | New, and then the template (my-xml, in this case).
To delete a document template from the list of document types, delete (or move) the template file from the template folder.
Assigning a DTD or XML Schema to a new XML document
When you create a new document of a certain type (say .xsd), then the new document will be created with the necessary schema assignments (DTD or XML Schema)—if these have been defined in the document type's specification. For example, an XHTML 1.0 Strict document will be assigned the DTD http://www.w3.org/TR/xhtml1/DTD/xhtml1-strict.dtd since this is the assignment defined in the XHTML specification for XHTML 1.0 Strict documents.
However, not every document type is associated with a specific schema—or can be associated with a schema at all. For example, a text file does not have a schema association. And an XML file can be assigned any schema by which it should be valid. If you are creating a new document for which the schema may be freely chosen (for example, a new XML document), then you are prompted to assign a schema (DTD or XML Schema) to the new document (screenshot below). This assignment will be written into the document and the chosen schema will be used from this point onwards for validating the document. Subsequently, you can use the menu command DTD/Schema | Assign DTD or DTD/Schema | Assign Schema to change the assigned schema.

The following options are available:
•Assign Schema/DTD File: Browse for the XML Schema or DTD file you want to assign. Note that you can make the assignment in the document a relative or absolute path.
•Assign Packaged Schema: Some schemas are each actually a package of schema files rather than a single schema file. The Assign Packaged Schema option opens a dialog that lists the schema packages supported by Altova's Schema Manager. In this dialog, schemas listed in black have already been installed on your machine, those in blue have not been installed and can be installed by Schema Manager. When you select a schema package or one of its schema entry points and click OK, the following happens: The schema package will be installed if it has not already been installed. The selected schema package (previously installed or newly installed) will be assigned to the document and will be used from this point onwards for document validation.
•Cancel: If a new file is being created, then it is created with no XML Schema or DTD assignment. If the schema assignment is for an already existing document, then the dialog is exited.
Specifying the root element of a new XML document
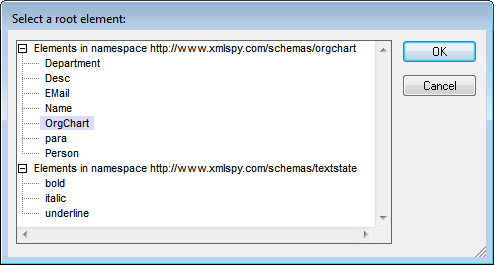
If an XML Schema is selected as the associated schema of an XML document and if this schema has more than one global element, each of these is a potential root element. In this case, the Select a Root Element dialog (screenshot below) pops up, in which you can select which global element is to be the root element of the XML document. In the screenshot below, the OrgChart global element is selected.

Clicking OK now will create a new XML document with this element (OrgChart) as its root element.
Assigning an SPS to a new XML document
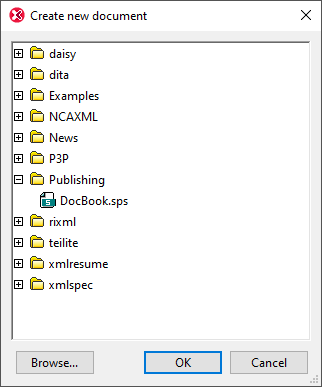
When a new XML document is created, you can associate a StyleVision Power Stylesheet (.sps file) to view the document in Authentic View. In the Create New Document dialog (see first screenshot in this section), when you click the Select StyleVision Stylesheet, the Create New Document dialog (shown below) appears.

You can browse for the required SPS in the folder tabs, or you can click the Browse button to navigate for and select the SPS.