Images: URIs and Inline Data
Images can be inserted at any location in the design document. These images will be displayed in Authentic View and the output documents; in Design View, inserted images are indicated with thumbnails or placeholders.
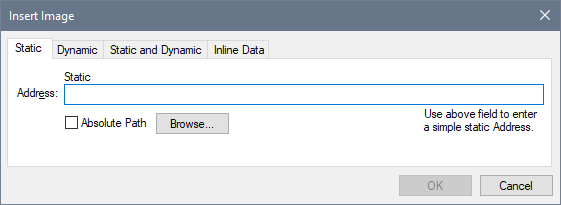
To insert an image, click the Insert | Image menu command, which pops up the Insert Image dialog (screenshot below).

Images can be accessed in two ways:
•The image is a file, which is accessed by entering its URI in the Insert Image dialog.
•The image is encoded as Base-16 or Base-64 text in an XML file.
Inserting an image file
An image file is inserted in the design by specifying its URI. This file is accessed at runtime and placed in the document. There are three ways in which the URI of the image can be entered in the Insert Image dialog (screenshot above):
•In the Static tab, the URI is entered directly as an absolute or relative URI. For example, nanonull.gif (relative URI; see section below), and C:/images/nanonull.gif (absolute URI).
•In the Dynamic tab, as an XPath expression that selects a node containing either (i) a URI (absolute or relative), or (ii) an unparsed entity name. For example, the entry image/@location would select the location attribute of the image element that is the child of the context node (that is, the node within which the image is inserted). The location node in the XML document would contain the image URI. How to use unparsed entities is described in the section Unparsed Entity URIs.
•In the Static and Dynamic tab, an XPath expression in the Dynamic part can be prefixed and/or suffixed with static entries (text). For example, the static prefix could be C:/XYZCompany/Personnel/Photos/; the dynamic part could be concat(First, Last); and the static suffix could be .png. This would result in an absolute URI something like: C:/XYZCompany/Personnel/Photos/JohnDoe.png.
Inserting an image that is encoded text
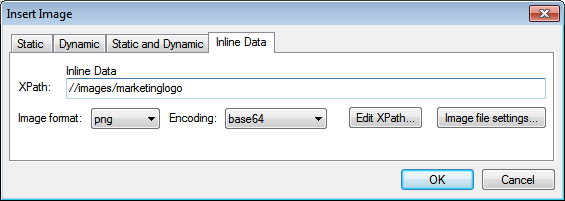
An image can be stored in an XML file as Base-16 or Base-64 encoded text. The advantage of this is that the image does not have to be accessed from a separate file (linked to it), but is present as text in the source XML file. To insert an image that is available as encoded text in the XML source, use the Inline Data tab of the Insert Image dialog (see screenshot below).

Use an XPath expression to locate the node in the XML document that contains the encoded text of the image. Select an option from the Image Format combo box to indicate in what format the image file must be generated. (An image file is generated from the encoded text data, and this file is then used in the output document.) In the Encoding combo box, select the encoding that has been used in the source XML. This enables StyleVision to correctly read the encoded text (by using the encoding format you specify).
The Image File Settings dialog (accessed by clicking the Image File Settings button) enables you to give a name for the image file that will be created. You can choose not to provide a name, in which case StyleVision will, by default, generate a name.
If you wish to embed an inline image in HTML output, select the Image Embedding with Data URI Scheme option in the Properties dialog of the SPS.
Accessing the image for output
The image is accessed in different ways and at different times in the processes that produce the different output documents. The following points should be noted:
•Note the output formats available for your edition: (i) HTML in Basic Editiion; (ii) HTML and RTF in Professional; (iii) HTML, RTF, PDF, and Word 2007+ in Enterprise Edition.
•For Design View and Authentic View in StyleVision, as well as for Authentic View in Altova products, you can set, in the Properties dialog, whether relative paths to images should be relative to the SPS or to the XML file.
•For HTML output, the URI of the image is passed to the HTML file and the image is accessed by the browser. So, if the path to the image is relative, it must be relative to the location of the HTML file. For the HTML Preview in StyleVision, a temporary HTML file is created in the same folder as the SPS file, so, for rendition in HTML Preview, relative paths must be relative to this location.
•For RTF output, the URI of the image is passed as an object link to the RTF file and is accessed by the RTF application (typically MS Word) when the file is opened. If the URI is relative, it must be relative to the location of the RTF file. For the RTF Preview in StyleVision, a temporary RTF file is created in the same folder as the SPS file, so, for rendition in RTF Preview, relative paths must be relative to this location.
•For PDF output, the URI is passed to the FO document and the image is accessed when the FO document is processed with the FO processor. This means that, if the URI is relative, it must be relative to the FO document at the time the FO document is processed. For the PDF Preview in StyleVision, a temporary FO file is created in the same folder as the SPS file, so, for rendition in PDF Preview, relative paths must be relative to this location.
•Whether the URI is relative or absolute, the image must be physically accessible to the process that renders it.
Editing image properties
To edit an image, right-click the image placeholder in Design View, and select Edit URL from the context menu. This pops up the Edit Image dialog, which is the same as the Insert Image dialog (screenshot above) and in which you can make the required modifications. The Edit Image dialog can also be accessed via the URL property of the image group of properties in the Properties window. The image group of properties also includes the alt property, which specifies alternative text for the image.
Deleting images
To delete an image, select the image and press the Delete key.