Getting Access to Node Names
When a node in an XML component (or a field in a CSV/FLF component) has children nodes, you can get both the name and value of each child node directly on the mapping. This technique is called "dynamic node names". "Dynamic" refers to the fact that processing takes place "on the fly", during mapping runtime, and not based on the static schema information which is known before the mapping runs. This topic provides details on how to enable dynamic access to node names and what you can do with it.
When you read data from a source, "dynamic node names" means that you can do the following:
•Get a list of all children nodes (or attributes) of a node, as a sequence. In MapForce, "sequence" is a list of zero or more items which you can connect to a target and create as many items in the target as there are items in the source. So, for example, if a node has five attributes in the source, you could create five new elements in the target, each corresponding to an attribute.
•Read not only the children node values (as a standard mapping does), but also their names.
When you write data to a target, "dynamic node names" means that you can do the following:
•Create new nodes using names supplied by the mapping (so-called "dynamic" names), as opposed to names supplied by the component settings (so-called "static" names).
To illustrate dynamic node names, this topic makes use of the following XML schema: <Documents>\Altova\MapForce2023\MapForceExamples\Tutorial\Products.xsd. This schema is accompanied by a sample instance document, Products.xml. To add both the schema and the instance file to the mapping area, select the Insert | XML Schema/File menu command and browse for <Documents>\Altova\MapForce2023\MapForceExamples\Tutorial\Products.xml. When prompted to select a root element, choose products.
To enable dynamic node names for the product node, right-click it and select one of the following context menu commands:
•Show Attributes with Dynamic Name, if you want to get access to the node's attributes
•Show Child Elements with Dynamic Name, if you want to get access to the node's child elements
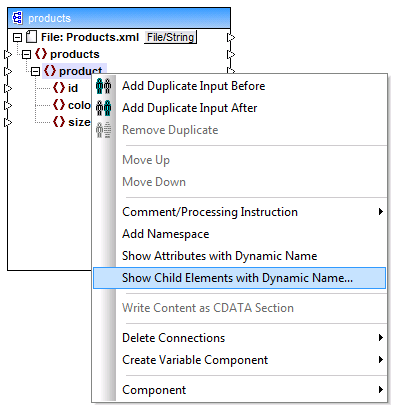
Fig. 1 Enabling dynamic node names (for child elements)
| Note: | The commands above are available only for nodes that have children nodes. Also, the commands are not available for root nodes. |
When you switch a node into dynamic mode, a dialog box such as the one below appears. For the purpose of this topic, set the options as shown below; these options are further discussed in Accessing Nodes of Specific Type.
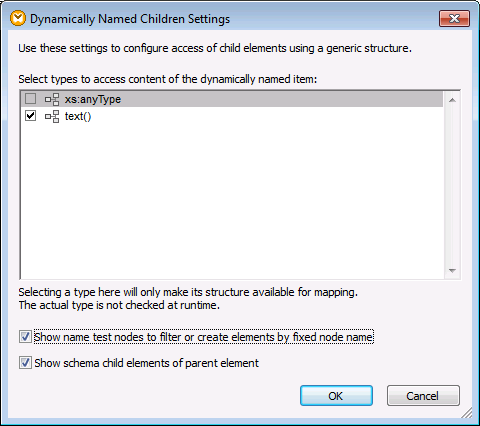
Fig. 2 "Dynamically Named Children Settings" dialog box
Fig. 3 illustrates how the component looks when dynamic node names are enabled for the product node. Notice how the appearance of the component has now significantly changed.
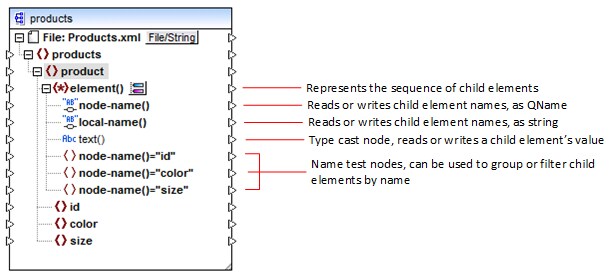
Fig.3 Enabled dynamic node names (for elements)
To switch the component back to standard mode, right-click the product node, and disable the option Show Child Elements with Dynamic Name from the context menu.
The image below shows how the same component looks when dynamic access to attributes of a node is enabled. The component was obtained by right-clicking the product element, and selecting Show Attributes with Dynamic Name from the context menu.
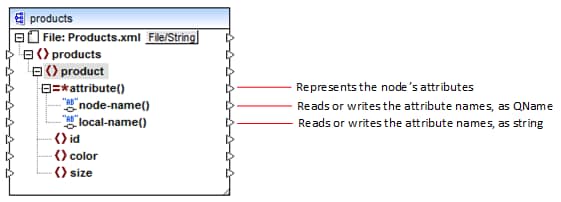
Fig. 4 Enabled dynamic node names (for attributes)
To switch the component back to standard mode, right-click the product node, and disable the option Show Attributes with Dynamic Name from the context menu.
As illustrated in Fig. 3 and Fig. 4, the component changes appearance when any node (in this case, product) is switched into "dynamic node name" mode. The new appearance opens possibilities for the following actions:
•Read or write a list of all children elements or attributes of a node. These are provided by the element() or attribute() item, respectively.
•Read or write the name of each child element or attribute. The name is provided by the node-name() and local-name() items.
•In case of elements, read or write the value of each child element, as specific data type. This value is provided by the type cast node (in this case, the text() item). Note that only elements can have type cast nodes. Attributes are treated always as "string" type.
•Group or filter child elements by name. For an example, see Example: Group and Filter Nodes by Name.
The node types that you can work with in "dynamic node name" mode are described below.
element()
This node has different behaviour in a source component compared to a target component. In a source component, it supplies the child elements of the node, as a sequence. In Fig.3, element() provides a list (sequence) of all children elements of product. For example, the sequence created from the following XML would contain three items (since there are three child elements of product):
<product> <id>1</id> <color>red</color> <size>10</size> </product> |
Note that the actual name and type of each item in the sequence is provided by the node-name() node and the type cast node, respectively (discussed below). To understand this, imagine that you need to transform data from a source XML into a target XML as follows:
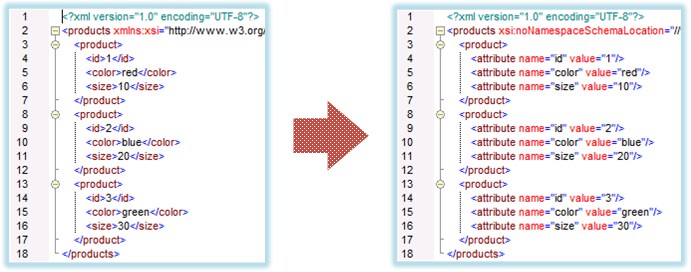
Fig. 6 Mapping XML element names to attribute values (requirement)
The mapping which would achieve this goal looks as follows:
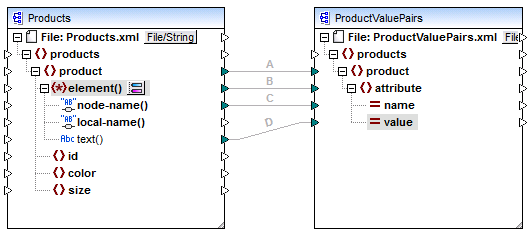
Fig. 7 Mapping XML element names to attribute values (in MapForce)
The role of element() here is to supply the sequence of child elements of product, while node-name() and text() supply the actual name and value of each item in the sequence. This mapping is accompanied by a tutorial sample and is discussed in more detail in Example: Map Element Names to Attribute Values.
In a target component, element() does not create anything by itself, which is an exception to the basic rule of mapping "for each item in the source, create one target item". The actual elements are created by the type cast nodes (using the value of node-name()) and by name test nodes (using their own name).
attribute()
As shown in Fig. 4, this item enables access to all attributes of the node, at mapping runtime. In a source component, it supplies the attributes of the connected source node, as a sequence. For example, in the following XML, the sequence would contain two items (since product has two attributes):
<product id="1" color="red" /> |
Note that the attribute() node supplies only the value of each attribute in the sequence, always as string type. The name of each attribute is supplied by the node-name() node.
In a target component, this node processes a connected sequence and creates an attribute value for each item in the sequence. The attribute name is supplied by the node-name(). For example, imagine that you need to transform data from a source XML into a target XML as follows:
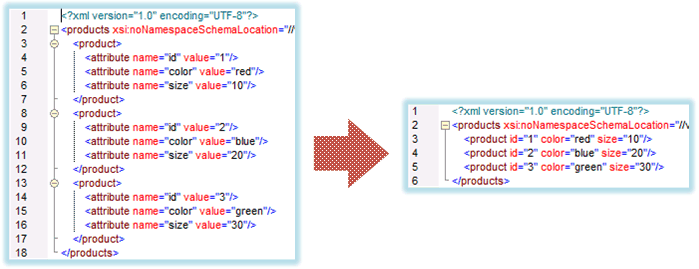
Fig. 8 Mapping attribute values to attribute names (requirement)
The mapping which would achieve this goal looks as follows:
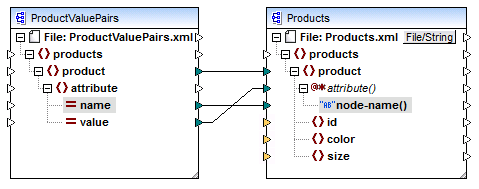
Fig. 9 Mapping attribute values to attribute names (in MapForce)
| Note: | This transformation is also possible without enabling dynamic access to a node's attributes. Here it just illustrates how attribute() works in a target component. |
If you want to reconstruct this mapping, it uses the same XML components as the ConvertProducts.mfd mapping available in the <Documents>\Altova\MapForce2023\MapForceExamples\Tutorial\ folder. The only difference is that the target has now become the source, and the source has become the target. As input data for the source component, you will need an XML instance that actually contains attribute values, for example:
<?xml version="1.0" encoding="UTF-8"?> |
Note that, in the code listing above, the namespace and schema declaration have been omitted, for simplicity.
node-name()
In a source component, node-name() supplies the name of each child element of element(), or the name of each attribute of attribute(), respectively. By default, the supplied name is of type xs:QName. To get the name as string, use the local-name() node (see Fig. 3), or use the function QName-as-string.
In a target component, node-name() writes the name of each element or attribute contained in element() or attribute().
local-name()
This node works in the same way as node-name(), with the difference that the type is xs:string instead of xs:QName.
Type cast node
In a source component, the type cast node supplies the value of each child element contained in element(). The name and structure of this node depends on the type selected from the "Dynamically Named Children Settings" dialog box (Fig. 2).
To change the type of the node, click the Change Selection (  ) button and select a type from the list of available types, including a schema wildcard (xs:any). For more information, see Accessing nodes of specific type.
In a target component, the type cast node writes the value of each child element contained in element(), as specific data type. Again, the desired data type can be selected by clicking the Change Selection (  ) button.
Name test nodes
In a source component, name test nodes provide a way to group or filter child elements from a source instance by name. You may need to filter child elements by name in order to ensure that the mapping accesses the instance data using the correct type (see Accessing Nodes of Specific Type). For an example, see Example: Group and Filter Nodes by Name.
In general, the name test nodes work almost like normal element nodes for reading and writing values and subtree structures. However, because the mapping semantics is different when dynamic access is enabled, there are some limitations. For example, you cannot concatenate the value of two name test nodes.
On the target side, name test nodes create as many elements in the output as there are items in the connected source sequence. Their name overrides the value mapped to node-name().
If necessary, you can hide the name test nodes from the component. To do this, click the Change Selection (  ) button next to the element() node. Then, in the "Dynamically Named Children Settings" dialog box (Fig. 2), clear the Show name test nodes... check box.