Configure AS2 Certificates
Digital certificates provide security at various levels in the AS2 message exchange process. In the context of AS2 communications, certificates may be used for (but are not limited to) the following purposes:
•AS2 message encryption
•AS2 message signing
•AS2 signature verification
FlowForce Server has a certificate store that is independent from the certificate store of the operating system where FlowForce Server runs. In FlowForce Server, certificates are stored in containers (and thus benefit from the same user access mechanism as other objects across FlowForce, see How Permissions Work). All the private or public certificates that you need for AS2 process must be imported into FlowForce Server (you can decide what the target containers should be and which users should be able to access them).
For AS2 message encryption and signature verification, the configuration steps are as follows:
1.Obtain from your trading partner the public certificate used for encryption or signature verification. This will often be the same certificate.
2.Import the certificate into the FlowForce Server certificate store, as shown below. You will need to refer to this certificate when creating the partner details in FlowForce (see Configuring AS2 Partners).
For AS2 message decryption and signing, the configuration steps are as follows:
1.Create your organization's public certificate, and the private key (in a program external to FlowForce Server). If your organization's certificate for signing already exists in the certificate store of the operating system, then export it to a file (the file must contain both the public certificate and the private key). For instructions on how to do this on Windows, see https://technet.microsoft.com/en-us/library/cc754329(v=ws.11).aspx. For Linux, the certificate files must be copied from the directory which acts as certificate store, for example /etc/ssl/private or /etc/ssl/certs on Ubuntu. For macOS, see https://support.apple.com/kb/PH20122?locale=en_US.
2.Send the public certificate (without the private key) to the partner. The private key must not be shared with anyone outside of your organization.
3.Import the certificate (with the private key) into the FlowForce Server certificate store, as shown below.
If the partner will send signed MDNs, then the partner's public certificate (required to verify the MDN signature) must also be imported into FlowForce. Again, you will need to refer to this certificate when creating the partner object, see Configuring AS2 Partners.
To import a certificate into FlowForce Server:
1.Log on to FlowForce Server Web Administration Interface.
2.Click Configuration, and then navigate to the container in which you want to create the certificate.
| Note: | By default, the "Public" container is accessible to all authenticated FlowForce Server users and so it might not be a suitable place to store sensitive information. It is recommended that you either restrict access to the "Public" container, or define sensitive objects in a separate container to which only entitled users have permissions, see Permissions and Containers. |
3.Click Create, and then Create Certificate.

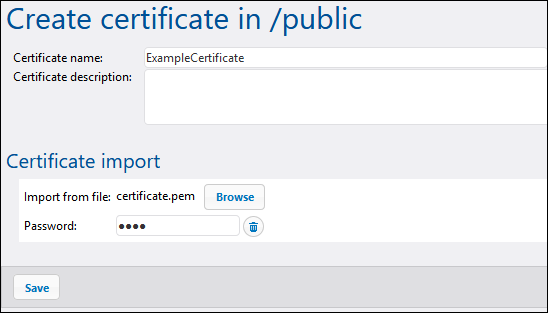
4.Enter a name, and, optionally, a description for the certificate. Choose a descriptive name to easily identify the certificate later. The description can be changed later.
5.Click Browse and select the certificate file.
The imported file must be in PEM, DER, or PKCS#12 format (this should not be confused with the file extension). The file extension can be one of the following: .pem, .der, .cer, .crt, pfx, p12. FlowForce will treat the file as follows:
•File is treated as PEM format if extension is .pem, .cer, .crt, and the file contains a line that starts with "-----BEGIN " or "---- BEGIN ". •File is treated as DER format if extension is .der, .cer, .crt and the file does not contain the line above. •File is treated as PKCS#12 if extension is .p12 or .pfx.
Files that contain only a private key (but not the certificate) cannot be imported. |
6.If the certificate file contains a private key that requires a password, enter the password into the corresponding field. If the certificate file contains an unprotected private key, click Delete  to omit this field.
7.Click Save.
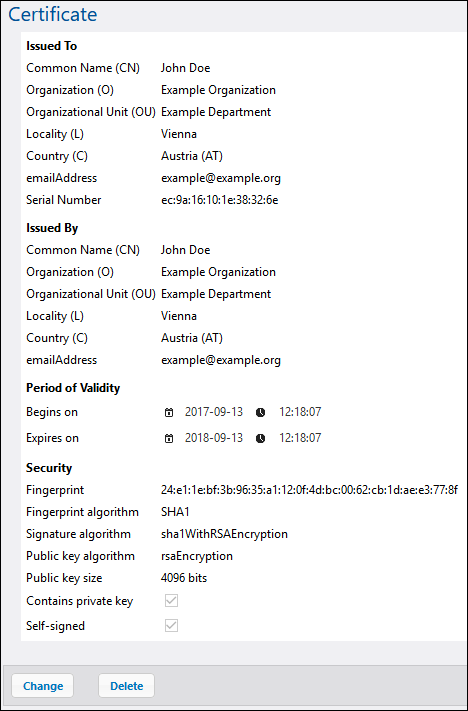
If the certificate was successfully imported, its details are displayed in the page, for example:

Since certificates expire after a certain amount of time, you will also need to periodically replace them from the FlowForce Server Web administration interface. This applies both to certificates created by your organization and those you received from your trading partner. (It is assumed that your trading partner will inform you when their public certificate expires, and send you the new certificate. Likewise, you should inform the trading partner when your public certificate expires and send them the new one.) The certificate's expiration date and other related information can be viewed from the Web administration interface (after you imported the certificate into FlowForce Server).
When you replace a certificate in FlowForce Server, the change will affect any partners using this certificate. To ensure the integrity of your AS2 operations, always co-ordinate changes to your organization's certificates with your trading partners in advance. |
To replace a certificate:
1.After logging in to FlowForce Server, click Configuration, and then navigate to the container where the certificate is stored.
2.Click the certificate entry. The certificate details page loads.
3.Click Import certificate.
4.Click Browse and select the new certificate.
5.Click Save. This replaces the old certificate with the new one.
Certificates previously imported into FlowForce Server can be deleted just like other FlowForce Server objects (select the check box next to the specific record, and then click Delete). Cloning or exporting certificates is not possible.
For an example of an AS2 exchange which involves two trading partners that exchange certificates for signing and encryption, see Example: Full AS2 Message Exchange (Advanced).