Home Page Form
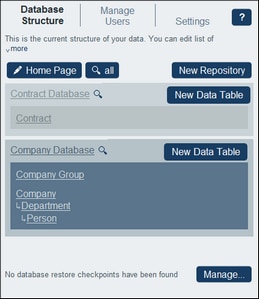
On the Database Structure page (screenshot below), click the Home Page button to go to the Home Page Form, where you can design the Home Page of your app.
The page that you design in the Home Page Form will be the page that users of the app will see when they start the app (its Home Page). This page must provide a well-designed entry point for viewing, editing, and otherwise processing records. Typically it would provide access to the app's data tables. Due reminders will be added automatically to the Home Page below the table that makes up the Home Page Form (compare the design form and the final form in the two screenshots below). So you do not have to include a template for due reminders in the Home Page Form
The Home Page Form is essentially one table, which we call the Home Page Form Table. You can add/delete rows or columns to this table. Inside each table cell, you can add a data table, text, an image, or another table. It is in this way that the design of the Home Page is built up inside the Home Page Form Table. In the screenshot below left, the table contains two rows, each of which contains a table. All three tables are indicated by table icons, which are located at the top right of each table.
Note, in the screenshot at right, that the actual Home Page contains a form at the bottom that is not in the Home Page Form. This form derives from a Homepage Alert Form, which contains reminders of events that have occurred or will occur (according to data in the date fields of data tables). How to design these forms is described in the topic Homepage Alert Forms. The home page will automatically display all the homepage alert forms of the system.
Create a Home Page Form
You can choose to auto-generate the Home Page by selecting the Auto-generate radio button near the top of the form. In that case, the Home Page is automatically generated on the basis of the database structure. To design a custom page, select the Manual design radio button.
To manually design the Home Page, do the following:
1.Click the Table-editing entry helpers icon at top right of the table you want to edit (see screenshot below). This causes the table editing icons to appear. In the screenshot below, the table-editing icons of the table inside the first row have been switched on. This is done by clicking the table icon of that table. To switch off the table-editing icons, click the table icon again. Callouts in the screenshot below indicate the functions of the table-editing icons.
2.Structure the table as you want. You can insert and append columns and rows, as well as delete individual columns and rows. You can also insert sub-tables inside a cell by clicking the cell's Edit content icon, then going to the Table tab and defining the table to insert.
3.Set styles for each table as you want. Note that images can also be added to cells.
4.When you have finished, click Save.


