Scripts in Entry Forms
Scripts in entry forms enable you to update fields of a record and, in some cases, to execute an action such as sending emails. Scripts can be executed in the following situations:
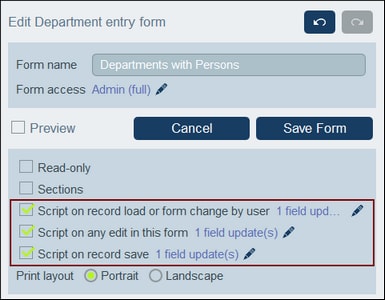
1.Script on record save: The script is used to modify other field values of the record and/or to send emails. The entry point for defining the script is a check box near the top of the entry form (framed red in screenshot below).
2.Script on editing any field of a record: When any field of a record is edited, the script modifies one or more other fields of the modified record. The entry point for defining the script is a check box near the top of the entry form (framed red in screenshot below).
3.Script on editing a specific field: When a specific field of a record is edited, the script modifies one or more other fields of the record.
4.Script behind buttons: When a button is clicked, its script can modify field values of the record.
5.Script when a child record changes: When a record changes, a script in the parent component can change data in the parent record.
6.Script on record load or form change by user: This script is triggered each time a record is loaded or when a record is changed by the user.
Given below are descriptions of how to create scripts for each of these scenarios.
Creating, removing, and editing scripts
For each type of script listed above, the entry point is a check box. Select the check box to create the script. Deselect the check box to remove the script. After a script has been created, click its Edit icon (see screenshot above) to modify the script.
Undo actions revert all script actions
If a user chooses to undo an action after a script has been executed, then all the actions of that script are reverted, regardless of whether the actions created, modified, or deleted a record.
The actions of a script
In a script, you can set up one or more actions.
•The kind of actions (for example, updating fields or sending emails) depends on the type of script. For each type of script listed below the available actions are listed.
•In a script, each action is listed below the action that was added previously.
•The actions of the script will be executed in the order in which they are listed.
•The Save action is automatically always added as the last action of the script.
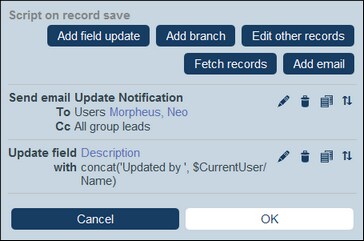
•If you wish to change the execution order, you can reorder the actions by clicking the Move Up/Down icon next to the action you want to move (first icon from the right in screenshot above). Note that the Move Up/Down icon appears on actions only after a second action has been added to the list. The Move Up/Down icon does not appear on Save actions because this type of action must always be the last action of the script.
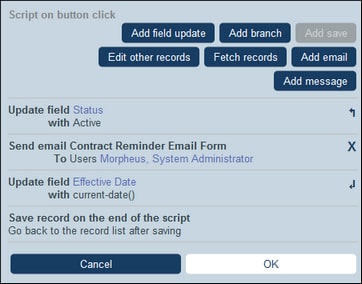
•On clicking the Move Up/Down icon, (i) all of that action's icons are replaced by one X icon and (ii) all the icons of each of the other actions are replaced by one arrow that points either up or down (see screenshot below). Now if you click one of these arrows, the originally selected action (indicated by X) will be inserted either above the action whose arrow you have just clicked or below it, according to the direction of the arrow. In the screenshot below, for example, the Send Email action can be moved to either the first or third position in the sequence.
1. Script on saving a record
Defined via: | Check box near top of entry form: Script on Record Save |
Script triggered: | When a record is saved |
Script actions: | (i) Modifies fields of the record to save; (ii) Sends emails; (iii) Creates ancestor and child records; (iv) Modifies/deletes child records |
Mechanisms: | (i) Add field updates; (ii) Add conditions (or branches); (iii) Edit other records (for any data table) or modify/delete child records; (iv) Fetch records; (v) Add emails |
In each script of this kind, you can: (i) specify the fields to update and their values (Add field update); (ii) set up conditions for the update (Add branch); (iii) create child records or records for any data table, or modify and delete child records (Edit other records); and (iii) send an email to selected recipients (Add email). You can choose each option multiple times. The screenshot below shows the script's form after actions have been added to it for sending emails and for updating a field.
You can add the following actions to the script.
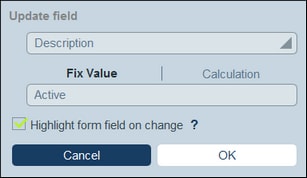
On clicking Add Field Update, the Update Field form appears (screenshot below): Here you specify a new value for a field of the record:
•In the combo box of the form, select which field of the current record to update when the action is triggered. •In the text box of the form, specify the new value of the target field. If you want to use a predetermined value, select Fix Value and enter the value. If you want to calculate a value dynamically, select Calculation and enter an XPath expression. •Since the update has been committed by the system and not been entered by a user, it is not automatically marked for highlighting in audits. If you want the update to be highlighted in audits, then select the Highlight check box.
|
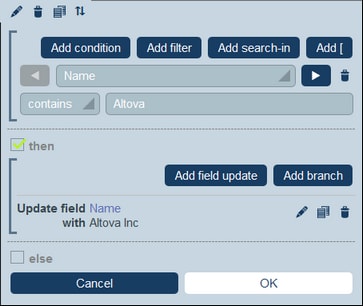
On clicking Add Branch, the Branch If form appears (screenshot below). It enables you to build a filter to select the field to update. Use the form's buttons to add condition branches. The structure of the branch is as follows. Check a set of conditions. For each case (true and false), carry out, as appropriate, any of the actions available for that type of script.
The available actions for each type of script are as follows:
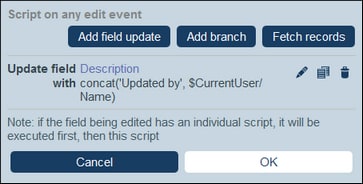
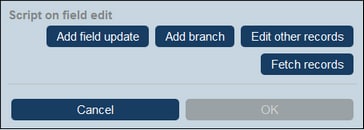
•Script on record save: (i) Add field update; (ii) Add filter; (iii) Add other (ancestor or child) records, or modify/delete child records; (iv) Add emails •Script on any edit in the form: (i) Add field update; (ii) Add filter; (see screenshot below) •Script on field edit: (i) Add field update; (ii) Add filter; (iii) Add other (ancestor or child) records, or modify/delete child records •Script behind buttons: (i) Add field update; (ii) Add filter; (iii) Save a record; (iv) Add other (ancestor or child) records, or modify/delete child records; (v) Add emails; (vi) Add message •Script when a child record changes: (i) Add field update; (ii) Add filter
Note: In the parameters of filters, you can use XPath expressions to generate parameter values. For details about how to use the form's buttons, see Define Condition Branches.
|
This option enables you to: (i) create child records or records for any data table, and (ii) modify and delete child records.
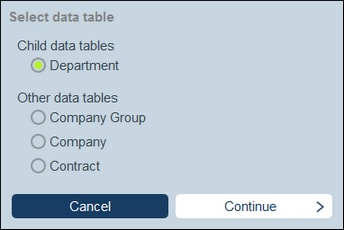
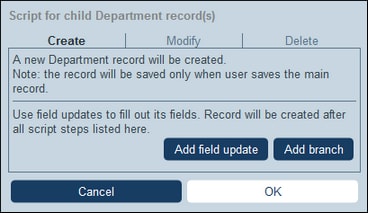
On clicking Edit Other Records, the Select data table form appears (screenshot below). Select either (i) the child data table in which you want to create, modify, or delete a record, or (ii) any non-descendant data table in which you want to create a record. Note that (i) you can create records in any data table that is not at a descendant level below child, but (ii) you can modify or delete records of child data tables only. On clicking Continue, the Script form appears (screenshot below). Here you can build a script to (i) create a new record for a child data table; (ii) create a new record for any other DB data table that is not a descendant data table at a level below child; (iii) modify records of a child data table; and (iv) delete records of a child data table. Since you have already selected, in the previous step, the data table of the record/s you want to create, modify, or delete, now select the appropriate tab (Create, Modify, or Delete) and build the script for that action. Note the following points:
•When you create a new record in a non-child data table, it is possible that records of the data table create the same new record multiple times. When such duplication is a possibility, a Replace option becomes available. Select it so that the record to be created is created only once. •When you create a new record or modify an existing record, you can fill or update a field by using the Add Field Update action. •Use the Add Branch action to restrict selections with conditions, filters, and searches before adding update actions. •You can modify all or specific records of a child data table. Specific records can be selected via conditions, filters, and searches. •You can specify, when child records are to be modified, that a new record be created of non exists. •You can delete all or specific records of a child data table. Like with modifications (see previous point), specific records can be selected via conditions, filters, and searches.
|
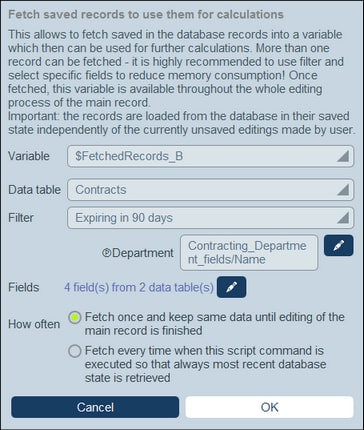
On clicking Fetch Records, the Fetch saved records to use for calculations form appears (screenshot below). The Fetch Records script enables you to fetch records from the database and store them in a variable. The data in the variable can then be used to make calculations while editing the current record. For example, while the user edits details of a department, you might want to show the user a list of that department's contracts. You can do this by fetching the records of the Contract data table and filtering these to show only the current department's contracts. In the screenshot below, the name of the current department is passed to the Department parameter of the filter named Expiring in 90 days. Consequently, the Filter returns only those records where the name of the current department is contained in a Contracting_Party field of a record. In the Fetch Records form, you specify what records go into a variable, as follows:
•In the Variable combo box, select one of the predefined values to be the name of the variable. This variable name must be unique within the entry form. •In the Data table combo box, select the data table from which you want to load records into the variable. •In the Filter combo box, you can select one of the data table's filters to apply to the record selection. A filter will limit the records to load and so reduce memory consumption. If a filter has been declared to have parameters, then each parameter is listed together with an entry field for its value. Here you can enter an XPath expression to generate the value. Alternatively, click the Edit button and select from the list of automatically generated context-based expressions. In the screenshot above, the XPath expression is: $FetchedRecords_A/Name, which selects the Name field contained in the variable $FetchedRecords_A (which is another variable defined in the current entry form and contains the fields of the current record). •In the Fields setting, select the fields of the selected records that you want to store in the variable. To reduce memory consumption, select only those fields that you need. •The How Often setting determines when the variable is updated: either once, when the script is first executed and till editing of the record is finished, or every time the script is executed. The second option enables the script to use the latest data in the DB.
|
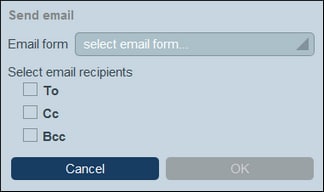
When creating scripts for actions to be taken (i) on record save and (ii) on button click, you can click Add Email to set up the script for emails. to send emails to selected recipients using one of the Email Forms defined for the current data table.
On clicking Add Email, the Send Email form appears (screenshot below): The form defines:
•The email form to use. In the dropdwon box, select one of the email forms that have been defined for the data table. If none exists, create on as described in the topic Email Forms. •Select recipients for the To, Cc, and/or Bcc lines of the email by checking the respective box.
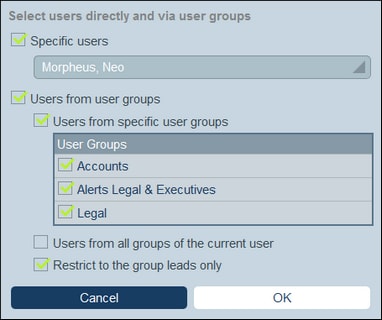
Select email recipientsYou can select email recipients on the following bases:
•Specific users, by name •Users from user groups, where there are options regarding which groups and which users in the groups (see screenshot below) •All group leads Note that you can use more than one selection criterion.
|
2. Script on editing any field of a record
Defined via: | Check box near top of entry form: Script on Any Edit in This Form |
Script triggered: | When any field of a record is edited |
Script actions: | Modifies fields of the edited record |
Mechanisms: | (i) Add field updates; (ii) Add conditions (or branches); (iii) Fetch records |
These scripts enable you to: (i) specify the fields to update and their values (Add field update) and (ii) set up conditions for the update (Add branch). You can choose both options multiple times. If the field that is being edited by the user has its own script (see Script Type 3 below), then that script will be executed before this script—which means that if both scripts update the same field, then this script will overwrite any previously updated value of the target field.
You can add the following mechanisms to the script.
On clicking Add Field Update, the Update Field form appears (screenshot below): Here you specify a new value for a field of the record:
•In the combo box of the form, select which field of the current record to update when the action is triggered. •In the text box of the form, specify the new value of the target field. If you want to use a predetermined value, select Fix Value and enter the value. If you want to calculate a value dynamically, select Calculation and enter an XPath expression. •Since the update has been committed by the system and not been entered by a user, it is not automatically marked for highlighting in audits. If you want the update to be highlighted in audits, then select the Highlight check box.
|
On clicking Add Branch, the Branch If form appears (screenshot below). It enables you to build a filter to select the field to update. Use the form's buttons to add condition branches. The structure of the branch is as follows. Check a set of conditions. For each case (true and false), carry out, as appropriate, any of the actions available for that type of script.
The available actions for each type of script are as follows:
•Script on record save: (i) Add field update; (ii) Add filter; (iii) Add other (ancestor or child) records, or modify/delete child records; (iv) Add emails •Script on any edit in the form: (i) Add field update; (ii) Add filter; (see screenshot below) •Script on field edit: (i) Add field update; (ii) Add filter; (iii) Add other (ancestor or child) records, or modify/delete child records •Script behind buttons: (i) Add field update; (ii) Add filter; (iii) Save a record; (iv) Add other (ancestor or child) records, or modify/delete child records; (v) Add emails; (vi) Add message •Script when a child record changes: (i) Add field update; (ii) Add filter
Note: In the parameters of filters, you can use XPath expressions to generate parameter values. For details about how to use the form's buttons, see Define Condition Branches.
|
On clicking Fetch Records, the Fetch saved records to use for calculations form appears (screenshot below). The Fetch Records script enables you to fetch records from the database and store them in a variable. The data in the variable can then be used to make calculations while editing the current record. For example, while the user edits details of a department, you might want to show the user a list of that department's contracts. You can do this by fetching the records of the Contract data table and filtering these to show only the current department's contracts. In the screenshot below, the name of the current department is passed to the Department parameter of the filter named Expiring in 90 days. Consequently, the Filter returns only those records where the name of the current department is contained in a Contracting_Party field of a record. In the Fetch Records form, you specify what records go into a variable, as follows:
•In the Variable combo box, select one of the predefined values to be the name of the variable. This variable name must be unique within the entry form. •In the Data table combo box, select the data table from which you want to load records into the variable. •In the Filter combo box, you can select one of the data table's filters to apply to the record selection. A filter will limit the records to load and so reduce memory consumption. If a filter has been declared to have parameters, then each parameter is listed together with an entry field for its value. Here you can enter an XPath expression to generate the value. Alternatively, click the Edit button and select from the list of automatically generated context-based expressions. In the screenshot above, the XPath expression is: $FetchedRecords_A/Name, which selects the Name field contained in the variable $FetchedRecords_A (which is another variable defined in the current entry form and contains the fields of the current record). •In the Fields setting, select the fields of the selected records that you want to store in the variable. To reduce memory consumption, select only those fields that you need. •The How Often setting determines when the variable is updated: either once, when the script is first executed and till editing of the record is finished, or every time the script is executed. The second option enables the script to use the latest data in the DB.
|
3. Script on editing a specific field of a record
Defined where: | As a property of a field |
Script triggered: | When this specific field is edited |
Script actions: | (i) Modifies other fields of the record containing the edited field; (ii) Creates ancestor and child records; (iii) Modifies/deletes child records |
Mechanisms: | (i) Add field updates; (ii) Add conditions (or branches); (iii) Add other records (for any data table) or modify/delete child records; (iv) Fetch records |
This type of script is defined on a field as one of the field's properties at the time when the field is created in the entry form. the script enables you to: (i) specify the fields to update and their values (Add field update); (ii) set up conditions for the update (Add branch); and (iii) create child records or records for any data table, or modify and delete child records (Edit other records). Any of these options can be chosen multiple times. Note that if another script is defined that will be executed on any edit in the form, then that script would overwrite the update of this script if they both update the same field (see Script Type 2 above).
You can add the following mechanisms to the script.
On clicking Add Field Update, the Update Field form appears (screenshot below): Here you specify a new value for a field of the record:
•In the combo box of the form, select which field of the current record to update when the action is triggered. •In the text box of the form, specify the new value of the target field. If you want to use a predetermined value, select Fix Value and enter the value. If you want to calculate a value dynamically, select Calculation and enter an XPath expression. •Since the update has been committed by the system and not been entered by a user, it is not automatically marked for highlighting in audits. If you want the update to be highlighted in audits, then select the Highlight check box.
|
On clicking Add Branch, the Branch If form appears (screenshot below). It enables you to build a filter to select the field to update. Use the form's buttons to add condition branches. The structure of the branch is as follows. Check a set of conditions. For each case (true and false), carry out, as appropriate, any of the actions available for that type of script.
The available actions for each type of script are as follows:
•Script on record save: (i) Add field update; (ii) Add filter; (iii) Add other (ancestor or child) records, or modify/delete child records; (iv) Add emails •Script on any edit in the form: (i) Add field update; (ii) Add filter; (see screenshot below) •Script on field edit: (i) Add field update; (ii) Add filter; (iii) Add other (ancestor or child) records, or modify/delete child records •Script behind buttons: (i) Add field update; (ii) Add filter; (iii) Save a record; (iv) Add other (ancestor or child) records, or modify/delete child records; (v) Add emails; (vi) Add message •Script when a child record changes: (i) Add field update; (ii) Add filter
Note: In the parameters of filters, you can use XPath expressions to generate parameter values. For details about how to use the form's buttons, see Define Condition Branches.
|
This option enables you to: (i) create child records or records for any data table, and (ii) modify and delete child records.
On clicking Edit Other Records, the Select data table form appears (screenshot below). Select either (i) the child data table in which you want to create, modify, or delete a record, or (ii) any non-descendant data table in which you want to create a record. Note that (i) you can create records in any data table that is not at a descendant level below child, but (ii) you can modify or delete records of child data tables only. On clicking Continue, the Script form appears (screenshot below). Here you can build a script to (i) create a new record for a child data table; (ii) create a new record for any other DB data table that is not a descendant data table at a level below child; (iii) modify records of a child data table; and (iv) delete records of a child data table. Since you have already selected, in the previous step, the data table of the record/s you want to create, modify, or delete, now select the appropriate tab (Create, Modify, or Delete) and build the script for that action. Note the following points:
•When you create a new record in a non-child data table, it is possible that records of the data table create the same new record multiple times. When such duplication is a possibility, a Replace option becomes available. Select it so that the record to be created is created only once. •When you create a new record or modify an existing record, you can fill or update a field by using the Add Field Update action. •Use the Add Branch action to restrict selections with conditions, filters, and searches before adding update actions. •You can modify all or specific records of a child data table. Specific records can be selected via conditions, filters, and searches. •You can specify, when child records are to be modified, that a new record be created of non exists. •You can delete all or specific records of a child data table. Like with modifications (see previous point), specific records can be selected via conditions, filters, and searches.
|
On clicking Fetch Records, the Fetch saved records to use for calculations form appears (screenshot below). The Fetch Records script enables you to fetch records from the database and store them in a variable. The data in the variable can then be used to make calculations while editing the current record. For example, while the user edits details of a department, you might want to show the user a list of that department's contracts. You can do this by fetching the records of the Contract data table and filtering these to show only the current department's contracts. In the screenshot below, the name of the current department is passed to the Department parameter of the filter named Expiring in 90 days. Consequently, the Filter returns only those records where the name of the current department is contained in a Contracting_Party field of a record. In the Fetch Records form, you specify what records go into a variable, as follows:
•In the Variable combo box, select one of the predefined values to be the name of the variable. This variable name must be unique within the entry form. •In the Data table combo box, select the data table from which you want to load records into the variable. •In the Filter combo box, you can select one of the data table's filters to apply to the record selection. A filter will limit the records to load and so reduce memory consumption. If a filter has been declared to have parameters, then each parameter is listed together with an entry field for its value. Here you can enter an XPath expression to generate the value. Alternatively, click the Edit button and select from the list of automatically generated context-based expressions. In the screenshot above, the XPath expression is: $FetchedRecords_A/Name, which selects the Name field contained in the variable $FetchedRecords_A (which is another variable defined in the current entry form and contains the fields of the current record). •In the Fields setting, select the fields of the selected records that you want to store in the variable. To reduce memory consumption, select only those fields that you need. •The How Often setting determines when the variable is updated: either once, when the script is first executed and till editing of the record is finished, or every time the script is executed. The second option enables the script to use the latest data in the DB.
|
4. Script on clicking a button
Defined where: | As a property of a button |
Script triggered: | When the button is clicked |
Script actions: | (i) Modifies fields of the record to save; (ii) Creates ancestor and child records; (iii) Modify/delete child records; (iv) Sends emails; (v) Displays messages |
Mechanisms: | (i) Add field updates; (ii) Add conditions (or branches); (iii) Save record; |
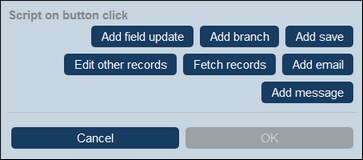
Scripts of this type are executed when a button of an entry form is clicked. The script enables you to: (i) specify the fields to update and their values (Add field update); (ii) set up conditions for the update (Add branch); (iii) save the record (Save record); (iv) create ancestor records and child records, or modify and delete child records (Edit other records); (v) send an email to selected recipients (Add email); and (vi) display a message (Add message). Each option, except Save record, can be used multiple times.
You can add the following mechanisms to the script:
On clicking Add Field Update, the Update Field form appears (screenshot below): Here you specify a new value for a field of the record:
•In the combo box of the form, select which field of the current record to update when the action is triggered. •In the text box of the form, specify the new value of the target field. If you want to use a predetermined value, select Fix Value and enter the value. If you want to calculate a value dynamically, select Calculation and enter an XPath expression. •Since the update has been committed by the system and not been entered by a user, it is not automatically marked for highlighting in audits. If you want the update to be highlighted in audits, then select the Highlight check box.
|
On clicking Add Branch, the Branch If form appears (screenshot below). It enables you to build a filter to select the field to update. Use the form's buttons to add condition branches. The structure of the branch is as follows. Check a set of conditions. For each case (true and false), carry out, as appropriate, any of the actions available for that type of script.
The available actions for each type of script are as follows:
•Script on record save: (i) Add field update; (ii) Add filter; (iii) Add other (ancestor or child) records, or modify/delete child records; (iv) Add emails •Script on any edit in the form: (i) Add field update; (ii) Add filter; (see screenshot below) •Script on field edit: (i) Add field update; (ii) Add filter; (iii) Add other (ancestor or child) records, or modify/delete child records •Script behind buttons: (i) Add field update; (ii) Add filter; (iii) Save a record; (iv) Add other (ancestor or child) records, or modify/delete child records; (v) Add emails; (vi) Add message •Script when a child record changes: (i) Add field update; (ii) Add filter
Note: In the parameters of filters, you can use XPath expressions to generate parameter values. For details about how to use the form's buttons, see Define Condition Branches.
|
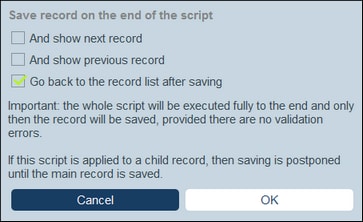
On clicking Add Save, the Save Record form appears (screenshot below). The Save Record action will save the current record after all the actions of the script have been executed. This action is always added as the last action of the script and can be added only once per script. You can choose what should be done after the record is saved:
•Select And show next record or And show previous record to go to the next or previous record after the current record has been saved. Only one of these options can be selected. •Select or deselect Go back to the record list to either go back to the list of records or stay in the current record, respectively (see screenshot). If either of the other check box options is selected, then the option to go back to the list of records will be effected only if there is no next or previous record.
|
This option enables you to: (i) create child records or records for any data table, and (ii) modify and delete child records.
On clicking Edit Other Records, the Select data table form appears (screenshot below). Select either (i) the child data table in which you want to create, modify, or delete a record, or (ii) any non-descendant data table in which you want to create a record. Note that (i) you can create records in any data table that is not at a descendant level below child, but (ii) you can modify or delete records of child data tables only. On clicking Continue, the Script form appears (screenshot below). Here you can build a script to (i) create a new record for a child data table; (ii) create a new record for any other DB data table that is not a descendant data table at a level below child; (iii) modify records of a child data table; and (iv) delete records of a child data table. Since you have already selected, in the previous step, the data table of the record/s you want to create, modify, or delete, now select the appropriate tab (Create, Modify, or Delete) and build the script for that action. Note the following points:
•When you create a new record in a non-child data table, it is possible that records of the data table create the same new record multiple times. When such duplication is a possibility, a Replace option becomes available. Select it so that the record to be created is created only once. •When you create a new record or modify an existing record, you can fill or update a field by using the Add Field Update action. •Use the Add Branch action to restrict selections with conditions, filters, and searches before adding update actions. •You can modify all or specific records of a child data table. Specific records can be selected via conditions, filters, and searches. •You can specify, when child records are to be modified, that a new record be created of non exists. •You can delete all or specific records of a child data table. Like with modifications (see previous point), specific records can be selected via conditions, filters, and searches.
|
On clicking Fetch Records, the Fetch saved records to use for calculations form appears (screenshot below). The Fetch Records script enables you to fetch records from the database and store them in a variable. The data in the variable can then be used to make calculations while editing the current record. For example, while the user edits details of a department, you might want to show the user a list of that department's contracts. You can do this by fetching the records of the Contract data table and filtering these to show only the current department's contracts. In the screenshot below, the name of the current department is passed to the Department parameter of the filter named Expiring in 90 days. Consequently, the Filter returns only those records where the name of the current department is contained in a Contracting_Party field of a record. In the Fetch Records form, you specify what records go into a variable, as follows:
•In the Variable combo box, select one of the predefined values to be the name of the variable. This variable name must be unique within the entry form. •In the Data table combo box, select the data table from which you want to load records into the variable. •In the Filter combo box, you can select one of the data table's filters to apply to the record selection. A filter will limit the records to load and so reduce memory consumption. If a filter has been declared to have parameters, then each parameter is listed together with an entry field for its value. Here you can enter an XPath expression to generate the value. Alternatively, click the Edit button and select from the list of automatically generated context-based expressions. In the screenshot above, the XPath expression is: $FetchedRecords_A/Name, which selects the Name field contained in the variable $FetchedRecords_A (which is another variable defined in the current entry form and contains the fields of the current record). •In the Fields setting, select the fields of the selected records that you want to store in the variable. To reduce memory consumption, select only those fields that you need. •The How Often setting determines when the variable is updated: either once, when the script is first executed and till editing of the record is finished, or every time the script is executed. The second option enables the script to use the latest data in the DB.
|
When creating scripts for actions to be taken (i) on record save and (ii) on button click, you can click Add Email to set up the script for emails. to send emails to selected recipients using one of the Email Forms defined for the current data table.
On clicking Add Email, the Send Email form appears (screenshot below): The form defines:
•The email form to use. In the dropdwon box, select one of the email forms that have been defined for the data table. If none exists, create on as described in the topic Email Forms. •Select recipients for the To, Cc, and/or Bcc lines of the email by checking the respective box.
Select email recipientsYou can select email recipients on the following bases:
•Specific users, by name •Users from user groups, where there are options regarding which groups and which users in the groups (see screenshot below) •All group leads Note that you can use more than one selection criterion.
|
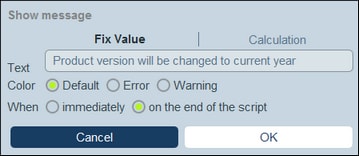
You can add a message to the actions that your script carries out. For example, when a button script starts, you can show a message to the user that contains information about what the script is going to do.
On clicking Add Message, the Show Message form appears (screenshot below). You can (i) enter the message directly as text (Fix Value) or as an XPath expression (Calculation), (ii) select the color of the displayed text (for example, the Error color is red), and (iii) either set the message to be shown either immediately when the Add Message action is triggered or when the script ends.
|
5. Script on editing a child record
Defined where: | As a property of the Child Rows entry of a data table (that has a child data table) |
Script triggered: | When a child row of the data table is edited |
Script actions: | Modifies fields of the record containing the edited child record |
Mechanisms: | (i) Add field updates; (ii) Add conditions (or branches); (iii) Fetch records |
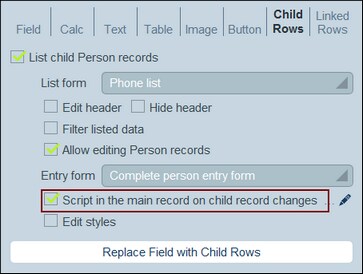
This kind of script is available in data tables that have child rows. In the entry form of such a data table, you can add child rows to a table cell of the entry form. In the definition of Child Rows, select the Allow editng <Child> records option (screenshot below) and select an entry form of the child data table. You can now define a script of the current data table that will be executed when the child record is edited (framed red below).
In this kind of script, you can: (i) specify the fields to update and their values (Add field update) and (ii) set up conditions for the update (Add branch). Both options can be chosen multiple times.
On clicking Add Field Update, the Update Field form appears (screenshot below): Here you specify a new value for a field of the record:
•In the combo box of the form, select which field of the current record to update when the action is triggered. •In the text box of the form, specify the new value of the target field. If you want to use a predetermined value, select Fix Value and enter the value. If you want to calculate a value dynamically, select Calculation and enter an XPath expression. •Since the update has been committed by the system and not been entered by a user, it is not automatically marked for highlighting in audits. If you want the update to be highlighted in audits, then select the Highlight check box.
|
On clicking Add Branch, the Branch If form appears (screenshot below). It enables you to build a filter to select the field to update. Use the form's buttons to add condition branches. The structure of the branch is as follows. Check a set of conditions. For each case (true and false), carry out, as appropriate, any of the actions available for that type of script.
The available actions for each type of script are as follows:
•Script on record save: (i) Add field update; (ii) Add filter; (iii) Add other (ancestor or child) records, or modify/delete child records; (iv) Add emails •Script on any edit in the form: (i) Add field update; (ii) Add filter; (see screenshot below) •Script on field edit: (i) Add field update; (ii) Add filter; (iii) Add other (ancestor or child) records, or modify/delete child records •Script behind buttons: (i) Add field update; (ii) Add filter; (iii) Save a record; (iv) Add other (ancestor or child) records, or modify/delete child records; (v) Add emails; (vi) Add message •Script when a child record changes: (i) Add field update; (ii) Add filter
Note: In the parameters of filters, you can use XPath expressions to generate parameter values. For details about how to use the form's buttons, see Define Condition Branches.
|
On clicking Fetch Records, the Fetch saved records to use for calculations form appears (screenshot below). The Fetch Records script enables you to fetch records from the database and store them in a variable. The data in the variable can then be used to make calculations while editing the current record. For example, while the user edits details of a department, you might want to show the user a list of that department's contracts. You can do this by fetching the records of the Contract data table and filtering these to show only the current department's contracts. In the screenshot below, the name of the current department is passed to the Department parameter of the filter named Expiring in 90 days. Consequently, the Filter returns only those records where the name of the current department is contained in a Contracting_Party field of a record. In the Fetch Records form, you specify what records go into a variable, as follows:
•In the Variable combo box, select one of the predefined values to be the name of the variable. This variable name must be unique within the entry form. •In the Data table combo box, select the data table from which you want to load records into the variable. •In the Filter combo box, you can select one of the data table's filters to apply to the record selection. A filter will limit the records to load and so reduce memory consumption. If a filter has been declared to have parameters, then each parameter is listed together with an entry field for its value. Here you can enter an XPath expression to generate the value. Alternatively, click the Edit button and select from the list of automatically generated context-based expressions. In the screenshot above, the XPath expression is: $FetchedRecords_A/Name, which selects the Name field contained in the variable $FetchedRecords_A (which is another variable defined in the current entry form and contains the fields of the current record). •In the Fields setting, select the fields of the selected records that you want to store in the variable. To reduce memory consumption, select only those fields that you need. •The How Often setting determines when the variable is updated: either once, when the script is first executed and till editing of the record is finished, or every time the script is executed. The second option enables the script to use the latest data in the DB.
|
6. Script on record load or form change
Defined where: | Check box near top of entry form: Script on Record Load or Form Change |
Script triggered: | Each time a record is loaded or the entry form is changed |
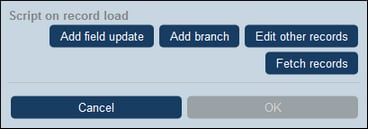
Script actions: | (i) Updates fields of the record; (ii) adds conditions; (iii) edits other records; (iv) fetches records |
Mechanisms: | (i) Add field updates; (ii) Add conditions (or branches); (iii) Edit other records (for any data table) or modify/delete child records; (iv) Fetch records |
This type of script is defined for the entry form and it is triggered each time a record is loaded or when the form is changed by the user.The script is also executed for child records, but it is executed only once, when the record is loaded. This means that the script is executed when the record is loaded. It is also executed when a child record is loaded. Returning to a child record will not cause script execution. For this to now happen, the main record will have to be changed.
It is the primary way to prepare data (by using the Fetch Records mechanism) for use in the form. Additionally, you can update fields directly a record is loaded (by using Add field update). Such updates can also be made conditional (by placing them in a condition added by the Add branch mechanism).
You can add the following mechanisms to the script.
On clicking Add Field Update, the Update Field form appears (screenshot below): Here you specify a new value for a field of the record:
•In the combo box of the form, select which field of the current record to update when the action is triggered. •In the text box of the form, specify the new value of the target field. If you want to use a predetermined value, select Fix Value and enter the value. If you want to calculate a value dynamically, select Calculation and enter an XPath expression. •Since the update has been committed by the system and not been entered by a user, it is not automatically marked for highlighting in audits. If you want the update to be highlighted in audits, then select the Highlight check box.
|
On clicking Add Branch, the Branch If form appears (screenshot below). It enables you to build a filter to select the field to update. Use the form's buttons to add condition branches. The structure of the branch is as follows. Check a set of conditions. For each case (true and false), carry out, as appropriate, any of the actions available for that type of script.
The available actions for each type of script are as follows:
•Script on record save: (i) Add field update; (ii) Add filter; (iii) Add other (ancestor or child) records, or modify/delete child records; (iv) Add emails •Script on any edit in the form: (i) Add field update; (ii) Add filter; (see screenshot below) •Script on field edit: (i) Add field update; (ii) Add filter; (iii) Add other (ancestor or child) records, or modify/delete child records •Script behind buttons: (i) Add field update; (ii) Add filter; (iii) Save a record; (iv) Add other (ancestor or child) records, or modify/delete child records; (v) Add emails; (vi) Add message •Script when a child record changes: (i) Add field update; (ii) Add filter
Note: In the parameters of filters, you can use XPath expressions to generate parameter values. For details about how to use the form's buttons, see Define Condition Branches.
|
This option enables you to: (i) create child records or records for any data table, and (ii) modify and delete child records.
On clicking Edit Other Records, the Select data table form appears (screenshot below). Select either (i) the child data table in which you want to create, modify, or delete a record, or (ii) any non-descendant data table in which you want to create a record. Note that (i) you can create records in any data table that is not at a descendant level below child, but (ii) you can modify or delete records of child data tables only. On clicking Continue, the Script form appears (screenshot below). Here you can build a script to (i) create a new record for a child data table; (ii) create a new record for any other DB data table that is not a descendant data table at a level below child; (iii) modify records of a child data table; and (iv) delete records of a child data table. Since you have already selected, in the previous step, the data table of the record/s you want to create, modify, or delete, now select the appropriate tab (Create, Modify, or Delete) and build the script for that action. Note the following points:
•When you create a new record in a non-child data table, it is possible that records of the data table create the same new record multiple times. When such duplication is a possibility, a Replace option becomes available. Select it so that the record to be created is created only once. •When you create a new record or modify an existing record, you can fill or update a field by using the Add Field Update action. •Use the Add Branch action to restrict selections with conditions, filters, and searches before adding update actions. •You can modify all or specific records of a child data table. Specific records can be selected via conditions, filters, and searches. •You can specify, when child records are to be modified, that a new record be created of non exists. •You can delete all or specific records of a child data table. Like with modifications (see previous point), specific records can be selected via conditions, filters, and searches.
|
On clicking Fetch Records, the Fetch saved records to use for calculations form appears (screenshot below). The Fetch Records script enables you to fetch records from the database and store them in a variable. The data in the variable can then be used to make calculations while editing the current record. For example, while the user edits details of a department, you might want to show the user a list of that department's contracts. You can do this by fetching the records of the Contract data table and filtering these to show only the current department's contracts. In the screenshot below, the name of the current department is passed to the Department parameter of the filter named Expiring in 90 days. Consequently, the Filter returns only those records where the name of the current department is contained in a Contracting_Party field of a record. In the Fetch Records form, you specify what records go into a variable, as follows:
•In the Variable combo box, select one of the predefined values to be the name of the variable. This variable name must be unique within the entry form. •In the Data table combo box, select the data table from which you want to load records into the variable. •In the Filter combo box, you can select one of the data table's filters to apply to the record selection. A filter will limit the records to load and so reduce memory consumption. If a filter has been declared to have parameters, then each parameter is listed together with an entry field for its value. Here you can enter an XPath expression to generate the value. Alternatively, click the Edit button and select from the list of automatically generated context-based expressions. In the screenshot above, the XPath expression is: $FetchedRecords_A/Name, which selects the Name field contained in the variable $FetchedRecords_A (which is another variable defined in the current entry form and contains the fields of the current record). •In the Fields setting, select the fields of the selected records that you want to store in the variable. To reduce memory consumption, select only those fields that you need. •The How Often setting determines when the variable is updated: either once, when the script is first executed and till editing of the record is finished, or every time the script is executed. The second option enables the script to use the latest data in the DB.
|
