User-Defined Templates
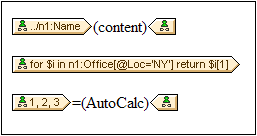
User-Defined Templates are templates for items generated by an XPath expression you specify. These items may be atomic values or nodes. In the screenshot below, which shows three User-Defined Templates, note the User-Defined Template icon on the left-hand side of the tags (a green person symbol). User-Defined Templates are very useful because they provide extraordinary flexibility for creating templates.

The XPath expression of each of the three User-Defined templates shown in the screenshot above do the following:
•Selects a node in a source schema. By using an XPath expression, any node in any of the schema sources can be reached from within any context node. If StyleVision can unambiguously target the specified node, the template will be changed automatically from a User-Defined Template to a normal template. If it is a User-Defined Template, this will be indicated by the green User-Defined Template icon on the left-hand side of the template tags.
•Selects a node that fulfills a condition specified by the for construct of XPath 2.0 and XPath 3.0. Such templates can never resolve to normal templates (but will remain User-Defined Templates) because the for construct does not allow StyleVision to unambiguously resolve the target from only the schema information it currently has at its disposal.
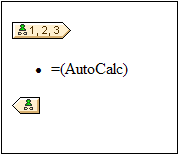
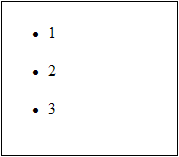
•Selects a sequence of atomic values {1, 2, 3}. While it is allowed to create a template for an atomic value, you cannot use the contents placeholder within such a template. This is because the xsl:apply-templates instruction (which is what the contents placeholder generates) can only be applied to node items (not atomic values). You could, however, use an Auto-Calculation in combination with some design element such as a list. For example, the User-Defined Template at left would generate the output at right.


| Note: | If the SPS uses XSLT 1.0, then the XPath expression you enter must return a node-set. Otherwise an error is reported. |
Advantage of using XPath to select template node
The advantage of selecting a schema node via an XPath expression (User-Defined Templates) is that the power of XPath's path selector mechanism can be used to select any node or sequence of items, as well as to filter or set conditions for the node selection. As a result, specific XML document nodes can be targeted for any given template. For instance, the XPath expression //Office/Department[@Location="NY"] will select only those Department nodes that have a Location attribute with a value of NY. Also see the other examples in this section.
| Note: | If an XPath expression contains multiple location path steps, then it is significant—especially for grouping and sorting—whether brackets are placed around the multiple location path steps or not. For example, the XPath expression /Org/Office/Dept will be processed differently than (/Org/Office/Dept). For the former expression (without brackets), the processor loops through each location step. For the latter expression (with brackets), all the Dept elements of all Office elements are returned in one undifferentiated nodeset. |
Brackets | Underlying XSLT Mechanism | Effect |
No | <xsl:for-each select="Org"> <xsl:for-each select="Office"> <xsl:for-each select="Dept"> ... </xsl:for-each> </xsl:for-each> </xsl:for-each> | Each Office element has its own Dept population. So grouping and sorting can be done within each Office. |
Yes | <xsl:for-each select="/Org/Office/Dept"> ... </xsl:for-each> | The Dept population extends over all Office elements and across Org. |
This difference in evaluating XPath expressions can be significant for grouping and sorting.
Inserting a User-Defined Template
To insert a User-Defined Template, do the following:
1.Click the Insert User-Defined Template icon in the Insert Design Elements toolbar and then click the design location where you wish to insert the template. Alternatively, right-click the design location where you wish to insert the template and, from the context menu that appears, select the Insert User-Defined Template command.
2.In the Edit XPath Expression dialog that pops up, enter the XPath expression you want, and click OK. Note that the context node of the XPath expression will be the node within which you have clicked. An empty node template will be created. Sometimes a joined node is created. When a node is joined, the targeted instance nodes are selected as if at a single level, whereas if a node is not joined (that is if it is split into multiple hierarchic levels), then the node selection is done by looping through each instance node at every split level. The nodeset returned in both cases of selection (joined and split) is the same unless a grouping or sorting criterion is specified. For a discussion of the effect joined nodes have on the grouping and sorting mechanisms, see Node-Template Operations.
Editing a Template Match
The node selection of any node template (user-defined or normal) can be changed by using an XPath expression to select the new match expression. To edit the template match of a node template, right-click the node template, then select the Edit Template Match command. This pops up the Edit XPath Expression dialog, in which you enter the XPath expression to select the new node. Then click OK.
Adding nodes to User-Defined Templates
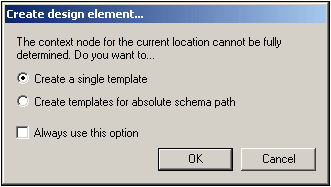
If a node from the schema tree is added to a User-Defined Template, the context for the new node will not be known if the User-Defined Template has been created for a node or sequence that cannot be placed in the context of the schema source of the SPS. You will therefore be prompted (screenshot below) about how the new node should be referenced: (i) by its name (essentially, a relative path), or (ii) by a full path from the root of the schema source.

Prompting for advice on how to proceed is the default behavior. This default behavior can be changed in the Design tab of the Tool | Options dialog.