Example: Group-By (Persons.sps)
The Persons.sps example is based on the Persons.xsd schema and uses Persons.xml as its Working XML File. It is located in the (My) Documents folder, C:\Documents and Settings\<username>\My Documents\Altova\StyleVision2023\StyleVisionExamples\Tutorial\Grouping\Persons\. The XML document structure is as follows: an employees document element can contain an unlimited number of person employees. Each person employee is structured according to this example:
<person first="Vernon" last="Callaby" department="Administration" grade="C"/>
In the design we group persons according to department. Each department is represented by a separate table and the departments are sorted in ascending alphabetical order. Within each department table, persons are grouped according to grade (sorted in ascending alphabetical order) and, within each grade, persons are listed on in ascending alphabetical order of their last names.
Strategy
The strategy for creating the groups is as follows. The grouping is created on the person element with the department attribute being the grouping-key. This causes the person elements to be ordered in groups based on the value of the department attribute. (If sorting is specified, then the department groups can be organized in alphabetical order, for example, Administration first, and so on.) Since the departments are to be created as separate tables, the current-grouping (which is based on the department grouping-key) is created as a table. Now, within this grouped order of Person elements, we specify that each group must be further ordered with the grade attribute as the grouping-key.
Creating the SPS
The design was created as follows:
1.Drag the person element from the schema tree and create it as contents.
2.Right-click the person element tag and, in the context menu, select Group by.
3.In the Define Output Grouping dialog, select group-by, set the XPath expression in the Match text box to @department, and click Yes.
4.A dialog pops up asking whether the groups should be sorted. Since we wish the groups to be sorted according to the default ascending alphabetical sorting, click OK. (Sorting can always be set, modified, or deleted subsequently.)
5.Since each group (which is a department) is to be created in a separate table, create the current group as a table. Do this by right-clicking the current-group() tag (screenshot below), and selecting Change to | Table, selecting the child attributes @last and @grade as the columns of the table.
 |
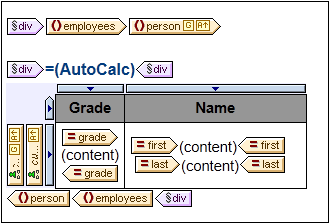
6.Re-organize the contents of the columns and cells of the table so that the first column contains @grade and the second column contains the @first and @last nodes (see screenshot below).
7.Within the current group, which is grouped by department, we wish to group by grade. So on the current-group() template, create a grouping for the grade attribute. Confirm the default sorting. A new current-group() template is created (see screenshot below).
8.Sort this current group (which is the sub-group of persons and grouped by grade), on the last attribute.
 |
9.Set formatting for the table.
10.Above the table provide a heading for the table. Since each table represents a department, the name of the department can be dynamically obtained from the current context by using an Auto-Calculation with an XPath expression that calls the current-grouping-key() function of XPath 2.0/3.0.
11.Repeat the entire process, to create similar output, but this this time grouping persons by grade and then by department.
To view or modify the grouping or sorting of a template, right-click that template and select Group by or Sort by from the context menu. This pops up the respective dialog, in which the settings can be viewed or modified.