Toolbars
A number of StyleVision commands are available as toolbar shortcuts, organized in the following toolbars:
The icons in each toolbar are listed in the sub-sections of this section, each with a brief description of the corresponding command.
Positioning the toolbars
A toolbar can float freely on the screen or can be placed in a toolbar area along any edge of the GUI. Toolbars are most commonly placed along the top edge of the GUI, just below the Menu bar. However, they can also be placed along the side or bottom edges of the GUI.
To position a toolbar in a toolbar area, do the following:
1.Grab the toolbar by its handle (if the toolbar is already in a toolbar area) or by its title bar (if the toolbar is floating).
2.Drag the toolbar to the desired toolbar area, if it exists, and drop it at the desired location in that toolbar area. If no toolbar area exists at the edge along which you wish to place the toolbar, dragging the toolbar to that edge will automatically create a toolbar area there when the toolbar is dropped.
To make a toolbar float freely grab it by its handle, drag it away from the toolbar area, and drop it anywhere on the screen except at an edge or in an existing toolbar area.
Switching the display of toolbars on and off
The display of individual toolbars can be switched on and off using any of the following three methods:
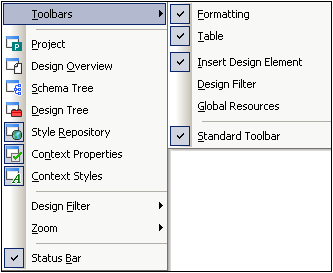
•In the View | Toolbars menu (screenshot below), select or deselect a toolbar to, respectively, show or hide that toolbar.

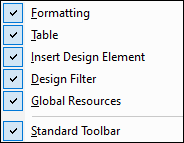
•Right-click any toolbar area to display a context menu (screenshot below) that allows you to toggle the display of individual toolbars on and off.

•In the Toolbars tab of the Customize dialog (Tools | Customize), toggle the display of individual toolbars on or off by clicking a toolbar's check-box. When done, click the Close button to close the dialog.
Adding and removing toolbar buttons
Individual toolbar buttons can be added to or removed from a toolbar, that is, they can be made visible or be hidden. To add or remove a button from a toolbar, do the following:
1.In the toolbar where the button to be added or removed is, click the More Buttons button (if the toolbar is in a toolbar area) or the Toolbar Options button (if the toolbar is a floating toolbar). The More Buttons button is an arrowhead located at the right-hand side of the toolbar (in horizontal toolbar areas) or at the bottom of the toolbar (in vertical toolbar areas). The Toolbar Options button is an arrowhead located at the right-hand side of the floating toolbar.
2.In the Add or Remove Buttons menu that pops up, place the cursor over the Add or Remove Buttons menu item (screenshot below). This rolls out a menu which contains the names of the toolbars in that toolbar area plus the Customize menu item (screenshot below).
| 3. | Place the cursor over the toolbar that contains the toolbar button to be added or removed (screenshot above). |
| 4. | In the menu that rolls out (screenshot above), click on the name of the toolbar button to add or remove that button from the toolbar. |
| 5. | Clicking the Customize item pops up the Customize dialog. |
The Reset Toolbar item below the list of buttons in each toolbar menu resets the toolbar to the state it was in when you downloaded StyleVision. In this state, all buttons for that toolbar are displayed.
Note: The buttons that a toolbar contains are preset and cannot be disassociated from that toolbar. The process described above displays or hides the button in the toolbar that is displayed in the GUI.