Layout Boxes
Every design element in a layout (such as static text, schema nodes, Auto-Calculations, images, lists, etc) must be placed in a Layout Box. The Layout Boxes containing design elements are laid out as required in the Layout Container. Note that a design element cannot be placed directly in a Layout Container; it must be placed in a Layout Box.
This section describes how Layout Boxes are used and is organized into the following sub-sections:
•Selecting and moving Layout Boxes
•Modifying the size of the Layout Box
•Defining Layout Box style properties
•Inserting content in the Layout Box
•Stacking order of Layout Boxes
Inserting a Layout Box
A Layout Box can be inserted only in a Layout Container. To add a Layout Box, first click the Insert Layout Box icon in the Insert Design Elements toolbar, then click on the location inside the Layout Container where you wish to insert the Layout Box. A Layout Box will be inserted, with its top left corner positioned at the point where you clicked. The box will be transparent, will have no borders, and will have default text.
Selecting and moving a Layout Box
To select a Layout Box, place the cursor over the left border or top border of the Layout Box so that the cursor becomes a crossed double arrow. When this happens, click to select the Layout Box. If you keep the mouse button depressed, you can move the Layout Box to another location within its Layout Container. You can also move a Layout Box left, right, up, or down by selecting it, and then pressing the cursor key for the required direction. When the Layout Box is selected, its properties and styles are displayed in the respective sidebars.
Layout Box size
Each Layout Box has a property called Auto-Resize (see screenshot below). When the value of this property is set to yes, the Layout Box automatically resizes to exactly accommodate any static content (including markup) that is inserted in it in the Design View. When the value of Auto-Resize is set to no, the size of the Layout Box does not automatically change when content is inserted in it.
To change the size of the Layout Box manually, drag its right border and bottom border. You can also the change the size of a Layout Box by using the cursor keys to move the right and bottom borders of the box. To do this first select the Layout Box. Then do the following: (i) to move the right border, keep the Shift key depressed and press the right or left cursor key till the required size is obtained; (ii) to move the bottom border, keep the Shift key depressed and press the top or bottom cursor key.
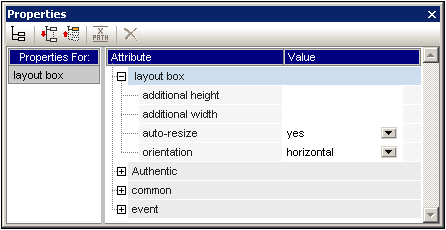
The Additional Height and Additional Width properties give the lengths that are additional to the optimal dimensions as determined by auto-resizing. The additional lengths are obtained when a Layout Box is manually resized. Conversely, by changing the values of these two properties, the size of the Layout Box can be changed.
Note: In a Layout Box a linefeed is obtained by pressing the Enter key. This is significant, because if content is added that does not contain a linefeed, then the length of the current line increases, thus increasing the optimal width of the Layout Box and—incidentally—affecting the Additional Width value, which is calculated with reference to the optimal width.
Layout Box style properties
The style properties of a Layout Box are set in the Layout Box styles in the Styles sidebar (screenshot below). The styles are displayed when the Layout Box is selected, and can then be edited.
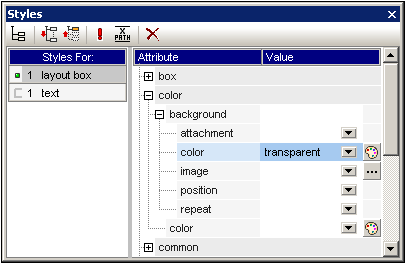
Note: The background-color value of transparent can be selected in the dropdown list of the property's combo box (it is not available in the color palette). The significance of this value in a situation where the Layout Box is part of a stack is explained below.
Inserting content in a Layout Box
Any type of design element can be inserted in a Layout Box, and is inserted just as it normally would be in an SPS. Note, however, that neither a Layout Container nor a Layout Line can be inserted in a Layout Box. The following points should be noted:
•When design elements are inserted that require a context node, the current node will be taken as the context node. The current node is the node within which the Layout Module has been created.
•Text content in a layout box can be rotated 90 degrees clockwise or anti-clockwise, so that the text is vertical, reading from top-to-bottom or bottom-to-top, respectively. To do this, in the design, select the text that is to be rotated and, in the Properties sidebar (screenshot below), select LayoutBox. In the Layout Box group of properties, select the required value for the Orientation property.
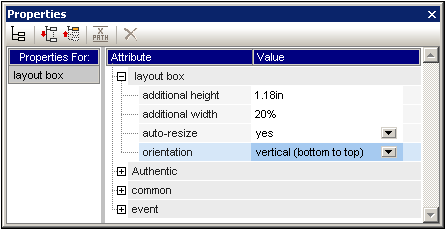
Note the following points:
•The rotation will be applied to the output, but will not be be displayed in the design.
•This property can also be applied to text in table cells.
Stacking order of Layout Boxes
Layout Boxes can be placed one over the other. When one Layout Box is placed on top of another, then, if it is opaque, it hides that part of the Layout Box which it covers. This behavior can be extended to a stack of several Layout Boxes. In such a stack, only the topmost Layout Box will be fully visible; the others will be partially or fully covered.
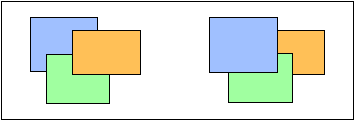
Layout Boxes can be sent backward or brought forward using the Order menu commands in the context menu of the selected Layout Box. Using these commands a Layout Box can be ordered: (i) relative to its nearest neighbor on the stack (the Bring Forward and Send Backward commands), or (ii) relative to the entire stack (the Bring to Front and Send to Back commands). In the screenshot above, the stacking order from front to back is as follows:
•Left stack: orange, green, blue
•Right stack: blue, green, orange
Note that Layout Boxes with transparent backgrounds (the default background of Layout Boxes) might appear to not move relative to each other, especially if more than one box in the stack is transparent and if boxes have no borders. The screenshot below presents some ways in which transparency affects stacking.
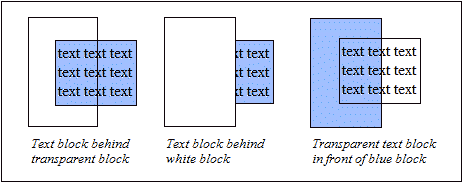
Note: Layout Lines can also be added to a stack of Layout Boxes, and each Line can be moved relative to other items in the stack.