Static Tables
To create a static table, do the following:
1.Use one of the following commands: Table | Insert Table or Insert | Table, or click the  Insert Table icon in the Insert Design Elements toolbar.
2.All of these commands pop up the Create Table dialog (screenshot below).

Click Static Table.
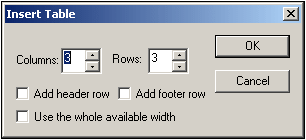
3.The Insert Table dialog (screenshot below) pops up, in which you specify the dimensions of the table and specify whether the table should occupy the whole available width.

4.Click OK. An empty table with the specified dimensions, as shown below, is created.

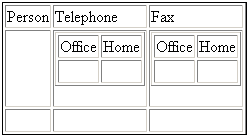
5.You can now enter content into table cells using regular StyleVision features. Cell content could be text, or elements dragged from the schema tree, or objects such as images and nested tables. The figure below shows a table containing nested tables.

Static SPS tables are especially well-suited for organizing XML data that is randomly situated in the schema hierarchy, or for static content (content not derived from an XML source).
Deleting columns, rows, and tables
To delete a column, row, or table, place the cursor in the column, row, or table to be deleted, and click the menu item Table | Delete Column, Table | Delete Row, or Table | Delete Table, respectively. If you have nested tables, these commands will apply, respectively, to the column, row, and table containing the cursor.
Toolbar table editing icons
The table editing icons, which are by default in the second row of the toolbar, are shortcuts to the Table menu commands. These commands allow you to insert, delete, edit the structure of, and assign formatting properties to the static table. These icons can also be used for dynamic SPS tables.