Components
Components are the central elements of any mapping design in MapForce. Visually, components are represented as rectangular boxes in the mapping area. This topic gives an overview of structural and data-processing components (see example below). The distinction is based on whether a component has a data structure or is used to transform data. See the description of these types in the subsections below. See also Mapping Fundamentals. Besides data and data-processing components, you can also add comments to your mapping (see Comments below).
Example
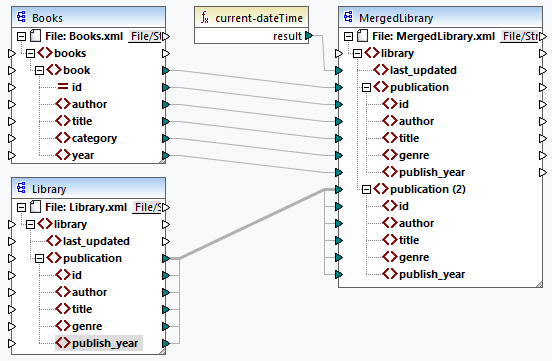
The sample mapping below illustrates two data sources (Books and Library), one data target (MergedLibrary), and one data-processing component (the current-dateTime function).

Data components
A data component represents an abstract structure of your data (e.g., an XML file). Data components can read data from some source(s), write data to some target(s), and store data at some intermediary stage in the mapping process (e.g., to preview the data). The table below gives an overview of data components and their respective toolbar buttons.
Icon | Description |
|---|---|
 | Simple input |
Simple output | |
XML component | |
 | Text component (Professional and Enterprise editions) |
 | Database component (Professional and Enterprise editions for SQL databases; Enterprise Edition for NoSQL databases) |
JSON component (Enterprise Edition) | |
Microsoft Excel component (Enterprise Edition) | |
WSDL component (Enterprise Edition) | |
EDI component (Enterprise Edition) | |
XBRL component (Enterprise Edition) | |
| Protocol Buffers (Enterprise Edition) |
PDF (Enterprise Edition) |
Processing components
Data-processing components enable you to transform data, store an intermediate mapping result for further processing, replace a value by another value, sort, group, join, define a set of rules that evaluate one or more input conditions, and filter your data. You can also add an exception, which stops the mapping process and displays an error when a condition defined by a filter occurs. The table below gives an overview of data-processing components and their respective toolbar buttons.
Icon | Description |
|---|---|
 | Filter component |
Sort component | |
Built-in function | |
User-defined function | |
Value-Map component | |
Variable | |
Constant | |
| If-Else condition |
Decision Table (Professional and Enterprise editions) | |
 | SQL/NoSQL-WHERE/ORDER component (Professional and Enterprise editions) |
 | Exception (Professional and Enterprise editions) |
| Join component (Professional and Enterprise editions) |
Web service call to an HTTP API or to a WSDL-based service (Enterprise Edition) | |
Web service call to the Shopify API or to a generic GraphQL API (Enterprise Edition) |
Comments
MapForce allows adding comments as standalone components and as notes under existing components. Comment text is available not only in a mapping, but it is also added to the generated mapping documentation. In the generated mapping documentation, component comments are added directly below the corresponding component, and comment components are part of the Remaining components section.
Comment components
Comment components are free-standing boxes that can display multi-line text and cannot be connected to any other components. To add a comment component, you can select one of the following options:
•Select the ![]() toolbar command, which opens a dialog where you can type your comment.
toolbar command, which opens a dialog where you can type your comment.
•Select the Insert | Comment menu command, which opens a dialog where you can type your comment.
•Double-click the empty area of your mapping, type the # sign, type a comment, and press Enter. The # sign will not appear in the comment box.
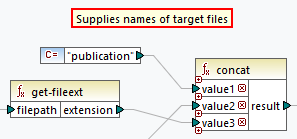
To move a comment, drag it to the desired location. To delete a comment, click on the comment box and press the Delete key. An example of a comment component is illustrated below (red rectangular box).

Component comments
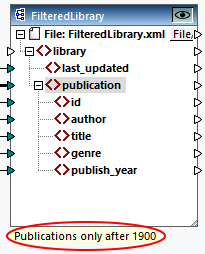
Besides free-standing comment boxes, you can also add comments to any existing components. Such comments are displayed below the component (circled red below).

To add a comment under an existing component, you can choose one of the following options:
•Right-click inside the component and select Edit Comment from the context menu. This opens a dialog where you can enter your comment.
•Select a component to which you would like to add a comment. Then select Edit Comment in the Component menu. This opens a dialog where you can enter your comment.
The display of components' comments can be limited to a specified number of lines, which can be defined in the menu Tools | Options | General | Mapping View. For more information, see Options.
To remove a component comment, take one of the following steps:
•Double-click the comment, delete all text, and click Enter.
•Right-click the comment or inside the component, select Edit Comment from the context menu, delete text, and click OK.
Edit comments
You can edit both types of comments in one of the following ways:
•Double-click the text of the comment and start editing directly in the box. Then press Enter.
•Right-click the comment box, edit the text in the Edit Comment dialog, and click OK. For component comments, you can also access the Edit Comment dialog by right-clicking inside the component and selecting the Edit Comment option in the context menu.
In this section
This section gives an overview of components and is organized into the following topics:

