New from XSLT, XSL-FO or FO File
An SPS design can be based on existing XSLT files that were designed for HTML output or XSLT files with XSL-FO commands for output in PDF or FO files. This means that SPS files do not have to be designed from scratch, but can take an already existing XSLT file as a starting point.
Steps for creating an SPS from XSLT
The steps for creating an SPS file from an XSLT, XSLT-for-FO, or FO file are as follows.
1.Select the command File | New | New from XSLT, XSL-FO or FO File.
2.In the Open dialog that appears, browse for the file you want.
3.In the next dialog you will be prompted to select a schema on which the SPS is to be based. Select the schema you want.
4.An SPS based on the structure and formatting in the XSLT or FO file will be created and displayed in Design View.
5.You can now modify the SPS in the usual way. For example, you could drag in nodes from the Schema Tree, modify the styling and presentation or add additional styling, and use StyleVision functionality such as Auto-Calculations and Conditional Templates.
6.You can save the SPS and use a Working XML File to preview various output formats. Subsequently you can generate stylesheets and output files using the Save Generated Files command.
Example
The example discussed below is located in the (My) Documents folder, C:\Documents and Settings\<username>\My Documents\Altova\StyleVision2023\StyleVisionExamples/Tutorial/NewFromXSLT. This folder contains the files: SimpleExample.xslt, SimpleExample.xsd, and SimpleEample.xml.
The XML file is shown below.
<?xml version="1.0" encoding="UTF-8"?> <Data xmlns:xsi="http://www.w3.org/2001/XMLSchema-instance" xsi:noNamespaceSchemaLocation="YearlySales.xsd"> <ChartType>Pie Chart 2D</ChartType> <Region id="Americas"> <Year id="2005">30000</Year> <Year id="2006">90000</Year> <Year id="2007">120000</Year> <Year id="2008">180000</Year> <Year id="2009">140000</Year> <Year id="2010">100000</Year> </Region> <Region id="Europe"> <Year id="2005">50000</Year> <Year id="2006">60000</Year> <Year id="2007">80000</Year> <Year id="2008">100000</Year> <Year id="2009">95000</Year> <Year id="2010">80000</Year> </Region> <Region id="Asia"> <Year id="2005">10000</Year> <Year id="2006">25000</Year> <Year id="2007">70000</Year> <Year id="2008">110000</Year> <Year id="2009">125000</Year> <Year id="2010">150000</Year> </Region> </Data> |
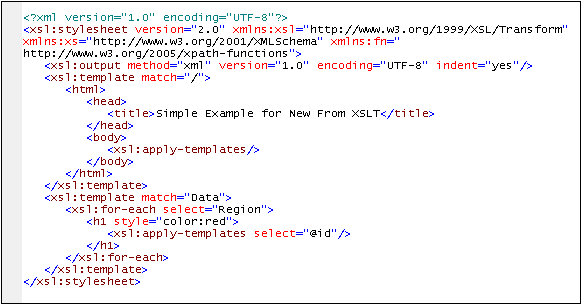
The XSLT file is as follows:

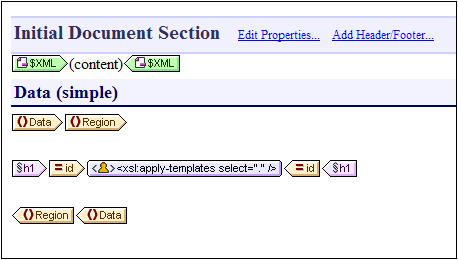
Follow the steps 1 to 4 listed above to obtain the SPS in Design View. The SPS will look something like this:

Notice that the two templates in the XSLT have been created in the SPS. Now switch to the HTML Preview (screenshot below), and notice that the h1 element's styling (color:red) has been also passed to the SPS.

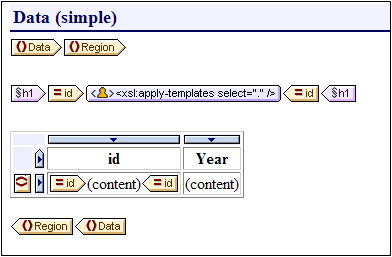
In Design View select the h1 element and change its color to black (in the Styles sidebar, in the Color group of properties). Then, from the Schema Tree, drag the Year element and create it as a table at the location shown in the screenshot below. Reverse the contents of the two columns so that the Year ID is in the first column.

You can make additional changes in the content, structure, and presentation properties of the document, then preview the output and save files using the Save Generated Files command.
