Set Administrator and Mobile Client Ports
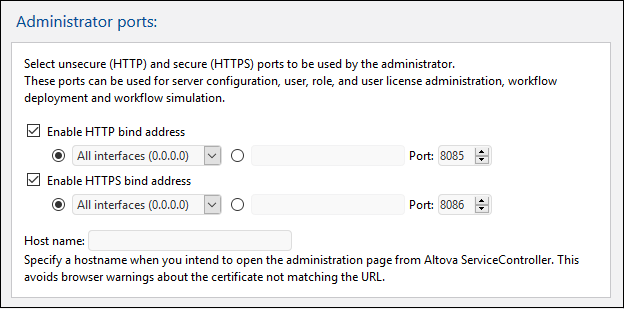
The administrator ports are used to connect to the Web UI of MobileTogether Server, while the mobile client ports are those the mobile client device uses to connect to the services of MobileTogether Server.
Set the administrator ports
The administrator ports provide access for the following purposes:
•To connect to the server's Web UI and perform administrative functions, such as setting up Users and Roles.
•To deploy MobileTogether designs (as MobileTogether solutions) to the server. MobileTogether Designer has a setting that specifies the address and port of the MobileTogether Server to which to deploy designs.

The HTTP port is the unsecure port; HTTPS is the secure port. To use HTTPS, you need to set up SSL Encryption. If you set up the HTTPS port and wish to avoid browser warnings about the SSL certificate not matching the URL, then specify the hostname of the computer on which the MobileTogether Server configuration page will be opened.
You can specify whether the server will use a specific IP address, or all interfaces and IP addresses. If a single IP address is to be used, enter it in the field of the second radio button. If you are using a dual-stack server running both IPv4 and IPv6, use a double colon :: as the bind address; this allows both protocols on all network interfaces. Only ports with numbers from 1 to 65535 may be used.
Set the mobile client ports
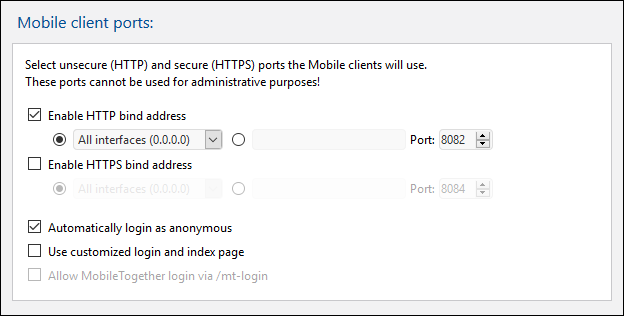
The ports that mobile devices will use to connect to the server. The HTTP port is the unsecure port; HTTPS is the secure port. To use HTTPS, you need to set up SSL Encryption. You can specify whether the server will use a specific IP address, or all interfaces and IP addresses. If a single IP address is to be used, enter it in the field of the second radio button. If you are using a dual-stack server running both IPv4 and IPv6, use a double colon :: as the bind address; this allows both protocols on all network interfaces. Only ports with numbers from 1 to 65535 may be used.

Automatically login as anonymous
If selected, clients will be logged in automatically as anonymous. The login page is skipped, and the server's first page is shown directly. The first page is either the standard page that displays the root folder, or it is a custom page that you have defined (see next point). If this option is not selected, the client will need to login with the appropriate credentials via the default login page. If anonymous login is selected, then remember to set the relevant privileges for anonymous.
Use customized login and index pages
Select this option if a customized login page and first page should be used. This enables you to design your own entry point for clients. Set up the customized pages as follows:
1.Create the two pages as HTML pages, and name them login.html and index.html, respectively.
2.Save the two files in the index folder that is located in the MobileTogether Server application data folder (see table below). Additional files, such as image files and CSS files, are best saved in a subfolder of the index folder (for instance in one that is called, say, static).
Linux | /var/opt/Altova/MobileTogetherServer |
Mac | /var/Altova/MobileTogetherServer |
Windows | C:\ProgramData\Altova\MobileTogetherServer |
The code listings of a sample login page and sample first (index) page are given below. These listings are basic, but you can modify the code as you like.
<!DOCTYPE html> <html> <head> <meta http-equiv="Cache-Control" content="no-store"/> <title>Customized Login</title> </head> <body> <div> <h1>Sign in</h1> <p>A bare-basics custom page for client logins to MobileTogether Server. Modify this page as required, and use the Static sub-folder to save CSS stylesheets, images, etc.</p> <form method="post" action="/do_login" name="loginform"> <table> <!-- The user to login --> <tr> <td> <label for="username">Username:</label> </td> <td> <input type="text" name="username" id="username" size="30"/> </td> </tr> <!-- The password of the user --> <tr> <td> <label for="password">Password:</label> </td> <td> <input type="password" name="password" id="password" size="30"/> </td> </tr> </table> <!-- The Active Directory domain details --> <h2>Active Directory Login:</h2> <table> <tr> <td> <label for="providernameprefix">Domain prefix:</label> </td> <td> <input type="text" name="providernameprefix" id="providernameprefix" value=""/> </td> </tr> <tr> <td> <label for="providernamesuffix">Domain suffix:</label> </td> <td> <input type="text" name="providernamesuffix" id="providernamesuffix" value=""/> </td> </tr> </table> <!-- The Sign-In button --> <input type="submit" value="Sign in"/> <!-- The page to redirect to after a successful login. --> <input type="hidden" name="from_page" value="/index"/> </form> </div> </body> </html>
|
<html> <head> <meta http-equiv="Cache-Control" content="no-store" /> <title>Custom Index</title> </head> <body> <img alt="Logo" src="/index/static/logo.png"></img> <hr/> <p><a href="/do_logout">Logout</a></p> <h1>MobileTogether Custom Login</h1> <p><a href='/run?d=/public/About'>Start the About app</a></p> <p><a href='/run?d=/public/DateCalc'>Start the Date Calculator app</a></p> <p><a href='/run?d=/public/WorldPopulation'>Start the World Population Statistics app</a></p> </body> </html>
|
Note: If the user is a domain user, the login credentials will have a form something like this: domainPrefix@domainSuffix. For example: If the domain user is someUserName@somedomain.altova.com, the domain prefix is someUserName, and the domain suffix is @somedomain.altova.com.
Allow MobileTogether login via /mt-login
This option specifies that the login will be via the default login page and first page—and not via the customized login and index pages. This allows you to store the login.html and index.html files at the designated location, but still use the default pages. Note that the client's browser or browser settings might require that the browser cache is emptied in order for this setting to take effect.
