Designing Database Objects
In UModel, you can create, edit, or delete database objects (such as tables, columns, foreign keys, and so on) either from a Database diagram, or from the Model Tree window.
When viewing or designing database objects In UModel, keep in mind the following basic rules:
•Tables are classes with the «Table» stereotype.
•Columns are class properties.
•Primary, foreign, and unique keys are classes with the «PrimaryKey», «ForeignKey», «UniqueKey» stereotypes, respectively.
•Check constraints are classes with the «CheckConstraint» stereotype.
•Indices are classes with the «Index» stereotype.
For an exhaustive table that illustrates how each database object maps to a UModel element, see Database Mappings .
Adding tables
To add a table to the model, do one of the following:
1.Create a database diagram or open an existing one. To create a new Database diagram, right-click a package in the Model Tree window, and select New diagram | Database diagram from the context menu.
2.Do one of the following:
a.Right-click inside the diagram and select New | Table from the context menu.
b.Click the New Table ![]() toolbar button, and then click inside the diagram to add the table.
toolbar button, and then click inside the diagram to add the table.
| Note: | You can add a table class anywhere in the model. However, as best practice and especially if you intend to use code engineering, all table classes must belong under a package that has the «Database» stereotype. Such a package is created automatically whenever you import an existing database into the model, see Importing SQL Databases into UModel. |
Adding other database objects
To add a column, index, foreign key, etc to a table, right-click the table on the diagram, and then select the respective command from the context menu, for example:
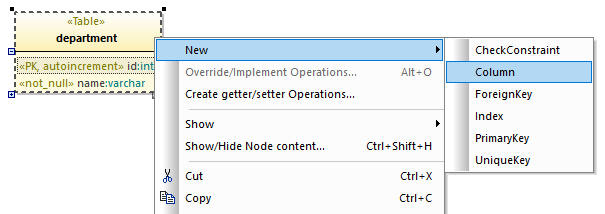
Alternatively, click a toolbar button in the diagram's toolbar, and then click inside the target table.
To set column attributes such as "autoincrement", "nullable", "primary key", first click the column, and then select the required checkbox (stereotype) in the Properties window:
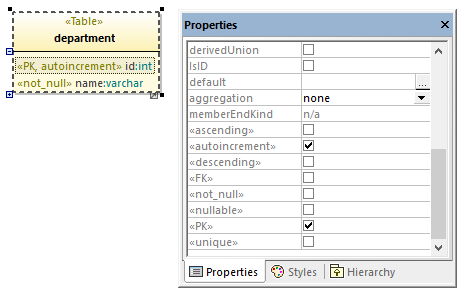
You can also create the column and set all required attributes directly as you type. For example, to create a primary, autoincrement column with the name "id" and type "int", do the following:
1.Select a table on the diagram and press F7.
2.Start typing <<PK, autoincrement>> id:int. As you type, UModel assists you to pick up the required values automatically from a list.
Adding database relationships
You typically add relationships to illustrate foreign key dependencies between columns of different tables. For example, let's assume that you have the following classes:

To add a foreign key relationship between the department_id column in the "employee" table and the id column in the "department" table, do the following:
1.Right-click the "employee" table and select New | ForeignKey from the context menu. A new class called "ForeignKey1" is added inside the "employee" class.
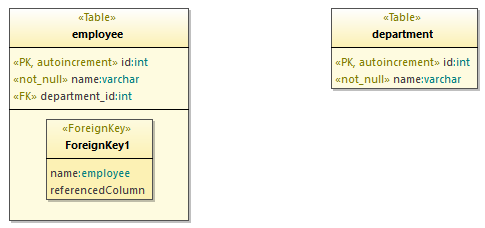
2.In the "ForeignKey1" class, change the first column entry to correspond to the owner column and table (in this example, department_id:employee). Then change the second column entry to correspond to the referenced column and table (in this example, id:department).
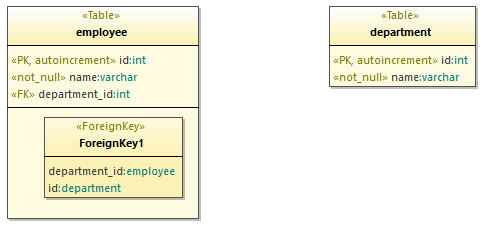
3.Click the Database Relationship Association ![]() toolbar button, and then drag from the "ForeignKey1" class onto the "department" class.
toolbar button, and then drag from the "ForeignKey1" class onto the "department" class.
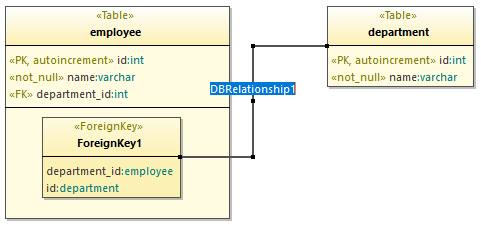
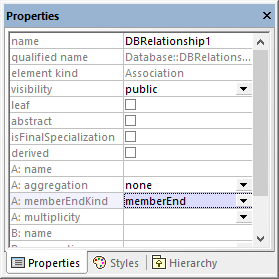
4.Select the relationship line, and, in the Properties window, change the A :memberEndKind property to memberEnd.
5.Press F11 to check the project syntax for any errors (see below for more information).
| Note: | If necessary, you can add multiple column entries per "ForeignKeys" class. You can also add multiple indices for the same table. |
Checking project syntax
As you create or change database objects in UModel, it is good practice to periodically check the syntax of your project for any potential design issues (for example, tables that do not have at least one column, missing foreign key references, and so on). To check the project syntax, do one of the following:
•On the Project menu, click Check Project Syntax.
•Press F11.
UModel validates the project and displays any encountered problems in the Messages window, for example:

The two warnings in the image above indicate that no code will be generated for the "department" and "employee" tables. You can ignore such warnings if you do not need code engineering support in your UModel project. Otherwise, see Configuring Round-Trip Engineering for Databases.