Defining Hyperlinks
Hyperlinks can be created around SPS components such as text or images. The targets of hyperlinks can be: (i) bookmarks in the SPS design, or (ii) external resources, such as web pages or email messages. In this section, we first discuss the content of the hyperlink (text, image, etc) and then the target of the hyperlink.
Creating hyperlinks
A hyperlink can be created in the following ways:
•Around text (static or dynamic), nodes, images, conditional templates, Auto-Calculations, and blocks of content or nodes; it cannot be created around a data-entry device such as an input field or combo box—though it can be created around a node or conditional template in which that data-entry device is. This is the content of the link, which, when clicked, jumps to the target of the link. To create a hyperlink around a component in the SPS, select that component and use the Enclose With | Hyperlink menu command.
•A new hyperlink can be inserted via the Insert | Hyperlink menu command. The content of the link will need to be subsequently added within the tags of the newly created hyperlink.
Defining the target of the hyperlink
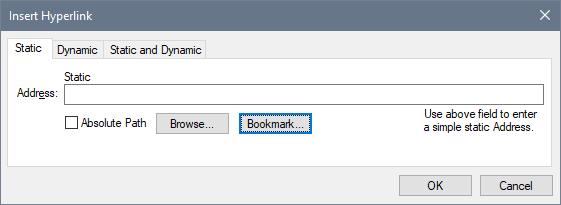
The target of the hyperlink is created in the Insert Hyperlink dialog (screenshot below), which is accessed via the Enclose With | Hyperlink or Insert | Hyperlink.

The target of a link can be either:
•A bookmark in the same SPS design (in which case the target URI must be a fragment identifier),
•Dynamically generated to match bookmark anchors (these URIs are also fragment identifiers),
•An external resource; the URI can be static (directly entered), dynamic (taken from a node in an XML document), a combination of static and dynamic parts, or the value of an unparsed entity.
How these targets are defined is explained below. After the URI has been defined in the Insert/Edit Hyperlink dialog, click OK to finish.
Linking to bookmarks
To link to a bookmark, do the following:
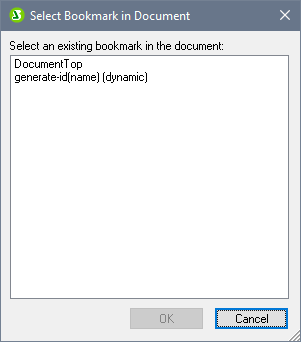
1.In the Static tab of the Insert Hyperlink dialog, click the Bookmark button. This pops up the Select Bookmark in Document dialog (screenshot below). The screenshot below shows two bookmarks: one static, one dynamic.

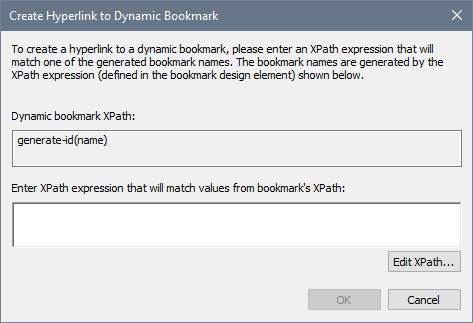
| 2. | To select a static bookmark as the target URI, double-click the static bookmark and click OK. If you double-click a dynamic bookmark, you will be prompted to enter an XPath expression to match the selected dynamic bookmark (see screenshot below). |

The dynamic bookmark is actually an XPath expression that generates the name of the bookmark; it is not itself the name of the bookmark. The Create Hyperlink to Dynamic Bookmark dialog, displays the XPath expression of the dynamic bookmark and enables you to construct an XPath expression that will generate a name to match that of the targeted bookmark. Click OK when done.
Linking to dynamically generated ID bookmarks
Bookmarks can have dynamically generated ID anchors. If one wishes to link back to such a bookmark, the problem then is this: Since the names of dynamically generated anchors are generated at runtime and therefore unknown at design time, how is one to set the href value of a hyperlink that targets such an anchor? The answer is to use the generate-id() function once again, this time within the href value of the hyperlink. The key to understanding why this works lies in a property of the generate-id() function. In a single transformation, each time the generate-id() function is evaluated for a specific node, it always generates the same ID. Because of this the IDs generated in the bookmark and the hyperlink will be the same.
Two points should be borne in mind:
•Since the generate-id() function must be evaluated as an XPath expression, use the Dynamic tab of the Insert Hyperlink dialog (see screenshot below) to set the target of the hyperlink.
•The evaluated value of the href attribute must start with # (the fragment identifier). Consequently the XPath expression will be: concat('#', generate-id(nodeXXX)). Alternatively, in the Static and Dynamic tab, enter # in the static part of the address and generate-id(nodeXXX) in the dynamic part.
Linking to external resources
URIs that locate external resources can be built in the following ways:
•By entering the URI directly in the Static tab of the Insert Hyperlink dialog. For example, a link to the Altova home page (https://www.altova.com) can be entered directly in the Address input field of the Static tab.
•By selecting a node in the XML document source in the Dynamic tab of the Insert Hyperlink dialog. The node in the XML source can provide a text string that is either: (i) the URI to be targeted, or (ii) the name of an unparsed entity which has the required URI as its value. For example, the Altova website address can be contained as a text string in a node.
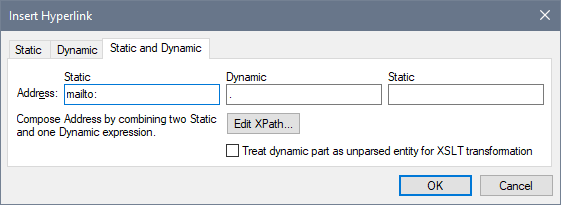
•By building a URI that has both static and dynamic parts in the Static and Dynamic tab of the Insert Hyperlink dialog. This can be useful for adding static prefixes (e.g. a protocol) or suffixes (e.g. a domain name). For example, email addresses could be created by using a static part of mailto: and a dynamic part that takes the string content of the //Contact/@email node (the screenshot below creates a link on the contents placeholder of the //Contact/@email node, which is why the abbreviated self::node() selector has been used). The Edit XPath button opens the Edit XPath Expression dialog to help you build the dynamic part of the hyperlink.

How to use unparsed entities is described in the section Unparsed Entity URIs.
| Note: | While linking to external documents is supported in the FO specification, an FOP limitation could result in external links not working in PDF documents created with FOP. |
Authentic View modification of parent node's content
The value of the parent node of a hyperllink can be selected by the Authentic View user. The SPS can be designed to modify presentation based on what the Authentic View user selects.
Editing hyperlink properties
To edit a hyperlink, right-click either the start or end hyperlink (A) tag, and select Edit URL from the context menu. This pops up the Edit Hyperlink dialog (screenshot above). The Edit Hyperlink dialog can also be accessed via the URL property of the Hyperlink group of properties in the Properties window.
Removing and deleting hyperlinks
To delete a hyperlink, select the hyperlink (by clicking either the start or end hyperlink (A) tag), and press the Delete key. The hyperlink and its contents are deleted.