Creating the Schema and SPS Design
The schema is created by dragging selections from Design View into the user-defined schema. You do this one selection at a time. The selection is dropped on a node in the schema tree (relative to which the new node will be created, either as a child or sibling). You select the type of the node to be created (element or attribute) and whether the selection is to be converted to the new node or surrounded by it.
The selection
The selection in Design View can be any of the following:
•A node in the HTML document.
•A text string within a node.
•Adjacent text strings across nodes.
•An image.
•A link.
•A table.
•A list.
•A combination of any of the above.
In this section we explain the process in general for any selection. The special cases of tables and lists are discussed in more detail in the section Creating Tables and Lists as Elements/Attributes.
To make a selection, click an HTML document component or highlight the required text string. If multiple components are to be selected, click and drag over the desired components to highlight the selection. Note that StyleVision extends the selection at the beginning and end of the selection to select higher-level elements till the first and last selected elements belong to the same parent.
The location in the schema tree
On dragging the selection over the desired schema tree node, the mouse pointer will be changed to one of the following symbols.
•Dropping the node when the Create as Sibling symbol ![]() appears, creates the selection as a sibling node of the node on which the selection is dropped.
appears, creates the selection as a sibling node of the node on which the selection is dropped.
•Dropping the node when the Create as Child symbol ![]() appears, creates the selection as a child node of the node on which the selection is dropped.
appears, creates the selection as a child node of the node on which the selection is dropped.
You should select the node on which the selection is to be dropped according to whether the selection is to be created as a sibling or child of that node.
Selecting how the node is created
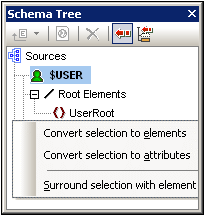
When you drop the selection (see previous section), a context menu pops up (screenshot below) in which you make two choices: (i) whether the node is to be created as an element or attribute; (ii) whether the selection is to be converted to the node or whether the node is to simply surround the selection.

The following points should be noted:
•When a selection is converted to a node (element or attribute), the node tags, together with a contained (content) placeholder, replace the selection in the design. In the design and the output the text content of the selection is removed from the static content. In the output, the text of the selection appears as dynamic content of the node in the XML document.
•If an HTML node is converted to an XML node, the XML node tags are inserted within the HTML node tags.
•When a selection (including HTML node selections) is surrounded by an XML node, the XML node tags are inserted before and after the selection. In the design and the output, the text content of the selection is retained as static text.
•The inserted node tags are inserted with the necessary path (that is, with ancestor node tags that establish a path relative to the containing node). The path will be absolute or relative depending on the context of the node in the design.
•How to create nodes from table and list selections are described in Creating Tables and Lists as Elements/Attributes.
Adding and deleting nodes in the schema
You can add additional nodes (which are not based on an HTML selection) to the user-defined schema. Do this by right-clicking on a node and selecting the required command from the context menu. Alternatively, you can use the toolbar icons of the Schema Tree sidebar.
To delete a node, select the node and then use either the context menu or the toolbar icon. Note, however, that when a node is deleted, some paths in the design could be invalidated.
Modifying the design
You can modify the structure of the design by dragging components around and by inserting static and dynamic components. Styles can also be modified using the various styling capabilities of StyleVision.